
A couple of months ago, I received an email from a fellow photographer who asked if I might be willing to provide her with some favorite, easy-to-access photography locations at Mount Rainier National Park in Washington State. She had read some of my photo columns published on the Traveler’s site and wanted to explore this national park a little more with her own camera.
Of course I obliged, since I enjoy sharing favorite spots with others. I want anybody with a camera – smartphone, point-and-shoot, or SLR – to take home great shots of their park visit. It’s my raison d'être for this Photography In The National Parks column.
I wrote a December 2024 article about photography at Mount Rainier, listing favorite localities for various scenes (sunrises, waterfalls, night sky), but I didn’t exactly tell readers how to get to these places or the specific stake-out spots I’ve discovered over 15 years of visits to “The Mountain.” Consider this article a companion piece to that 2024 publication.
The images you see here were all photographed over different years and seasons from short trails, view areas, pullouts, and sites along slightly lengthier hikes. All these areas are easy to access for anybody and I truly believe you don’t need to hike long distances into the backcountry for a great photo – unless you want to, of course.
Since I have so many favorite locations and listing/describing each one for this national park would be far too long for a single article, I decided to divide this park into several sections and will discuss Tipsoo Lake and Sunrise spots this month.

Tipsoo Lake View Area
Drive west along Chinook Pass Highway (aka Washington State Route 410) from central and eastern Washington, and your first view of “The Mountain” will be from Tipsoo Lake. It’s a whopper of a view, even at oh-dark-thirty in the morning, when you can detect the white brightness of the snowcapped volcano against the pre-dawn indigo sky.


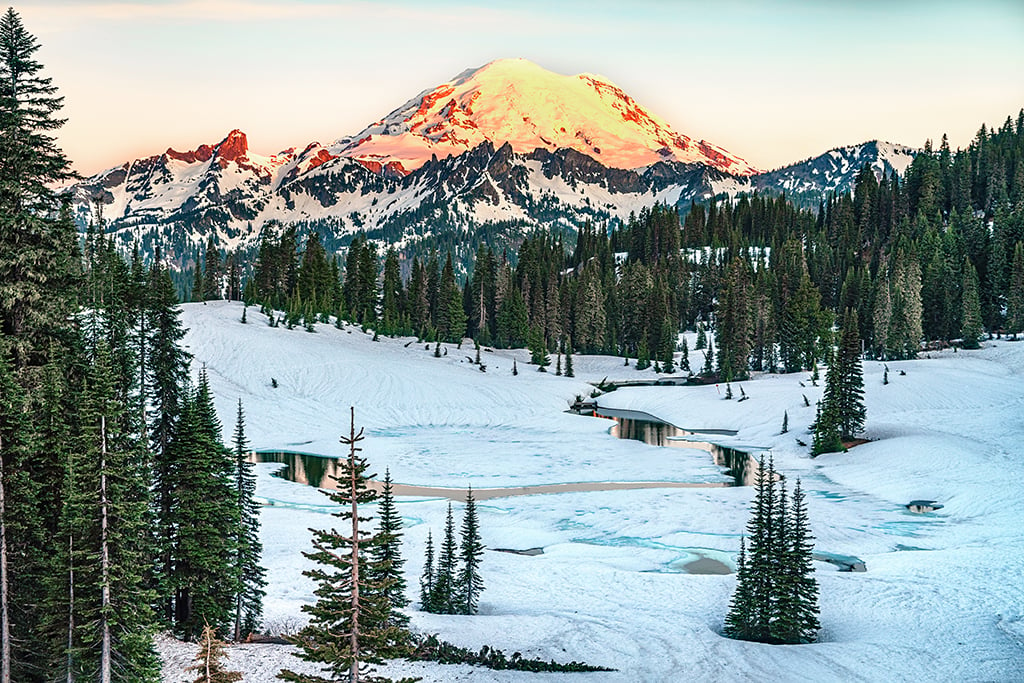
Drive over Chinook Pass summit and to your right is a wide shoulder beside a paved walkway extending for some distance up and down the road. Sunrises are sublime here, as is the blue hour prior to sunrise. Return during different seasons and you’ll capture a landscape altered by the colors, lighting, and Nature’s decorations brought on by changing time and weather.
My favorite photography spot here is at the very end of the paved walk back in the direction toward Chinook Pass summit. This small dirt area next to pavement’s end affords the best view (IMO) of mountain and lake landscape.
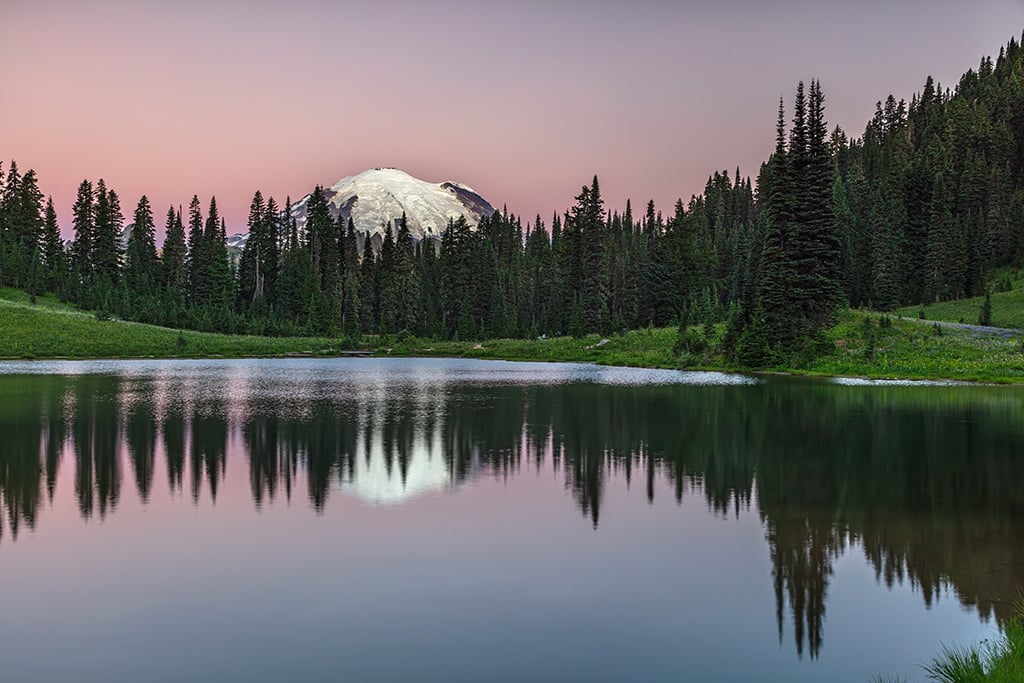
By the way, “blue hour” represents the time prior to sunrise or just after sunset, when the landscape is swathed with paint strokes of blue, purple, pink, and mauve. Blue hour doesn’t last an hour – more like maybe 20 or 30 minutes – so you will want to have your position staked out prior to photographing the view at that time.
Once you’ve captured your fill of photos here, return to your vehicle and continue driving down Highway 410, turning left into the Tipsoo Lake parking area. From there, you can hike the trail around the lake to capture different perspectives of both mountain and water.


Sunrise Area
Exiting the Tipsoo Lake parking lot, turn right and drive down the road until you come to the left turnoff toward Paradise. Save that trip for later. Keep straight and drive for approximately 5 miles (8 kilometers) on what is now Mather Memorial Parkway (it’s still also SR 410), turning a sharp left onto the White River Entrance Road shortly after seeing the sign for this turnoff. From there, you’ll drive approximately 15.5 miles (25 kilometers) to reach the Sunrise parking area, day lodge, and visitor center.
Note: The road to Sunrise generally opens around July 4, if not a few days earlier or later, depending upon snow conditions. So, you’ll be driving there during peak season and will need a timed-entry reservation if you intend to arrive between 7 a.m. and 5 p.m. Of course, if it’s sunrise shots or a parking spot you seek - especially during a weekend - you will need to arrive much, much earlier than 7 a.m. (and you won’t need a timed entry reservation). During weekends, parking up there is almost completely full by 4:30 a.m., so keep that in mind when deciding upon an arrival time.

On the map above, I’ve numbered the locations of my favorite photo spots sequentially rather than preferentially to make spot identification and description easier.
Location 1
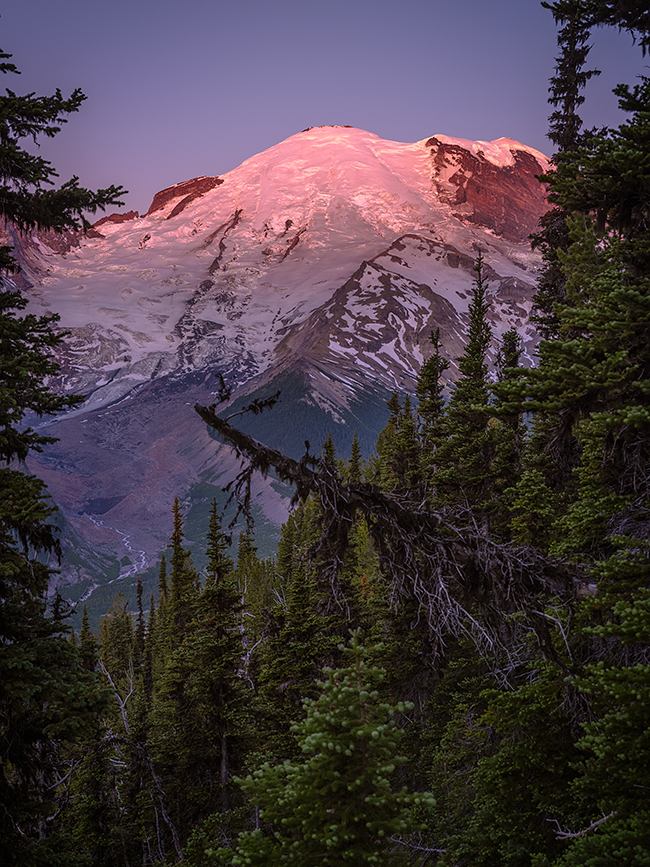
Approaching the Sunrise parking lot from the hairpin curve of Sunrise Point, you will notice several dirt pullouts to your left. I’m sure almost any of those pullouts afford a great view of “The Mountain,” but this particular pullout offers a fantastic view of the mountain framed by tall evergreens. I think this is probably the third dirt pullout to your left. It’s a longer pullout than the others.

Location 2
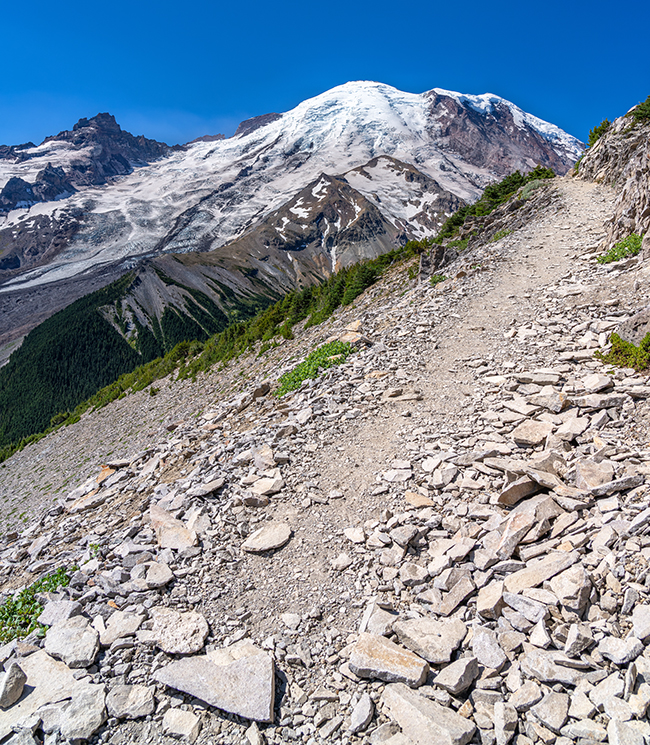
Hike from the Sunrise parking area up that paved road located to the right of the restrooms. Upon reaching that large informational sign to your right, head onto the dirt trail and begin hiking up toward that T-section where you can either turn left onto the Frozen Lake Trail, or right onto the Sourdough Ridge Trail. Turn right and continue hiking up the trail toward a log bench overlooking Huckleberry Basin (see map location). From there, continue toward Dege Peak.
This hike from parking area to peak is about a 3.4-mile (5.5 kilometers) out-and-back trail. On that last 200 feet (61 meters) of climbing the spur trail to get to the top, you’ll begin to see the amazing views of the ribbon of road leading toward the parking area and visitor center with Mount Rainier looming over everything.

Location 3
Along the Sourdough Ridge Trail heading toward Dege Peak, there is a nice, open spot where you can place your tripod near the edge and capture sunrise, sunset, and night shots of Mount Rainier and surrounding landscape. The spot is probably 0.3 mile (0.5 kilometers) further after hiking from the Sunrise parking area to that part of the trail with the log bench overlooking Huckleberry Basin (see map). Continue your hike toward Dege Peak over a rocky patch of trail with trees to your right and a ridge wall to your left, eventually emerging onto a treeless length of level, dusty trail overlooking the meadows below. I find the best overall spot to be near the end of that treeless portion near the stand of trees marking the beginning of another forested part of the trail to Dege Peak.


Location 4
Hike up Sourdough Ridge Trail to the log bench and make a sharp left turn from that bench to hike up through a forested area, arriving at another treeless length of trail. You will see a small sign along the trail warning hikers to avoid trampling the delicate meadows. Here, X marks the spot for great sunrise and night sky photography.


Location 5
This follows the same route along Sourdough Ridge as locations 2, 3, and 4 to the log bench overlooking Huckleberry Basin. You won’t need to hike up as much of the steep trail, but you should notice the higher you climb, the better overall perspective afforded of Mount Rainier and surrounding landscape.
Of course, your view will include the trails and parking area and Sunrise Day Lodge, but at night when using a slow shutter speed, the car lights, pinpoints of light from climbers attempting to summit the mountain, and hikers’ headlamps and handheld flashlights all create interesting light streaks beneath the starry sky.
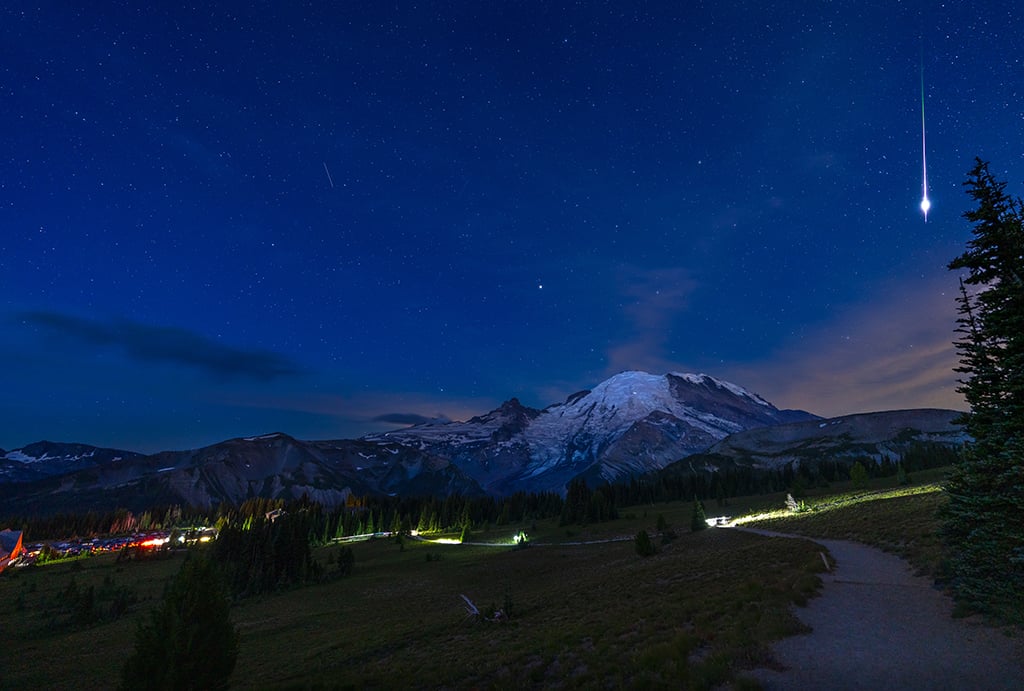
At Locations 3, 4, and 5, you should occasionally turn your camera away from Mount Rainier and focus on the other mountains during sunrise or sunset. Depending upon the month you visit, those meadows below may be blanketed with patches of blue-purple lupine or other wildflowers.

Location 6
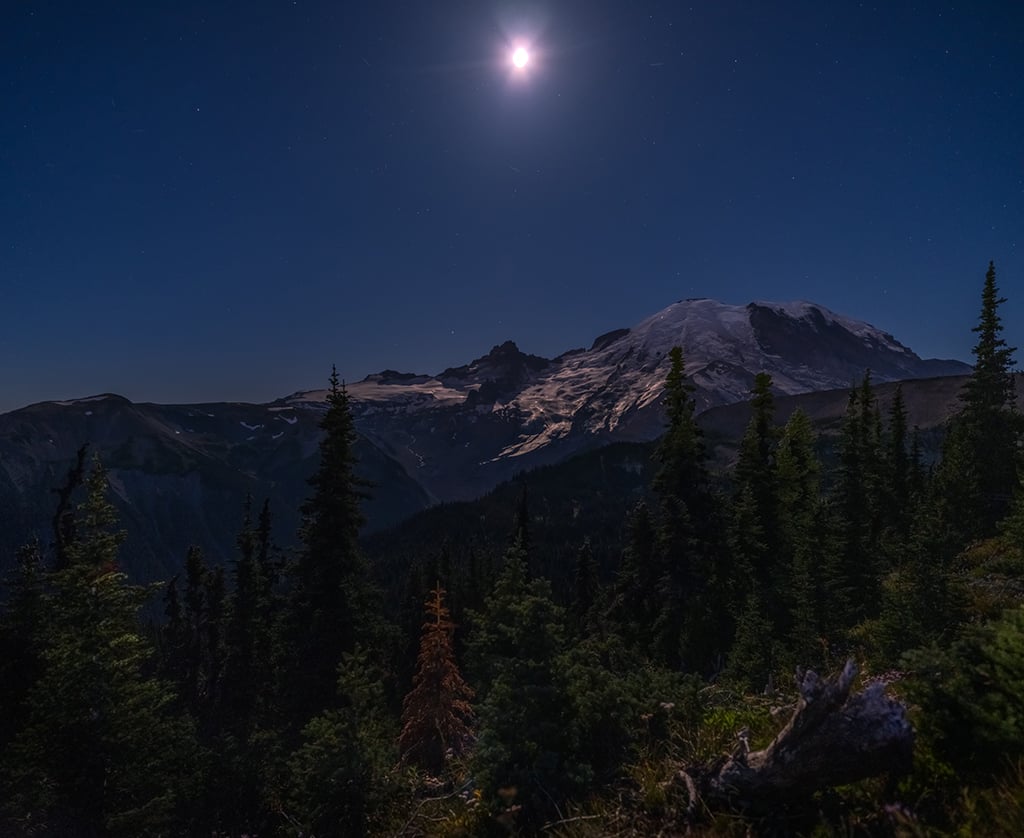
This is officially my new favorite site for blue hour and sunrise shots of Mount Rainier up at Sunrise. I’ve visited this place three different times and it always changes just a little depending upon lighting, weather, and the presence or absence of clouds.
At the part of the trail up from the parking lot where you can turn left toward Frozen Lake, or right toward Sourdough Ridge Trail, turn left (total length from parking area to this T-section is 0.3 mile/0.5 kilometers). Hike up to the spot where you can either make a sharp turn to the right onto Sourdough Ridge from the other end, or continue along the Frozen Lake Trail for another 0.3 mile, hiking up a short, steep, rock-and-dirt patch to a fork. Stay left on that fork in the trail and hike up maybe 0.1 mile (0.16 kilometers) further until you see a view of Mount Rainier along the trail’s left side and a portion of Huckleberry Basin to your right. The mountain is nicely framed by trees and there is a short, dead log with a splayed end that makes a nice foreground object.

Not only is this a great place for blue hour and sunrise shots, but it’s also a cool location for photographing glacial ice glistening in the moonlight.
The view toward Huckleberry Basin is quite nice, also, and you might even manage to capture a little Northern Light action, too.

Location 7
Hike all the way to Frozen Lake (approximately 1.4 miles/2.3 kilometers one-way), then turn right and begin the march up Fremont Lookout Trail. Periodically turn around to view Mount Rainier, the trails below, Frozen Lake, and the landscape beyond.


You might even see a herd of mountain goats grazing the meadow near the trail.
Location 8
Still on the Fremont Lookout Trail, but now nearer to the fire lookout, notice how the narrow, rocky approach to the lookout creates a leading line from where you stand toward trail’s end. It’s even more interesting if you photograph people in that scene for scale and reference.

This is one of my favorite longer hikes in the park (longer for me, anyway), and it's very popular. You, of course, don’t have to do the complete hike to capture great shots. The trail becomes rocky and you need to be mindful of foot placement (trust me on this). However, if you do decide to hike this trail, the views of both mountain and other landscape are a great reward.
For the next favorite spot descriptions, I’m stepping out of number order because it works better with my descriptions and photo spots on the map.
Location 10
At the southern edge of the Sunrise parking lot (near the trash cans) is a trail down to Emmons Vista. Before reaching the overlook, veer right onto the trail toward Shadow Lake and Sunrise Camp. Hike about 1.3 miles (2.1 kilometers) to, then past, Shadow Lake and the campground, continuing straight onto the trail up to Glacier Overlook. The trail steepens but only for about 0.3 mile. At the overlook, you’ll view Mount Rainier, Emmons Glacier, White River, and some unnamed turquoise-hued lake far below.

Location 9
From Glacier Overlook, you have the option of returning the way you came, or continuing 1.3 miles further up the dirt-and-rock Sunrise Rim Trail, arriving at a T-section leading toward First and Second Burroughs Mountains on your left, or down to Frozen Lake on your right back to the parking lot for a total loop distance of about 4.7 miles (7.6 kilometers) from the starting point of Emmons Vista. Although it’s slow going on the loose rocks, Sunrise Rim Trail affords close views of Mount Rainier, Emmons Glacier, and Steamboat Prow while providing a nice leading line.
Location 11
From the south end of the parking lot, head down that trail to Emmons Vista, a small area with a powerful view of Mount Rainier, Emmons Glacier, and White River, all framed by tall evergreen trees. A very popular spot during the day, it’s empty early in the morning and great for sunrise imagery.


Location 12
Head down the trail toward Emmons Vista from the parking lot, passing the overlook to continue due east along what is now the Silver Forest Trail (1.6 miles/2.6 kilometers roundtrip). This is an easy walk along a fairly level trail through the forest, and after approximately 0.3 mile (0.5 kilometers), you will emerge onto a sunny portion of the trail with flower bedecked meadows to your left side and amazing views of Mount Rainier, White River, and that unnamed turquoise lake on your right.

Bring along a telephoto lens or use your smartphone’s telephoto setting to capture the many curious ground squirrels popping their heads up to inspect your presence.
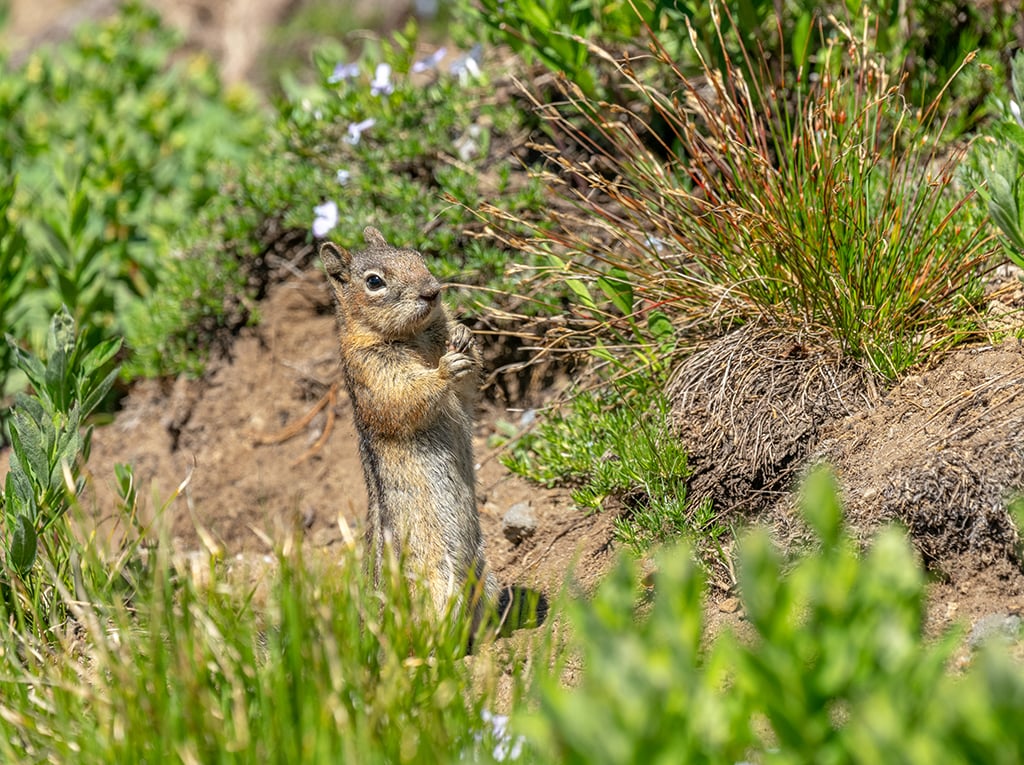
Telephoto lenses are also great for getting close-up views of the magenta and scarlet paintbrush, alpine aster, and penstemon you will see while wandering this trail during early July.


- Did I use a tripod for all these shots you see in this article? No. Some photos, like the night, blue hour, and sunrise images, I did use a tripod to prevent camera blur and reduce noise (grain inherent from using a high ISO and wide-open aperture). Other compositions shot along narrow trails or during bright daylight were captured handheld using the burst method of holding down on the shutter button for several clicks, which works quite well at achieving at least one, if not more, clear, sharp photos. This method takes up space on your memory card, however, so always pack a few extras in your pocket.
- You may think I added too much color saturation to some of these compositions. The sunrise colors at Sunrise are truly as rich and vibrant as what you see in these photos.
- FYI, Mount Rainier goes through several light stages during a sunrise on a clear day. Just prior to sunrise, the mountain’s summit turns bright white, to be replaced by a rosier shade of light as the sun edges further up the horizon. Little by little, that color and light creep downward, changing from rosy-orange to a brilliant yellow, eventually replaced by an overall white.
These numbered spots on the map in this month’s column are my very favorite locations for photography at Sunrise. Maybe they will become your favorites too (if they aren’t already), and you’ll add them to other favorite spots you’ve discovered on your own while visiting this section of Mount Rainier National Park.
Stories about:
Story Categories:
A copy of National Parks Traveler's financial statements may be obtained by sending a stamped, self-addressed envelope to: National Parks Traveler, P.O. Box 980452, Park City, Utah 84098. National Parks Traveler was formed in the state of Utah for the purpose of informing and educating about national parks and protected areas.
Residents of the following states may obtain a copy of our financial and additional information as stated below:
- Florida: A COPY OF THE OFFICIAL REGISTRATION AND FINANCIAL INFORMATION FOR NATIONAL PARKS TRAVELER, (REGISTRATION NO. CH 51659), MAY BE OBTAINED FROM THE DIVISION OF CONSUMER SERVICES BY CALLING 800-435-7352 OR VISITING THEIR WEBSITE. REGISTRATION DOES NOT IMPLY ENDORSEMENT, APPROVAL, OR RECOMMENDATION BY THE STATE.
- Georgia: A full and fair description of the programs and financial statement summary of National Parks Traveler is available upon request at the office and phone number indicated above.
- Maryland: Documents and information submitted under the Maryland Solicitations Act are also available, for the cost of postage and copies, from the Secretary of State, State House, Annapolis, MD 21401 (410-974-5534).
- North Carolina: Financial information about this organization and a copy of its license are available from the State Solicitation Licensing Branch at 888-830-4989 or 919-807-2214. The license is not an endorsement by the State.
- Pennsylvania: The official registration and financial information of National Parks Traveler may be obtained from the Pennsylvania Department of State by calling 800-732-0999. Registration does not imply endorsement.
- Virginia: Financial statements are available from the Virginia Department of Agriculture and Consumer Services, 102 Governor Street, Richmond, Virginia 23219.
- Washington: National Parks Traveler is registered with Washington State’s Charities Program as required by law and additional information is available by calling 800-332-4483 or visiting www.sos.wa.gov/charities, or on file at Charities Division, Office of the Secretary of State, State of Washington, Olympia, WA 98504.

National parks and their natural resources belong to you. The National Parks Traveler works to ensure you know how these essential places are being cared for.
Sign Up For Our Weekly Newsletter
Unsubscribe at any time.
INN Member

The easiest way to explore RV-friendly National Park campgrounds.

Here’s the definitive guide to National Park System campgrounds where RVers can park their rigs.
Our app is packed with RVing- specific details on more than 250 campgrounds in more than 70 national parks.
You’ll also find stories about RVing in the parks, tips helpful if you’ve just recently become an RVer, and useful planning suggestions.
