
Suspension bridge across the Ohanapecosh River along Grove of the Patriarchs Trail, Mount Rainier National Park / Rebecca Latson / Rebecca Latson
If you read the November 29th article about the National Parks Traveler's Essential Park Guides (and maybe have checked these guides out for yourself), you'll know from time to time that articles taken from these park pages will show up on the Traveler's main feed. This article, for instance - a subpage to the Mount Rainier National Park Page - is one of them and serves as this month's December photo column. It's also a photography primer, filled with tips and techniques about which I've written over the past 12 years with the Traveler. Fair warning: it's much longer than the usual article, but if you make your way completely through it, I not only congratulate you but hope you will take away at least some of the advice in this article.
Without further ado:
As a contributing photographer for the National Parks Traveler, I can tell you from experience, Mount Rainier National Park in Washington State is filled with superlatives. You can capture those superlatives with your own camera, be it tricked-out SLR, easy-to-tote point-and-shoot, or the smartphone camera you carry in your pocket. Whether you are visiting this Pacific Northwest park for the first time, or the fifth time, these locations, tips, and techniques detailed below should help you go from taking a good picture to taking a great picture.
First and foremost, remember to photograph whatever interests you. Your national park visit is a story, and the photos you take flesh out that story of both the park and your trip. These photos might include landscapes, wildlife, wildflowers, waterfalls, forest interiors, and anything else that catches your attention, from banana slug, to suspension bridge, to the frame-filling majesty of “The Mountain.”
Now, many photo op spots within this national park are oft-photographed spots. Should you ignore them, then, because they are popular? Absolutely not! The image you capture of that specific place is your image, taken with your camera. There’s a reason that location is so admired: it’s beautiful. Don’t deny yourself the opportunity to capture your own awesome image.
Also, nothing is truly the same. There will always be differences resulting from where you place your tripod, the angle of your shot, the time of day, the weather, the season, and the atmospheric conditions (i.e. a hazy day due to area wildfire smoke). All these variances add up to an original shot made by you.
My Favorite Places For Photography
While just about anywhere is a fantastic place for a stunning imagery, here’s a list of places you should check out during your Mount Rainier visit and why they are my faves.
Reflection Lakes – Great for: sunrises, mountain reflections, starry night skies.
Paradise Area – Great for: wide-angle as well as frame-filling compositions of Mount Rainier, waterfalls, leading lines of trails, brilliant autumn color, pure white winter color, night photography, blue hour, sunrise.
Sunrise Area – Great for: wide-angle as well as frame-filling compositions of Mount Rainier from a different perspective, leading lines of trails, night photography, blue hour, sunrise. Make sure to check out Emmons Vista, best visited early in the morning or much later in the afternoon/evening. From there, you’ll get views of Mount Rainier, Emmons Glacier, and the White River with natural frames of the tall trees near the overlook.
Glacier Bridge – This is the bridge you’ll cross along the Nisqually-to-Paradise Corridor. Great for: views of the Nisqually River up and down the mountainside. Park at pullouts/parking lots on either side of the start of the bridge to get an interesting view of the bridge across the river.
Nisqually River – A winding, narrow river weaving its way between wide, rocky riverbanks. Great for: leading lines of the river, moody views of the landscape, silky water shots, sunrise
Waterfalls – Great for: silky water shots. Below are a few waterfalls to check out along the Nisqually-to-Paradise Corridor.
- Westside Road about a mile from the Nisqually Entrance (not a waterfall name, but the location of at least a couple unnamed waterfalls)
- Falls Creek waterfall
- Christine Falls
- Narada Falls
- Upper Sunbeam Falls
- Myrtle Falls
Ricksecker Point – Great for: vertigo-inducing images of Glacier Bridge far below (yes, the one you crossed over earlier to get to this view area on your way to Paradise).
Longmire Meadow – Just across the road from the National Park Inn at the Longmire Historic District. Great for: meadowland views with “The Mountain” framed by dark trees.
Forest Interiors – Great for: shadowy, mossy forests of greens and browns occasionally punctuated by spots of bright sunlight.
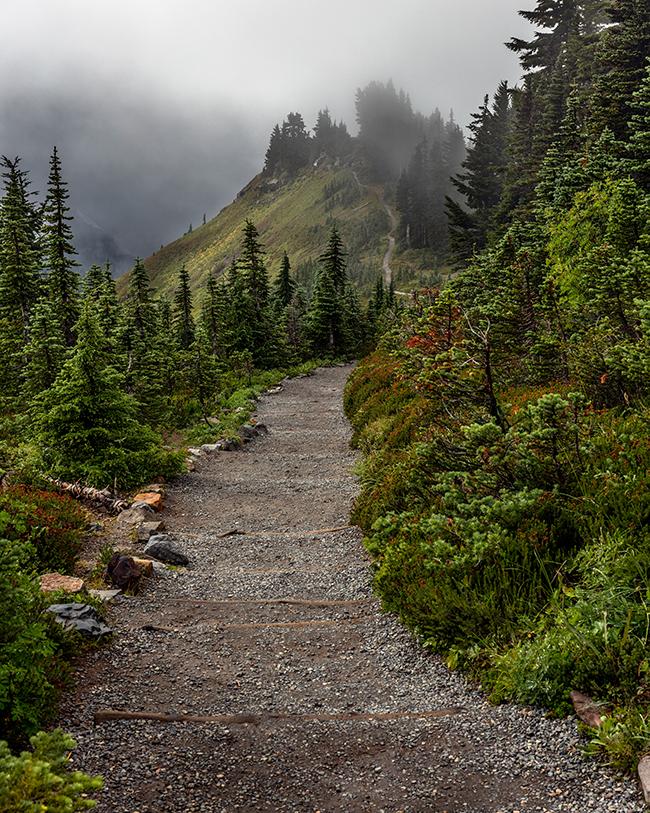
Hiking Trails – Great for: wide-angle and frame-filling compositions of Mount Rainier and the landscape, leading lines of the trails, sunrise, sunset, starry sky, and perhaps, even a faint Aurora Borealis view from spots along the trails. Below are some of my favorite day-hiking trails.
- Alta Vista Trail
- Fremont Mountain Trail
- Sunrise Rim Trail
- Dege Peak Trail
- Sourdough Ridge Trail
- Skyline Trail
- Silver Forest Trail
- Pinnacle Peak Trail
- Grove of the Patriarchs Trail (CLOSED for the foreseeable future)
Photography Tips And Techniques
Golden Hour, Alpenglow, and Blue Hour
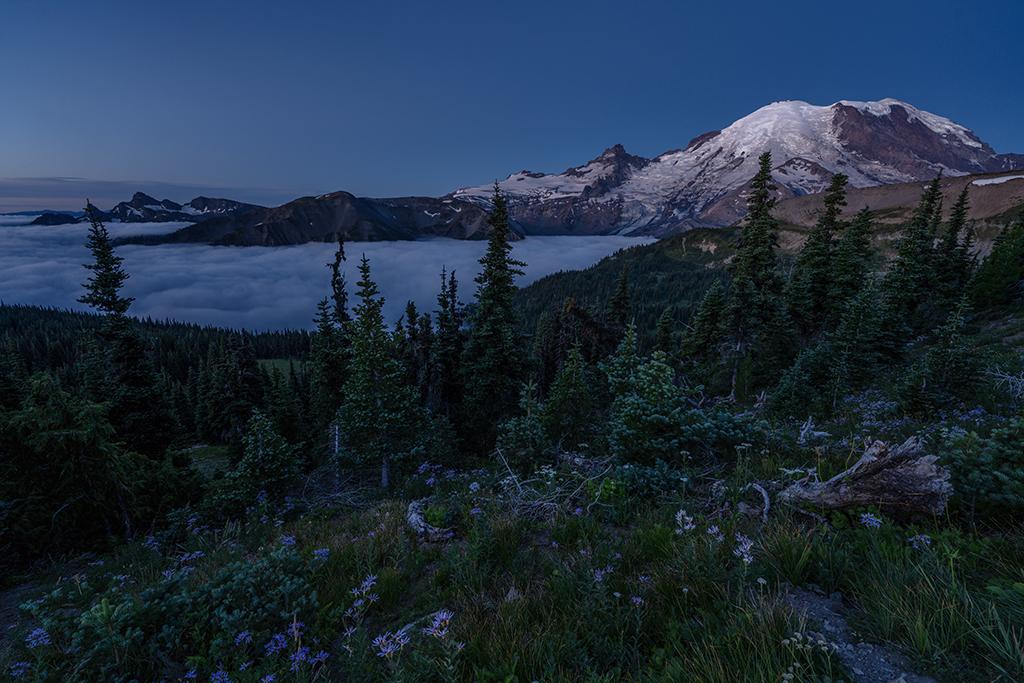
Golden Hour: That time of the morning (sunrise) or evening (sunset) when the sun is at an angle to bathe the landscape in soft, saturated hues of red, orange, and yellow. In addition to the marvelous color and light, the sun’s angle at these times also creates shadows for depth and character you won’t see during the harsh light of high noon.
Blue Hour: That time of the morning preceding sunrise or right after sunset, when the sky and landscape are painted in swaths of blue, purple, mauve, and pink.
Alpenglow: The reddish radiance seen on mountaintops just prior to sunrise or just after sunset. The sun’s “last hurrah” après sunset and a colorful “good morning” pre-sunrise.
Blue hour colors in the Sunrise area of Mount Rainier National Park / Rebecca Latson

The sunrise golden hour at the Sunrise area of Mount Rainier National Park / Rebecca Latson

Some frosty autumn alpenglow at Tipsoo Lake, Mount Rainier National Park / Rebecca Latson
Note: none of these last an hour. You’ll have anywhere from 30 seconds to 15 minutes to capture the full effect of these events, which is why it is important you’ve staked out your photo spot at least 30 minutes prior.
Think about using lens filters for sunrise and sunset shots. Filters come in all sizes, from square to circular. The circular ones screw directly onto the lens front. Why use filters? The sky will be bright with the sun, and the foreground below the horizon remains shadowed. If you expose for the shadowed area, your sky and sun may become “blown out” (overexposed). A graduated neutral density filter (grad ND) helps mitigate this lighting difference.
Depending upon where your camera is pointing in relation to the rising or setting sun, a circular polarizing filter (polarizer or CPL) can increase color saturation while removing lens glare and reflections on the water. The CPL works along the same principle as your polarized sunglasses, but the lens must be at an angle to the sunlight for it to succeed. Rotate the filter and you will see glare and reflection disappear.
Night photography
There are so many spots to capture the starry night sky over “The Mountain.” Usually, the stars begin to really sparkle around 10 p.m. The Milky Way is the brightest and clearest between March and September. It usually pops out around 10 p.m. as well.

Reflection Lakes is a great location for night sky photography, Mount Rainier National Park / Rebecca Latson
At night during May through September, you might also be able to photograph little pin pricks of light on the volcano’s flanks. These are climbers hoping to reach the summit.

Headlights, hiker lights, and even the tiny pinpoints of climber lights on "The Mountain," Mount Rainier National Park / Rebecca Latson
This national park is also a fantastic venue from which to capture meteor showers, like the Perseids in August.

The scene at the Sunrise area during the peak Perseid meteor shower in August, Mount Rainier National Park / Rebecca Latson
Check the internet to see if any aurora borealis light might be flickering at the park. You may not be able to detect the aurora with your naked eyes, but a slow shutter speed will definitely pick up any aurora color to be seen.

A little bit of aurora seen during the wee hours of the morning along the Sourdough Ridge Trail, Mount Rainier National Park / Rebecca Latson
For night photography, you absolutely need a tripod. Your camera will be set to a very high ISO (640 – 6400+), a wide-open aperture (f-1.2 to f-4), and a very slow shutter speed (10 seconds to 30 seconds). With these kinds of settings, you won’t be able to handhold your camera and keep it still for as long as the shutter needs to be open. A tripod provides stability, and a wireless or corded shutter release prevents vibration resulting from your finger pushing down on the shutter button. In lieu of a remote, you can also use your camera’s 2-second timer.
Something else you may need is noise reduction software – standalone or as a plug-in to your regular editing program. When high ISOs, wide-open apertures, and very slow shutter speeds combine for a low-light night sky or interior shot, the resulting images generally tend to have a grainy look to them. That’s “noise.” There are several noise reduction programs out there to help mitigate that issue, including Imagenomic Noiseware, Topaz DeNoise AI, Nik Dfine 2, and Capture One.
An abundance of wildlife thrives within the three life zones (forest, subalpine, alpine) found at Mount Rainier National Park in Washington State. Look closely and you might see one or more of 65 mammal species, 14 amphibian species, 5 reptile reptiles, or 182 bird species, along with numerous invertebrates (like banana slugs and butterflies). If you use a CPL filter to remove glare and reflections, you might also see any of 14 native fish species through the water.
There are two ways you can capture a great wildlife shot:
- via telephoto lens
- as part of a landscape image
Wildlife is always on the move. They don’t really care to pose for the photographer, and they do NOT want the photographer getting too close to them. To capture a sharp portrait of that moving wildlife, a telephoto lens (aka “long lens”) and a “fast” camera are called for.

A yellow flower for breakfast (captured using a 100-400mm zoom telephoto), Mount Rainier National Park / Rebecca Latson
A telephoto lens can be anything from 70-200mm, 100-400mm, 200-600mm, or a big, honkin’ prime lens with a 500mm, 600mm, or 800mm focal length. But, you don’t have to purchase any of them, you know. Renting a lens will cost you a fraction of the full price and there are several online lens rental companies out there, including lensrentals.com, cameralensrentals.com, and lensprotogo.com. Just Google “camera lens rentals” and see what pulls up.
A “fast” camera is one that has a high fps (frames per second) rate. This can range from 20 fps to 30+ fps when using the “burst method.” What is that? The burst method means you are holding your finger (or wireless/corded shutter release) down on the camera shutter button for several successive “clicks.” Out of all those shots will be one (probably more) sharp, clear image of that wildlife.
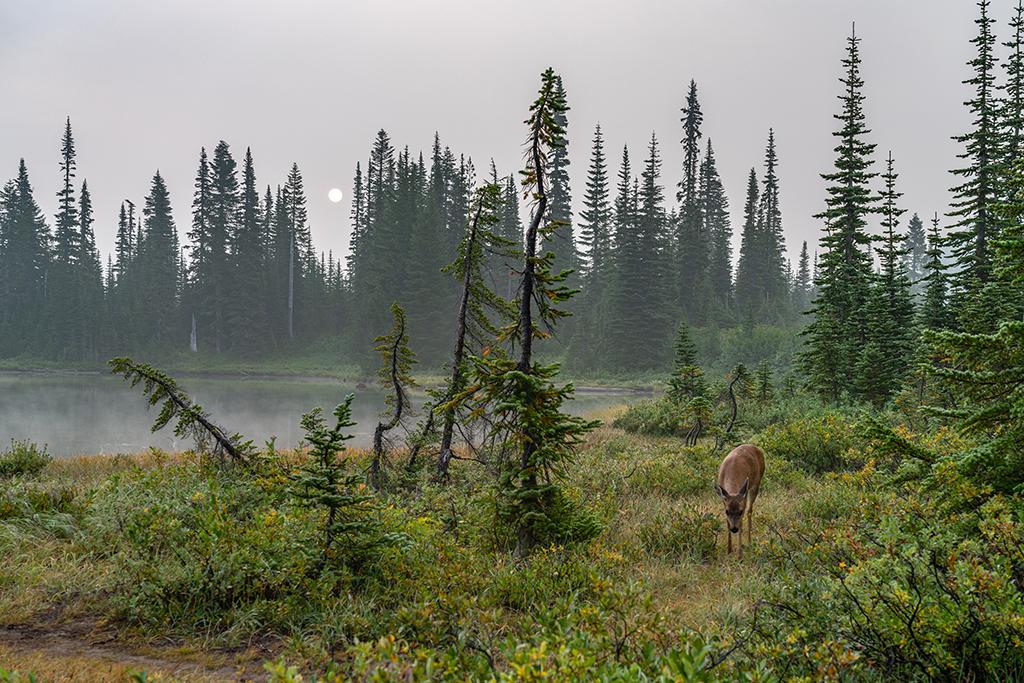
So, what if you don’t have access to a long lens? Or, what if you forgot to bring it with you for your trip, or left it in your vehicle or lodge room? Or what if the telephoto lens on your camera is just not strong enough for a frame-filling animal headshot? Get a landscape shot of that wildlife, instead. Yes, that grazing herd of mountain goats will be further away, but you’ll capture a beautiful landscape image showing your audience not only the wildlife seen in the park, but also the environment in which wildlife lives and roams.
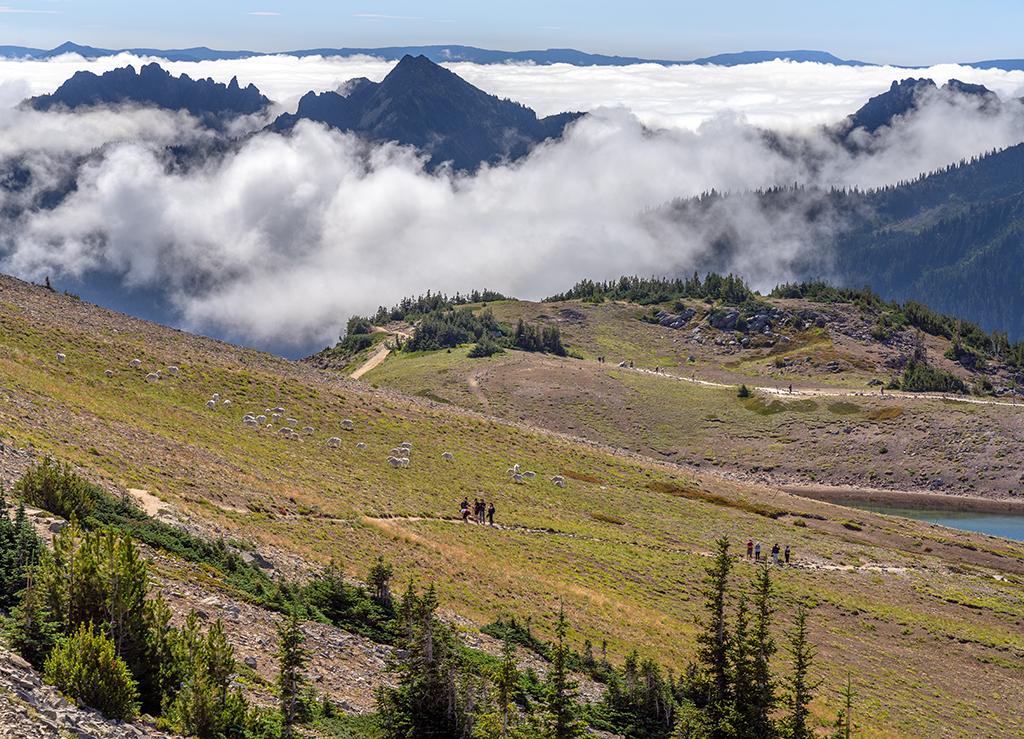
A herd of mountain goats grazing in the meadow, Mount Rainier National Park / Rebecca Latson
Mount Rainier National Park is awash with colorful blooms from mid-July to mid-August. Carry a little wildflower identification book in your pack, and affix either a telephoto lens to your SLR or use the telephoto setting on your point-and-shoot or smartphone. Yes, I said telephoto lens. These lenses are great not only for sports and wildlife, but wildflower closeups, too.
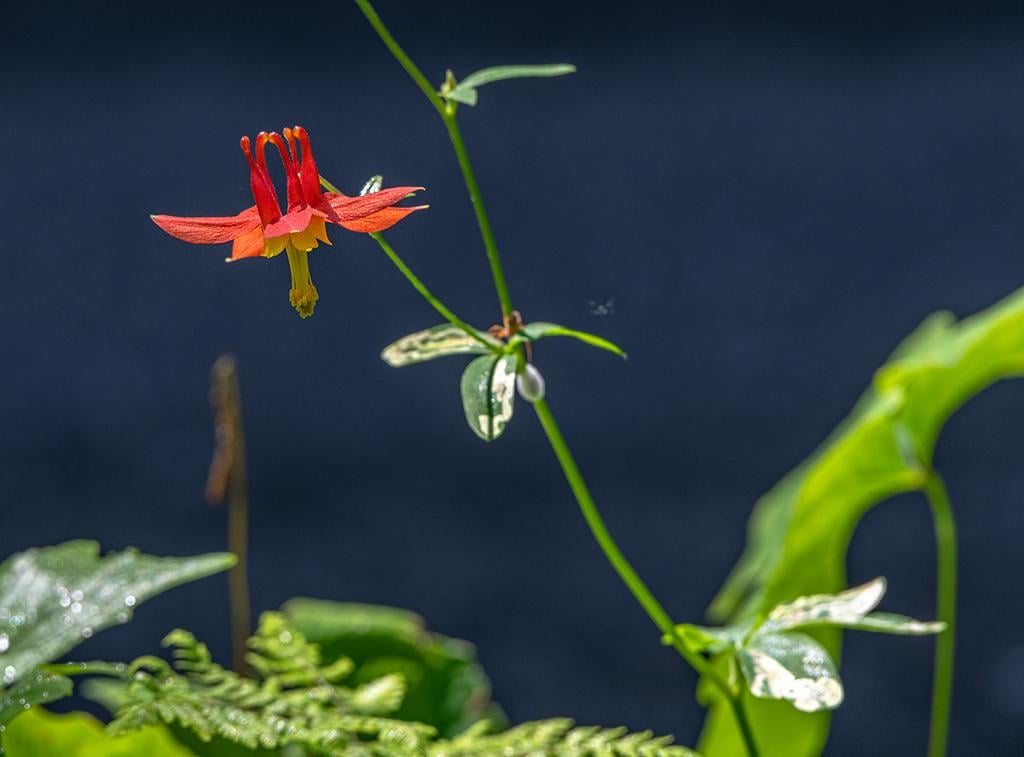
Crimson columbine, Mount Rainier National Park / Rebecca Latson
Waterfalls are the perfect place to practice your silky water photo technique to capture that silken texture given to moving water when using a slow shutter speed and either a neutral density (not a grad ND) filter or a CPL filter. You’ll need a tripod for this too – unless you are using a smartphone. If you are using one of the newer-model iPhones, all you’ll need to do is turn on the Live Photos feature (that round icon in the top right of your iPhone), tap the shutter button to capture the waterfall scene, then go to your Photos app. Tap on the photo you took. If you have an iPhone 15 or newer model, you’ll see on the upper left an icon that says “Live” with a down drop arrow. Tap that icon and you’ll see Long Exposure among your choices. Tap on Long Exposure, give it a few seconds, and then you’ll have a silky water shot. Voila!
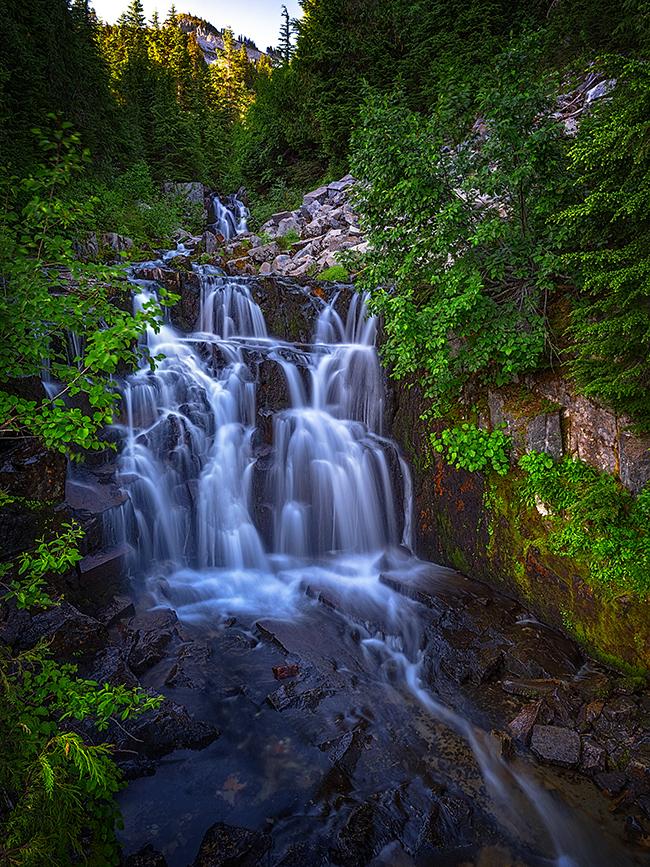
The silken waters of Upper Sunbeam Falls, Mount Rainier National Park / Rebecca Latson
Leading line compositions provide a sense of distance and lead the viewer’s eyes from one part of the photo to another along a trail, or up a series of steps, or along a highway, or from one end of a fence to another.
Looking back down the Alta Vista Trail, Mount Rainier National Park / Rebecca Latson
Rule of Thirds
This is a tried-and-true technique whereby the photographer places the subject on one side of the frame, instead of smack dab in the middle. You’d think this would create an imbalance to the composition, but it instead creates a compelling, visually appealing image.

Canada jay, Mount Rainier National Park / Rebecca Latson
Most landscape photographers hate using people or any hint of civilization in their landscape images. That’s understandable. But, the use of something familiar, like a person or anything made by people, adds scale and reference to an image. You may not realize that waterfall is as tall as a 10-story building, or that bobcat is the size of a wheelbarrow unless you have some sort of recognizable object included in that photo.

Grandiosity at Paradise, Mount Rainier National Park / Rebecca Latson
Perspective
Perspective is a particular way of looking at something. Many photographers use a wide-angle lens (11-24mm, 14mm, 17 mm, 24mm, 16-35mm) and get close to the ground, tilting the lens up a little bit for a different perspective of the landscape. To accomplish a sharp resulting composition, though, you should take two shots of the same exact scene in the same exact spot (which is why using a tripod for this is handy). One shot should focus on the background, and the second shot should focus on the foreground. During the editing stage, you’ll stack these shots for a completely focused image, edge-to-edge. Your photo editor should have a menu choice for stacking images. There are also software products like Helicon Focus and Zerene Stacker that take the work out of combining multiple images to produce a single, focused shot.

In focus front to back, Mount Rainier National Park / Rebecca Latson
Of course, some photographers want the foreground or background to be unfocused because that also captures a viewer’s attention, creating more attention to the focused part of the shot.
Architecture
Don’t forget to photograph some of the historic architecture you’ll see at Mount Rainier, such as the rustic log and stone interiors and hand-painted lanterns in Paradise Inn, or the “parkitecture” of the Longmire Museum, or the arched bridge over Christine Falls. These are part and parcel of the park and help flesh out the story of your visit. For interior views of the buildings, you’ll be using settings like those for night photography, with or without a tripod (in which case you’ll make use of the “burst method”).

The Paradise Inn dining room, Mount Rainier National Park / Rebecca Latson
We often tend to see national parks in terms of “Big Picture” landscapes or wildlife (bears, elk, moose), but little things like chipmunks, seashells, dew drops, even banana slugs, add to and flesh out your national park story. So, aim your macro or telephoto lens at these little things, occasionally.
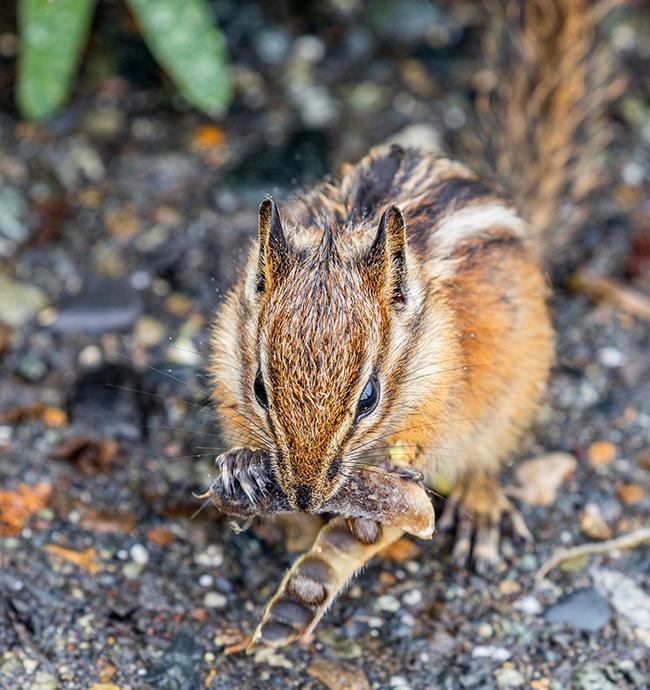
Munching on a seed pod, Mount Rainier National Park / Rebecca Latson
As you hike a trail or stop at a view area, what is it that gives you pause long enough to capture an image? Is it something colorful like a bright yellow sunflower? Perhaps the texture of moss draping a tree branch caught your eye. Or maybe the pattern on that rattlesnake’s scales (yikes). Color, texture, and pattern are all properties you may knowingly or subconsciously perceive in your composition. The more you look for things like this, the more observant you become, and the more you improve your photography skills.

The pattern created by phlox flowers, Mount Rainier National Park / Rebecca Latson
Different Seasons/Times/Weather Conditions
The face of Mount Rainier National Park changes with the seasons. The same spot can look markedly different due to the season, time of day, and weather conditions. This is why it’s a great idea to revisit a favorite place more than once, if you can.
Winter snows create a bright, white landscape beneath a sky that’s either brilliant blue or matte pewter. Huckleberry bushes in autumn add a burst of orange and red to the groundcover. A rainy day enhances colors, and clouds create a bit of drama as well as texture to the composition. Time of day alters lighting conditions.

An autumn scene of the bridge over Edith Creek at Paradise, Mount Rainier National Park / Rebecca Latson

Where is Edith Creek? Where is the bridge? Both are covered beneath winter snow at Paradise, Mount Rainier National Park / Rebecca Latson
Photography During Winter
The higher elevations (and sometimes the lower elevations) of this national park provide plenty of opportunity for snow photos.

Paradise in winter is paradise, indeed, Mount Rainier National Park / Rebecca Latson
Sometimes, though, snow may come out looking blue, or a dull gray in your photo, rather than bright white. If your snow scene is a little on the blue side, try switching modes from Auto White Balance to something like Cloudy, Shade, or even Fluorescent. This tells your camera to add a little warmth (yellow) to counteract that cool (blue) scene.
You might also try overexposing your image just a little bit, to brighten up the show without blowing out the highlights. Your camera’s metering system is calibrated for a medium gray tone, which usually works just fine for most images … except snow. On SLRs and possibly also on high-end point-and-shoots, there’s either a little dial with + numbers, or an “Exposure Compensation” menu setting with numbers and plus or minus signs. Keep whatever exposure settings you may already have, but move that dial to +1 or +2 and see if you like the resulting images.
Summer is often wildfire season at Mount Rainier. The park itself may not necessarily be victim to a raging wildfire, but the area around it might. If the prevailing wind is such that it blows smoke into the park, you might find yourself (and your camera) having a difficult time focusing on anything past your immediate foreground. The mountain’s outline might be very faint and you won’t achieve that glorious composition you perceived in your mind’s eye. On the other hand, sunrises and sunsets are spectacular, and even the sun during the day might be such you can photograph that round globe without blowing out the highlights. Plus, a smoky background forces you to concentrate your photography more on the landscape near you.
A smoky morning at Mount Rainier National Park / Rebecca Latson
Photographing a forest interior veiled by the gauzy haze of wildfire smoke will make that scene either ethereal or foreboding, depending upon the mood you seek for your composition.

If you’ve made it this far without your eyes glazing over, congratulations! You see now there is quite a bit to digest when it comes to capturing stunning photos of this national park (or any national park, really). Sure, you might still think it’s all rather tedious and wonder whether it’s worth the effort to use any of these tips and techniques. Yes, it is worth the effort. You don’t have to use every single technique listed here, but you should at least try one or two. Experiment a little during your Mount Rainier visit. I guarantee you will be pleased with the awesome photographic results you achieve.


Comments
thanks, I like these writeups and pictures per park