I thought I would combine three of my favorite things in this column, since all three are wonderful to photograph within a national park, and you can capture some real stunners as long as you have the right tools and techniques.
I’m a morning person. When I am on vacation with my cameras, I get my best work done between the hours of 2 a.m. and 10 a.m. Because of this, I love photographing sunrises; a sunrise heralds the start of a new day with plenty of promise.
Not all photographers are morning people, but they do understand the need to get out of bed while it is still dark, gather together their camera gear, and head out to stake their spot for a sunrise session.
I’m not exactly an evening person, but the same thing applies in terms of picking out and sticking to my sunset spot at least 30 minutes prior to the sunset.

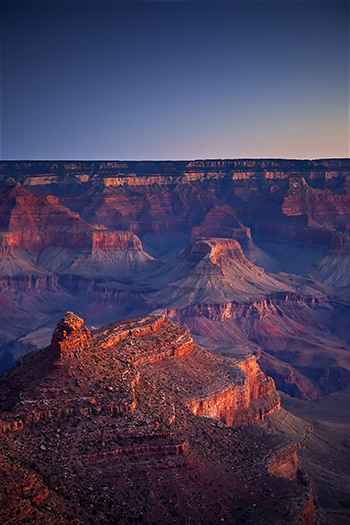
A very chilly November sunrise behind the Bright Angel Lodge along the South Rim of Grand Canyon National Park. Photo by Rebecca Latson, all rights reserved.
Why do photographers get excited over sunrises and sunsets? What’s the big deal?
It’s all about the light….and shadow and detail and color saturation. Photographers call that particular time of day “the golden hour,” or “the magic hour,” when the scene is bathed in a brilliantly-saturated gold-red-orange-pink glow with some purple-blue hues and maybe a smattering of sun rays.
This special light creates and accentuates shadows on the land to produce an image with a sense of depth and drama. This is why you may see hordes of photographers, cameras on tripods, patiently waiting at such locations as Wild Goose Island or Swiftcurrent Lake in Glacier National Park in Montana, or Many Parks Curve in Rocky Mountain National Park in Colorado, or the La Sal Mountains Viewpoint in Arches National Park in Utah, or the Bright Angel portion of the South Rim in Grand Canyon National Park in Arizona.
Getting Those Sunrises And Sunsets
So, you’ve done your reconnaissance work and picked out a great spot for a fantastic sunrise or sunset. You know you need to be there at least 30 minutes prior. If it’s a popular spot, you should probably be there much earlier than that, because anywhere from six to 60+ photographers may be joining you.
You’ve set your camera on your tripod. Now, you need to be aware that your camera is going to either meter for the sky or meter for the ground. If it meters for the sky, the ground will be so totally underexposed that details will be hidden within the darkness. If your camera meters for the ground, then the sky will be so overexposed (“blown out”) that color and details will be lost and probably not retrievable even with post-processing.
How do you achieve a stunning photo without either blowing out the sky or drastically underexposing your ground?

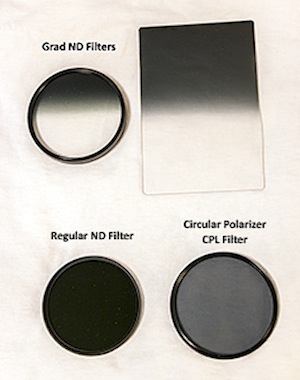
Examples of graduated ND filters, a regular ND filter, and a CPL filter.
The key is in the use of a graduated neutral density filter (grad ND). This filter is an absolute requirement for a good sunrise, sunset, or any other type of photo where you have some sort of horizon dividing light from dark in your composition.
The purpose of this filter is to even out the exposure by darkening the sky while delineating the shadows and texture of any clouds, as well as keeping the sun from being totally blown out and blinding.
A grad ND is a round, square, or rectangular filter that is half clear – half shaded. The shading is gray and comes in different intensities of darkness. The dividing line between the shade and the clear may be either “hard edge” or “soft edge.”
A hard edge grad ND has the same strength of gray, while the gray shade in a soft edge grad ND goes from dark to light incrementally. The round grad ND screws onto your camera lens and has a rotating mount. Square and rectangular grad NDs may either be held to the lens with a special holder, or simply hand-held flush to the lens glass. If you don’t own a grad ND (and you really should if you are serious about your sunrises and sunsets), you can apply a “virtual” gradient filter to your image while post-processing.
Aperture, Adobe Lightroom, and Adobe Photoshop and Photoshop Elements all have gradient filter tools and I’m sure other photo editing software packages or plug-ins have similar tools.
Silky Waters
Ok, sunrises and sunsets are in the bag. Now, how about this silky water thing?

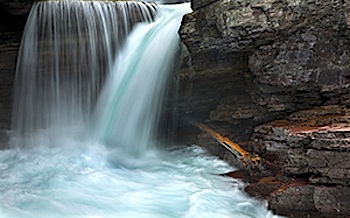
The turquoise hues of St. Mary Falls in Glacier National Park.. Photo by Rebecca Latson, all rights reserved.
I know you’ve seen photos before of waterfalls or streams where the water is blended and blurred into a smooth flow of “silk”, right? There are fans for and against this technique. I once had a fan actually thank me for “letting water be water” after viewing one of my non-silky waterfall images.
I happen to like that dreamy quality of silky water, myself, but I appreciate what the fan had to say. As with the rest of photography, it’s all subjective.
The silky water effect is achieved with a regular neutral density (ND) filter (i.e. non-grad) alone or in combination with a circular polarizer filter (CPL) and/or a graduated ND filter.
The trick to getting silky water is to have a long shutter speed between 2 seconds and 10 seconds, or more. To accomplish this technique, you should choose the "manual," "shutter priority," or "bulb" setting on your camera so you can control your shutter speed. It goes without saying that your camera absolutely needs to be on a tripod.
The caveat to this whole process is that the length of time to slow down and blend the water’s movement means the camera shutter will also be letting light in, thus totally blowing out the image details unless you use one or more of the filters listed above.

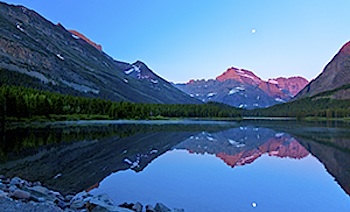
Sunrise and moonset over Mount Gould and Swiftcurrent Lake in Glacier National Park. Photo by Rebecca Latson, all rights reserved.
Singh-Ray and a number of other companies sell “variable” ND filters that allow you to actually dial in the amount of darkness desired. Singh-Ray also offers a “Vari-N-Duo” filter combining a CPL and a variable ND.
Occasionally, you may still have some silky water blown-out highlights. Luckily for us, there are all sorts of wonderful photo editing packages (like the ones mentioned earlier in this column) with which you can eliminate some of those overly-bright spots.
This brings me to some final advice regarding your sunrise/sunset/silky images: don’t delete the photos you think are total losers because they look too under- or overexposed. Leave those photos and come back to them a few days or weeks later, after you’ve gotten more photo editing experience under your belt. Try re-processing them and see if you don’t end up with real sunrise, sunset, and silky water winners.
And please, when on location, remember to take your eye away from the viewfinder periodically to just enjoy the moment and the view.


 Support Essential Coverage of Essential Places


Comments
Thank you, Rebecca. You've hit on some things that have really frustrated me and my camera.
But now I'll be frustrated when I discover how much those filters will cost.
Ah, well . . . . . .
Thanks for the tips. I also need to get some filters.
Rebecca, thank you for the great tips. I will definitely be putting your suggestions to use!
I've been using a polarizing filter for years with my DSLR, and I love the results. It really punches the blue in the sky and does a good job eliminating glare.
I recently bought a graduated neutral density filter, and while I'm still experimenting with it, I've been fairly pleased with the results so far. After reading Rebecca's article, I'm thinking I might need to get a full ND filter, as well. I'd love to start getting some of "silky waterfall" shots!
Neither was terribly expensive. I got the grad ND from an eBay seller called adoramacamera for $12, and I think the polarizer was part of a set with a UV filter and fluorescent filter for around $15, so neither was prohibitively spendy. They were well worth it for the improvement in my photo quality.
I just priced ND filters at my favorite camera store and was very pleasantly surprised. Some prices are still reasonable out there.
For any folks who would like to be in the parks with like minded others, or brush up on some photography skills here is the extensive list for photography workshops that will be held in Arches and Canyonlands National Parks in 2013. And be reminded that each year the park service has a contest, the winning photograph will be on the annual park pass.