
An early summer morning at Tipsoo Lake, Mount Rainier National Park / Rebecca Latson
It’s not always about the camera, but it is always about the photographer. I wrote that in my very first article for the Traveler back in 2012. Granted, some of the articles I’ve written over these 10 years have been slanted more toward SLR use, but most of the articles I write are for general photography because I truly believe you can get great national park images with any camera, be it smartphone, point-and-shoot, or SLR.
Not too long ago, Traveler Editor Kurt Repanshek emailed me a link to a free smartphone photography workshop offered by photographer Taz Talley at Great Sand Dunes National Park and Preserve on October 1-2. While I would like to attend Tally’s workshop, I’m not going to be in Colorado in October. So, Kurt suggested I take my own smartphone to nearby Mount Rainier National Park instead, which is just what I did, hiking the 3.5-mile Naches Peak Loop Trail near Tipsoo Lake.
The smartphone camera (and smartphone, itself) is an amazing piece of technology, and people are getting all sorts of really cool shots with their phones. While I know my way around digital SLR camera settings, composition, framing, and photo editing, I needed to understand how to apply that knowledge to smartphone photography. I own an iPhone, so prior to this Mount Rainier trip, I ordered a book by photographer and author Scott Kelby on iPhone photography. The more I read, the more I realized just how much I didn’t know about my iPhone’s camera.
Full disclosure: the iPhone photos used for this article have been edited and are not “straight from the camera.” I firmly believe the majority of images captured with any camera usually need some tweaking, be it sharpening, color saturation, light adjustment, dehazing, or noise removal.
Go To Your Smartphone’s Camera Settings
Smartphones are great tools for getting a quick snapshot. The real trick is to create great images that look less “snapshotty” (Kelby’s term). To achieve this, one of the first things you should do is take a look at your smartphone camera settings.
Note 1: I used an Android tablet many years ago, but that’s as far as I’ve gone. So, what I write here will need some slight translation (by you) into “Android speak.”
Note 2: Bear in mind, if your iPhone is older than, say, an iPhone 11, there will be settings you see in these screen prints that you may not see on your own phone model. Don’t worry, you’ll still get great shots. Just make sure you’ve updated your camera’s OS (operating system) with the latest version.
In your iPhone, go to Settings and scroll down to your Camera app. Tap on that and take a look at all the things you can change, from photo formats to how you record your videos to lens correction to whether or not you want to see a grid (which sure helps with keeping horizons straight and figuring out the Rule-of-Thirds technique).
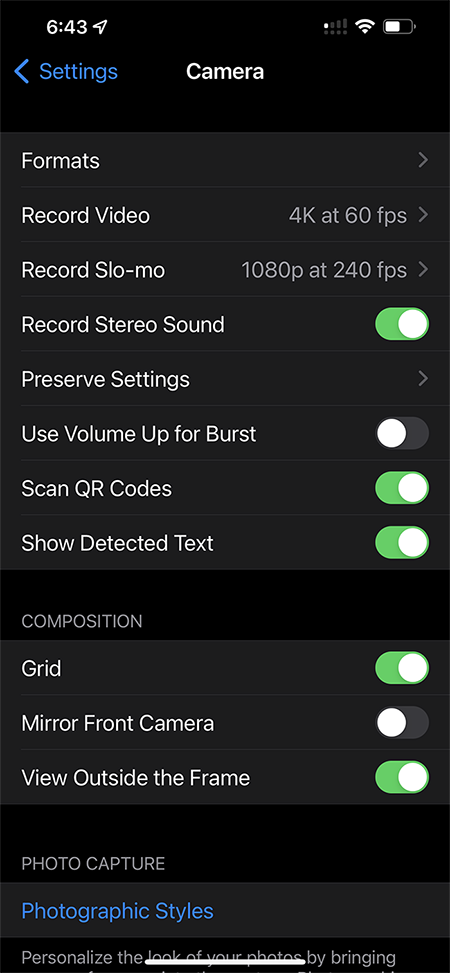
Camera app selections on an iPhone 13 Pro Max / Rebecca Latson

Camera format choices on an iPhone 13 Pro Max / Rebecca Latson
These choices are totally subjective and I suggest you play around with the settings so you know what your photos will look like with whatever selections you choose. If you own an iPhone 12 Pro or newer model, you can actually shoot photos in Raw in addition to jpeg. Of course, there’s always been that old argument as to which is better. It depends upon what you want. If you’ve got that choice between jpeg and Raw and don’t feel like doing much tweaking to your image after you’ve gotten the shot, then you might as well keep it on the “Most Compatible” format, which captures jpegs. The camera will decide the color saturation, sharpness, brightness, etc. This setting, however, does throw out some of the photo data. Raw captures all the data. A Raw photo might not look as bright or color-saturated, but that’s because it’s not allowing the iPhone to call the shots, instead leaving it up to your own photo editing prowess. Also, be aware your photo file will be larger using Raw and take up more space in your phone. Based upon my experience capturing both jpg and Raw images during my hike, the resulting jpgs on a larger screen (like my laptop screen) appeared grainier and less detailed. On a small screen like your smartphone, though, or for small or thumbnail website images, you won’t notice that.

Choosing a photographic style on your iPhone / Rebecca Latson
Oh, and you can choose a photographic “style” too, such as Standard, Rich Contrast, Vibrant (my pick), Warm, or Cool.
Now that you’ve got those initial settings all figured out, let’s talk about techniques. I’ve written previous articles about most of the suggestions you see here, but it doesn’t hurt to be reminded, and many of you may be new readers to the Traveler and/or this photo column.
Note 3: It’s a very good idea to practice with these settings and techniques before actually going out into the park and trying them there for the first time. Just like knowing how to use the settings on your SLR or point-and-shoot camera, you should be comfortable with using your smartphone’s camera selections so you’re not wasting time fiddling around looking for what you want as that beautiful light disappears, or the wildlife walks or flies away from you.
Capturing Moving Subjects
Speaking of wildlife, let’s say you see a bird or maybe a fox or wolf or bison or bear roaming around. You want a nice clear shot of that moving wildlife but that’s kinda tricky to get on a smartphone … or is it? Smartphones (well, the iPhone, anyway) can capture a series of shots using the “burst method,” just like you can with holding your finger on your SLR’s shutter button for a quick series of clicks. All you need to do on your (newer model) iPhone is tap, hold, and swipe the shutter button to the left (if holding the phone vertically) or swipe down (if holding the phone horizontally). You’ll see a count of how many shots are being taken, and if you haven’t muted your shutter button sound (and it’s actually a good idea to do that so you don’t spook the wildlife), you’ll hear a continuous shutter click. Of course, you’ll have a photo album filled with lots of the same shots, but you can go through and see which one is the clearest before deleting the rest. If you have an older model iPhone (my sister has an iPhone 7), then all you need to do for the burst effect is tap and hold the shutter button. No swiping involved.
Silky Water Effect

Getting that silky water effect on an iPhone / Rebecca Latson
If you’ve read any of my photo columns discussing how to capture that silky water effect when photographing flowing water, you’ll know I always recommend a tripod, because handholding your camera is a recipe for a blurry photo. With the smartphone (or, with the iPhone, anyway), there’s a special filter that actually does that for you, so you can handhold your smartphone and still get a silky water shot. You can’t be shooting in Raw for that, though. You’ll need to turn on the Live Photo feature when using your camera (it’s the concentric circles icon). Once you capture your flowing water image, go into your photo album and select the photo you just captured, tap that “Live Photo” in the upper left of the screen, and you’ll see a series of choices. Tap “Long Exposure” and in a couple of seconds, you’ll have that silky water look. If you have an older model iPhone (like my sister’s iPhone 7), then you’ll need to hold down on the photo and swipe up to choose the Long Exposure feature.
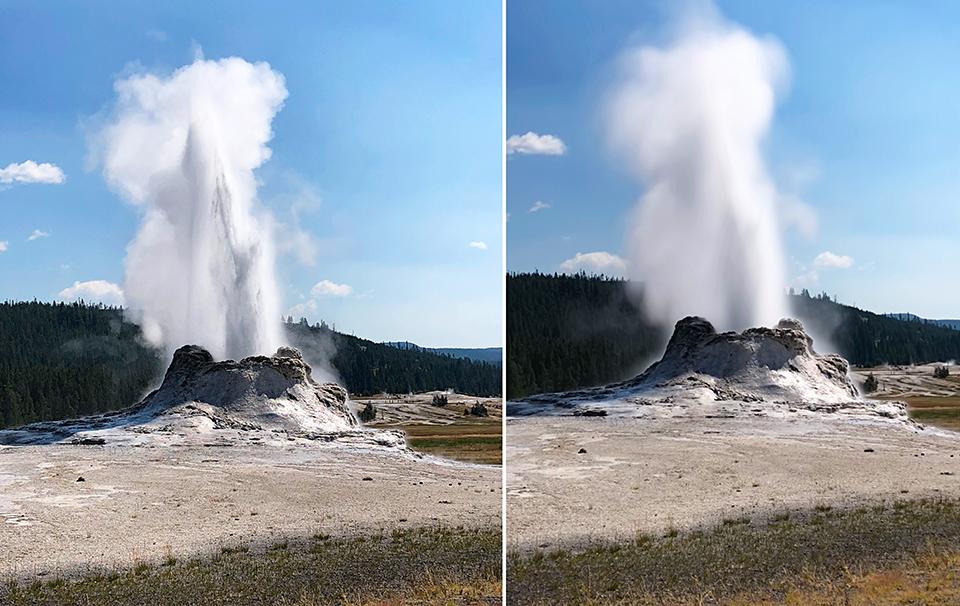
The silky water before and after using Castle Geyser as an example, Yellowstone National Park / Rebecca Latson
The before/after images you see here were definitely not captured at Mount Rainier. Because of where I entered the park and the construction work going on, logistics kept me from getting to either Christine or Narada waterfalls or any of the small falls and creeks along the Longmire – Paradise corridor. So, Yellowstone’s Castle Geyser erupting was used for a silky water example, instead.
Clean Up Your Composition
While framing your composition, try to keep those edges clean. Kelby calls this “avoiding junk.”

Bottom and left clutter (the Before shot), Mount Rainier National Park / Rebecca Latson
In the “Before” image, those slivers of rocks at the bottom of the shot and little bits of tree branches at the far left have the potential to clutter and distract.

Clutter all cropped out (the After shot), Mount Rainier National Park / Rebecca Latson
In the “After” image, I cropped the left and bottom sides of the shot to remove the offending distractions. It’s easier if you simply adjust your composition prior to the shutter click to avoid that clutter in the first place. No, this does not mean moving that log or big rock blocking a part of your image. Park staff take a dim view of moving the scenery around just so you can get your shot.
Getting A Close-Up
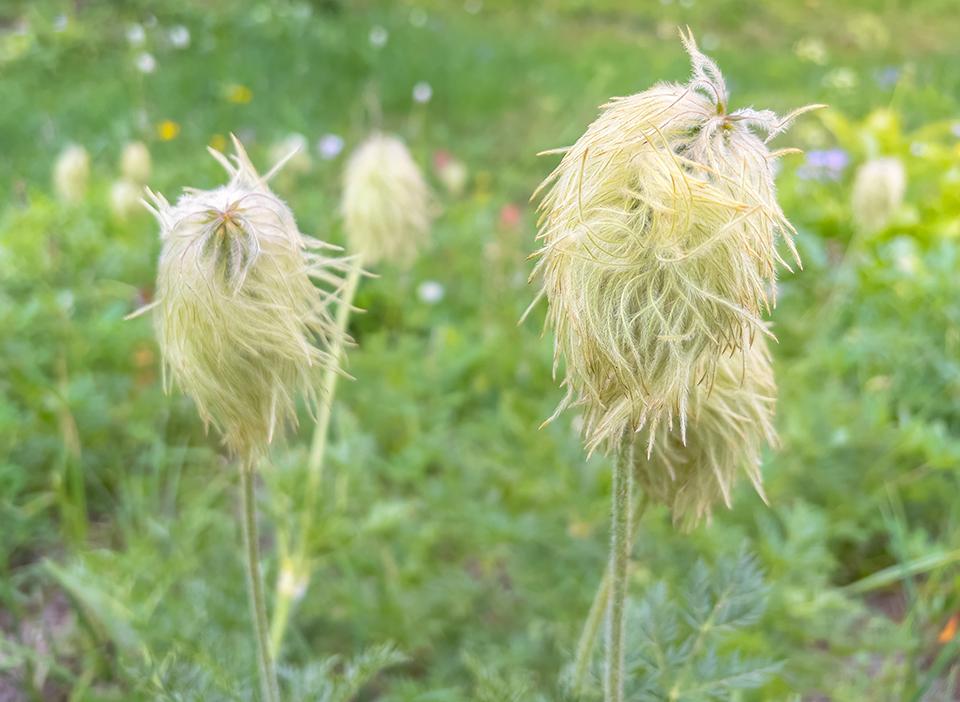
Western pasqueflowers seen along the trail, Mount Rainier National Park / Rebecca Latson

A funky mushroom right next to the trail, Mount Rainier National Park / Rebecca Latson
If you see a beautiful wildflower or interesting mushroom along the trail, why not move in for a close-up. You might even want to use one of those mini-tripods to keep your smartphone still for the clearest close-up shot possible. UBeesize and Andobil brands from Amazon both work well and are small enough to carry inside your backpack.
On a side note, does anybody know what kind of mushroom is pictured here? It was quite large - maybe four or five inches (or more) tall. Smartphones are nifty repositories for all sorts of flora and fauna identification apps, so be more prepared than I was and download some of those apps on your phone before your next national park adventure.
Low-Light Photography

Using a phone tripod (the only non-iPhone shot in this article), Mount Rainier National Park / Rebecca Latson
If you arrive before sunrise or after sunset, you’ll be treated to a “blue hour” view of the landscape, when shades of purple, mauve, and blue bathe the scene. Blue hours (they don’t really last an hour) are low-light affairs. Your iPhone camera is smart enough to detect a low-light scene and automatically switches to Night Mode (you’ll see a little half-moon on your screen). Just like using a slow shutter speed on an SLR, Night Mode uses a timer to keep the lens “open” to allow more light on your smartphone’s camera sensor. This means you either need to hold your phone verrrry still to get the shot, or, better yet, use one of those little phone tripods I mentioned earlier.
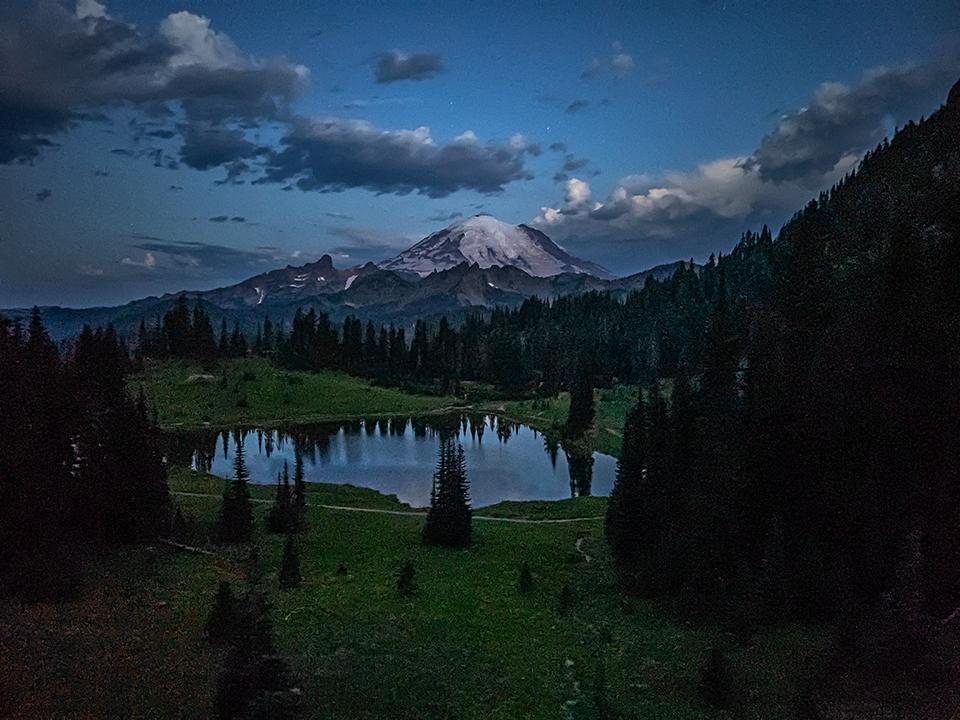
An example of low-light grain in this early morning iPhone image, Mount Rainier National Park / Rebecca Latson
The caveat with a low-light landscape is that your resulting photo may be noisy (grainy), as seen in the image above captured while attached to a phone tripod, with an iPhone-selected ISO of 2500, at f1.5 and a shutter speed of 0.5 second. Of course, applying your photo editor’s noise-reduction app or plug-in helps, and again, if the image remains on your smartphone or as a small website image, you probably won’t even see the grain.
A Few Other Techniques

Scenery along the Naches Peak Loop Trail, Mount Rainier National Park / Rebecca Latson
One of my favorite techniques is called the Rule-of-Thirds. This is where that grid feature in your camera settings comes in handy. Just divide your composition into threes, and place your subject to the side, rather than smack dab in the middle.

The sweet-tart goodness of a huckleberry, Mount Rainier National Park / Rebecca Latson
Filling the frame is similar to that close-up shot described earlier, except in this instance, it’s ok to place your subject in the middle of the shot because that’s really the only thing there of interest. Sure, that little huckleberry is still pretty small, but that’s what you eye is first drawn to in the image, right? Btw, those little hucks were sure tasty (and it’s ok to pick up to 2 quarts in the park for personal consumption).

Framing "The Mountain" with tall trees, Mount Rainier National Park / Rebecca Latson
Create a natural frame around your subject. In the image above, I used the trees to frame both sides of Mount Rainier. Anything from branches to fences to cliff dwelling windows to the views through a stone arch make nice natural frames.
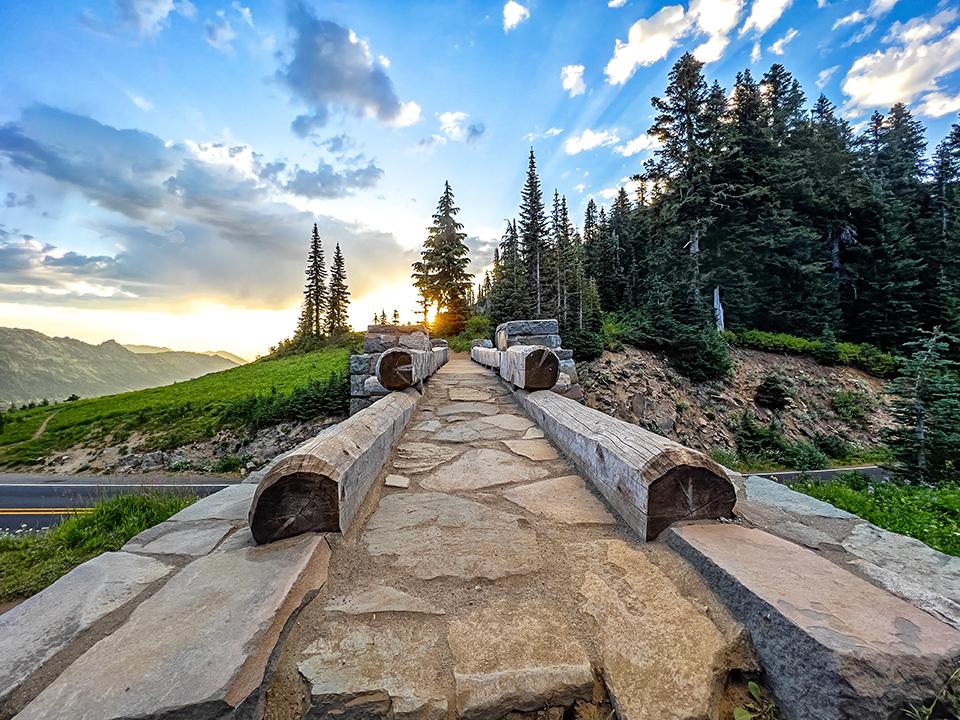
The pedestrian overpass along the Naches Peak Loop Trail, Mount Rainier National Park / Rebecca Latson
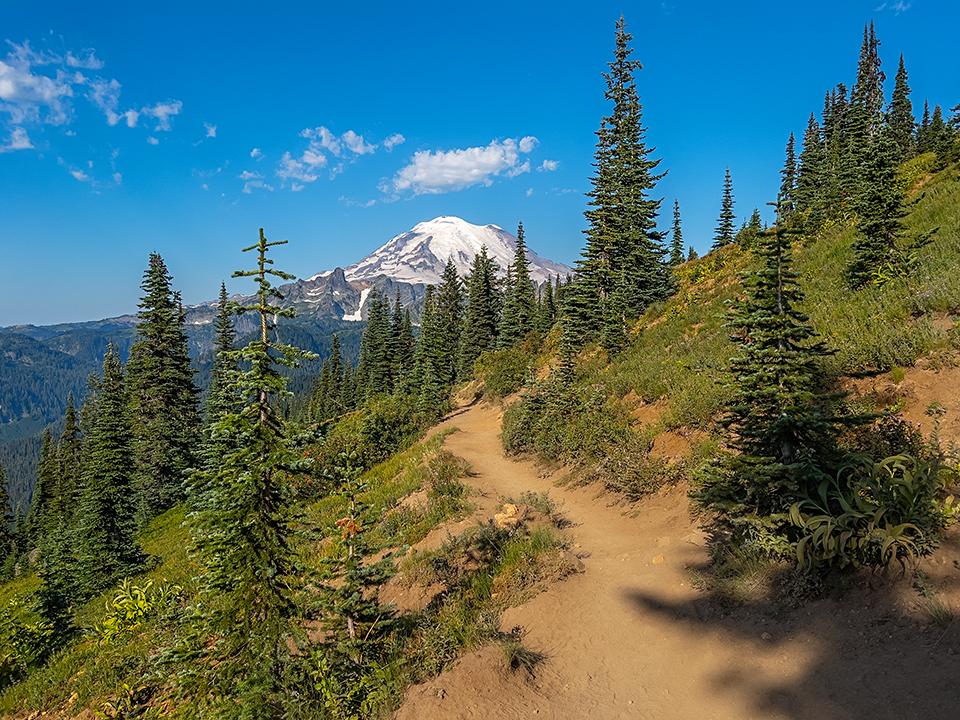
A trail and mountain view along the hike, Mount Rainier National Park / Rebecca Latson
A leading line (another favorite technique) draws the viewer from one part of the photo to the next. Try this using your ultra-wide-angle lens versus the regular lens and see which you like better.
No matter what unit of the National Park System you visit, a quick check of your smartphone’s camera settings before you head out to the park, and the application of one or more of these suggested techniques, should turn those good smartphone pics into great smartphone pics, and they’ll look less, well, “snapshotty.” And that’s exactly the goal you should want to achieve with your national park imagery.
There’s so much you can do with your smartphone’s camera that I’m saving some for a Part 2, where I’ll be including a few more techniques along with the kinds of in-phone filters and editing you can apply, as well as different methods of transferring your photos from your phone to your computer.

A very "snapshotty" selfie, Mount Rainier National Park / Rebecca Latson
P.S. If you visit Mount Rainier National Park and decide you want to hike the Naches Peak Loop Trail, I suggest you take the trail clockwise, so your last 1.4 miles will be frame-filling views of “The Mountain.”


 Support Essential Coverage of Essential Places


Comments
This is a terrific article, Rebecca. Thank you.
And thanks to Kurt for commissioning it.
Wonderful photos all the way through, but seeing that selfie - my guess is that the wide brim hat is a necessity of life with your freckles?
I'm still shooting with my iPhone 7, but its limits and the great advances made in the more recent models are pushing me towards bitting the bullet (cost) of a newer iPhone. My phone also has limited storage, which I tend to fill and then can't shoot anymore, until I take time to clean up the storage. I mostly capture simple images of things or places outside of the best lighting conditions, when I'm roaming around scouting locations for possible golden hour photography or getting quick shots, while traveling, when getting out the DSLR and walking around with it is just too much effort. I do edit my images, but the editing is limited due to only getting jpeg images with my old iPhone.
At what point does all this technology that allows a photograph to be altered during and after its taking--at what point does photography lose its artistic realism and moves into the altered reality of digital manipulation?