
Shooting this mountain goat on the Going-to-the-Sun Road in Glacier National Park from a distance places a clear sense of scale in your photographs. Rebecca Latson photo.
You’ve heard the old saying that it’s the photographer who takes great photos, and not the camera, right? Well, to a point, that really is true.
My cameras are SLRs (single lens reflex). I can change lenses on these cameras, use filters to manipulate the way I see light, and configure my cameras’ settings for the end product. Not everybody owns (or wants) an SLR. What everybody does want – especially when experiencing the natural beauty of our national parks and monuments - is to capture great images for themselves, family, and friends, with whatever camera they happen to be carrying in their pocket or daypack.
You can get not only beautiful, but also more interesting images with any camera by applying one or more simple compositional guidelines. Many of these guidelines can be done in-camera, or they can be achieved with your photo editing software of choice.
The Rule-of-Thirds
Mentally divide your viewfinder screen into three separate sections and place your subject above, below, to the right, or to the left of center.
An example might be an elk or a bear or a chipmunk you want to photograph. Instead of placing the elk/bear/chipmunk smack-dab in the center of your view, move your subject to the lower right or left corner. This actually focuses the eye even more on the subject and adds interest to the photo because it’s not your standard center shot.
Leading Lines
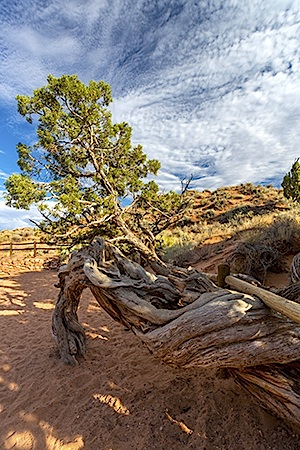
Tree trunk twisting around a fence along the trail to Landscape Arch at Arches National Park. Rebecca Latson photo.
This is a method often used by photographers to capture an audience’s attention by composing the image such that the lines (a road, a fence, a stand of trees) in that image lead the viewer’s eye from the foreground to the infinite horizon, or from one point to another point to another point ad infinitum.
A Sense of Depth
Photography is a 2-D art, but you can give a sense of depth to your 2-D image by having a foreground, middle ground, and a background.
An example would be a close-up of rocks on a beach foreground with the water in the middle and mountains or a forest in the background. Another example would be series of mountain ridges – one ridge in the foreground, another in the middle, and another ridge in the background.
A Sense of Scale
I know for a fact that many landscape photographers eschew including people or anything man-made in their photos and will remove said distractions with the clone tool (the digital software equivalent of a very fancy eraser).
There are times, though, when incorporating that car on the road, or that person next to a tall waterfall or a huge rock formation can add a needed sense of scale. I applied this guideline quite a bit during my trip to Arches National Park in Utah, this past September, to emphasize the incredible immensity of the formations. A photo of just the landscape doesn’t always convey.
Perspective
How you view your subject can add quite a bit of interest to the composition if you do something other than face the subject straight on. Get on the ground and look up at your subject. Climb a rock and look down at your subject. Stand to the side and capture your subject at an angle.
Filling The Frame
When you “fill the frame,” you are getting as much of your subject into the frame as possible, eliminating any distracting background that might shift focus from your subject. If you don’t think to get this while snapping the shot, then you can actually go in and crop (digitally cut away) your image during photo processing.
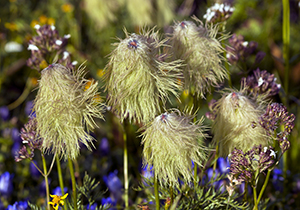
Western Pasqueflower, Glacier National Park, photo by Rebecca Latson.
Not only does it focus attention, but it also eliminates such issues as too much blown-out sky or too much dark or unattractive background. Crop that stuff out, fill the frame with your main subject, and you’ve got something beautiful that doesn’t distract the viewer.
Yes, the higher-end the camera, the more depth and clarity you will achieve in your photographs. That being said, a person using a point-and-shoot or smartphone camera can capture some amazing images too, by simply applying one or more of these guidelines listed above.
Experiment a little. Try them out the next time you are hiking/driving around a national park or monument. Capture an image without using any of these guidelines, and then capture another using one or more of these guidelines and judge for yourself which is the more interesting image. It really is about the photographer.
Story Categories:
A copy of National Parks Traveler's financial statements may be obtained by sending a stamped, self-addressed envelope to: National Parks Traveler, P.O. Box 980452, Park City, Utah 84098. National Parks Traveler was formed in the state of Utah for the purpose of informing and educating about national parks and protected areas.
Residents of the following states may obtain a copy of our financial and additional information as stated below:
- Florida: A COPY OF THE OFFICIAL REGISTRATION AND FINANCIAL INFORMATION FOR NATIONAL PARKS TRAVELER, (REGISTRATION NO. CH 51659), MAY BE OBTAINED FROM THE DIVISION OF CONSUMER SERVICES BY CALLING 800-435-7352 OR VISITING THEIR WEBSITE. REGISTRATION DOES NOT IMPLY ENDORSEMENT, APPROVAL, OR RECOMMENDATION BY THE STATE.
- Georgia: A full and fair description of the programs and financial statement summary of National Parks Traveler is available upon request at the office and phone number indicated above.
- Maryland: Documents and information submitted under the Maryland Solicitations Act are also available, for the cost of postage and copies, from the Secretary of State, State House, Annapolis, MD 21401 (410-974-5534).
- North Carolina: Financial information about this organization and a copy of its license are available from the State Solicitation Licensing Branch at 888-830-4989 or 919-807-2214. The license is not an endorsement by the State.
- Pennsylvania: The official registration and financial information of National Parks Traveler may be obtained from the Pennsylvania Department of State by calling 800-732-0999. Registration does not imply endorsement.
- Virginia: Financial statements are available from the Virginia Department of Agriculture and Consumer Services, 102 Governor Street, Richmond, Virginia 23219.
- Washington: National Parks Traveler is registered with Washington State’s Charities Program as required by law and additional information is available by calling 800-332-4483 or visiting www.sos.wa.gov/charities, or on file at Charities Division, Office of the Secretary of State, State of Washington, Olympia, WA 98504.

National parks and their natural resources belong to you. The National Parks Traveler works to ensure you know how these essential places are being cared for.
Sign Up For Our Weekly Newsletter
Unsubscribe at any time.
INN Member

The easiest way to explore RV-friendly National Park campgrounds.

Here’s the definitive guide to National Park System campgrounds where RVers can park their rigs.
Our app is packed with RVing- specific details on more than 250 campgrounds in more than 70 national parks.
You’ll also find stories about RVing in the parks, tips helpful if you’ve just recently become an RVer, and useful planning suggestions.

Comments
Photography Workshops can be found in many National Parks. This list is for 2013
Arches and Canyonlands National Parks Photography Workshops
in the Moab Utah area.