
A view of Mount Rainier at the Sunbeam Creek pullout, Mount Rainier National Park / Rebecca Latson
Last month’s article (Part 1) led you through a photographic tour of the Sunrise area of Mount Rainier National Park and discussed basics about the entrances to this national park and what one can, more or less, anticipate when visiting during each season. I gave tips regarding times, locations, and what kind of gear to use for achieving your own amazing photos, along with an explanation of a couple of items I carry in my own gearbag. I also explained my reasoning behind the creation of the Armchair Photography Guides.
Part 2 continues your photographic journey through Mount Rainier by focusing on the route from the Stevens Canyon entrance up to Paradise. You might want to download the map of the park for reference while reading this guide.
Note: The images you see in this article were captured during spring, summer, and fall, so don't get confused into thinking that all of these photos were taken during the same time of year.
OK, let's get started. From Sunrise, drive back to the White River entrance. Turn right onto SR 410 and continue down the road to the right-hand turnoff onto Highway 123 toward the Stevens Canyon entrance. Drive about 11 miles, turn right at the sign and on through the Stevens Canyon entry booth. While there are stops and pullouts for your exploration immediately after the entrance booth (Grove of the Patriarchs, for example), Falls Creek is the first spot I want to describe.
Falls Creek

The waterfall at Falls Creek, Mount Rainier National Park / Rebecca Latson
Up the road, not far past the Grove of the Patriarchs trail \head, you’ll spy a small sign with the creek’s name and a pullout to your right just before crossing the bridge spanning the creek. Take a moment to stop because the waterfall feeding into the creek is the perfect opportunity for you to practice a “silky water” shot.
For those of you unfamiliar with the term “silky water,” it’s a popular photo technique attributing a smoothed, “silky” look to a body of moving water, such as a waterfall or creek. All you need for this technique is a tripod, a little knowledge of your camera’s manual settings, and either a neutral density (ND) or polarizing filter (polarizer).
An ND filter (not to be confused with a grad ND filter) is one of those accessories you should always carry in your gearbag next to your polarizer and grad ND. It's a piece of dark glass or high-grade resin in round, square, or rectangular format that attaches to your lens and comes in varying light-to-heavy shades of gray (called “densities”). You can purchase an ND filter in a single density or one that allows for variable shades (I call them “dial-a-density” filters). If you don’t have an ND filter but do have a polarizing filter, then that will work to an extent, but you’ll have to be more careful with exposure settings since a polarizer won’t be as dark and you won’t be able to slow your shutter speed as much. You see, the silky water touch is all in the shutter speed. For this technique to work, you absolutely need to use a tripod; otherwise, your image will be totally blurred.
Even if you are not a silky water fan, you should still take the time to stop at this spot and capture the luminescence produced by the bright waterfall surrounded by dark rocks and the shadowed green shades of trees and foliage. You want the camera to let in enough light to highlight the waterfall but not so much that it would overexpose the entire composition.
After photographing the waterfall and enjoying the cool shaded surroundings, drive approximately 10 miles (stopping at available pullouts as the urge takes you) to arrive at your next official photo stop in this guide.
Box Canyon / Cowlitz River Overlook

Late afternoon view along the Box Canyon trail, Mount Rainier National Park / Rebecca Latson
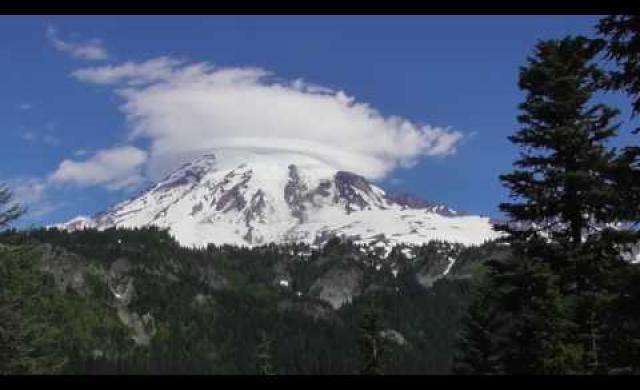
This is a larger stop with restrooms, and you’ll see the parking lot to your left, prior to crossing the bridge spanning the Muddy Fork Cowlitz River. It’s a great place to stretch your legs, and the short Box Canyon trail leads one through excellent displays of glacial striations seen on the smoothed rock formations called roche moutonees. Mount Rainier has the largest number of glaciers (25) on a single peak in the contiguous U.S., and you’ll spot evidence of these glaciers throughout the park.
You only need to walk along the trail a short distance to get a great view of “The Mountain.” Your images will be lovely, no matter the time of day, as long as you use your circular polarizer and grad ND filter to saturate the colors, accentuate the clouds, reduce any glare, and balance the variation between the brighter sky and darker ground. The shot above was captured in the late afternoon, when the light was a little harsh on both clouds and mountain. I used both polarizer and ND grad to keep from blowing out the highlights. During the editing stage, I lightened up the shadowed areas a little.

Box Canyon, Mount Rainier National Park / Rebecca Latson
While on the trail, do walk a bit further to the Box Canyon bridge. Box Canyon is slightly tricky to photograph, because of the shaded canyon and the brighter sky and foliage. You don’t want to use a polarizer here, nor do you really want to use a grad ND filter. A wide-angle lens is nice to use for this scene, anywhere from 14mm to 24mm, to capture not only the canyon, but also the canyon walls, the trees and maybe even some sky. For the Box Canyon image to your right, I used my 16-35mm lens. ISO was set to 200, aperture was f/11, and shutter speed was 1/45. The photo still required a little editing to reduce the dark shadows in the canyon and the bright highlights in the sky above the canyon.
Note: As you review your images, don't automatically delete shots that don't please you because of exposure (e.g., harsh light or too much shadow). Keep your image file and revisit that shot for another try after you’ve gained a little more editing prowess. The camera has captured all the data within your composition, and it’s up to you to bring that data out for view. One of my own most important rules of photography I always follow is to never immediately throw away an image unless it is obviously blurred.
Stevens Canyon

The view from the Stevens Canyon Road, Mount Rainier National Park / Rebecca Latson
After Box Canyon, drive through the tunnel and along Stevens Canyon Road, where various small pullouts tempt you to photograph some of the amazing scenery you view while winding your way up into the higher elevations. Stop only at pullouts. Do not stop along the road next to the high rock wall, not only due to rockfall hazard but also because the road is narrow, often with no real shoulder on your right side.
Just before you get to a major switchback the park map calls “The Bench,” there is a large pullout on the left side of the road. This pullout not only affords awesome views of Mount Rainier but, if you are visiting in July and August, should provide you the opportunity to photograph some gorgeous wildflowers.

The beauty of Mount Rainier National Park as seen from the pullout just prior to "The Bench" / Rebecca Latson
Speaking of wildflowers, you don’t need a macro lens to capture beautiful blooms. If you are using an SLR, then a telephoto works nicely, either handheld or on a tripod. If there is a breeze (and there usually is), use your camera’s focus mode that tracks moving subjects. My Canon’s setting is called AI Servo. Nikon calls this setting AF-C, Pentax calls it AF.C, and Sony calls it AF-C.
If you are using a point-and-shoot, then you not only have a built-in telephoto, but you should also have a built-in macro setting. Curiously enough, a point-and-shoot’s macro setting symbol is usually that of a flower. Smartphones capture nice flower images too, but don't focus as easily on blooms swaying in the breeze.
For a more arresting composition of your wildflower shot, fill your frame or use the Rule of Thirds: divide your LCD screen/viewfinder into three equal parts, either horizontally or vertically, and place the subject of your image in one of those thirds.

A tiger lily and the Rule of Thirds, Mount Rainier National Park / Rebecca Latson

Filling the frame with a bright red paintbrush, Mount Rainier National Park / Rebecca Latson
Snow Lake Trail

A view along Snow Lake Trail, Mount Rainier National Park / Rebecca Latson
Shortly after maneuvering that last hairpin curve at The Bench, you’ll spy a sign to Snow Lake, the trailhead of which is located on the left side of the road beside a small parking area. During July, avalanche lilies, beargrass, pink mountain heather, and Jeffrey’s shooting star all line this trail. If you decide to hike here, stop at some point, set up your tripod, and place your camera for a vertical, rather than horizontal, shot.
Station the tripod somewhat low to the ground and affix a wide-angle lens to your camera for an interesting perspective of the scene while using the trail as a leading line. If you can, include the trees all the way up to their tops. If your lens is not wide enough to do that, then concentrate more on filling your composition with the trail and the flowers. Late afternoon and early evening both produce some very nice light for this scene.
Just across the road is another imposing view of Mount Rainier, with trees forming a natural frame on each side of the mountain. Remember your polarizer and grad ND filters because late afternoon may produce a harsher light on the mountain.

A view of "The Mountain" from across the road at the Snow Lake trailhead, Mount Rainier National Park / Rebecca Latson
Sunbeam Creek
A little further up the road to Paradise, past the Louise Lake pullout, be on the lookout for a sign with the words “Sunbeam Creek.” This pullout is on your right, and you'll be treated to another imposing view of Mount Rainier. Avalanche lilies, small-flowered penstemon, and bright orange-red paintbrush line the edges of the pullout in July. Sunbeam Creek is on the other side of the road, so use caution when crossing because of the blind spot formed by a curve in the road. Depending upon the time of year, this little waterfall will be a bit of a trickle or quite busy. I visited in September and July, and you can see the water flow differences in the images below. Again, this would be a great opportunity to practice the silky water technique.

A September trickle at Sunbeam Creek, Mount Rainier National Park / Rebecca Latson

A July gusher at Sunbeam Creek, Mount Rainier National Park / Rebecca Latson
Reflection Lakes
Drive onward and upward from Sunbeam Creek. A string of three lakes parallels the road to your right, with a sidewalk paralleling the lakes. These small waterbodies are collectively named Reflection Lakes. A parking lot fronts the largest lake, and you can either walk along the sidewalk or take the steps down to the shore of the larger lake. Keep in mind, there may still be snowpack during early summer, which might hinder your efforts to get close to the shore.
Early mornings are great for capturing a mountain reflection in the still water. To the naked eye, the water is clear enough to see beneath it. For your camera’s eye to see the same thing, though, you’ll need to use the polarizer filter. While looking through the viewfinder, turn the polarizer ring until you can see beneath the water, but not so much that you diminish the reflection of Mount Rainier on the water.

A mountain reflection at Reflection Lake, Mount Rainier National Park / Rebecca Latson
Sometimes, in the morning, a mist glides over the lakes, imparting a sense of calm serenity. Work fast to grab some shots, because the mist dissipates as the sun rises higher in the sky.

A misty morning reflection of Mount Rainier at Reflection Lake, Mount Rainier National Park / Rebecca Latson
Panoramic View Area (aka Inspiration Point)
After a Reflection Lakes stop, drive up the road to a large parking area on your left, with panoramic views of the Tatoosh mountain range, the valley beyond, and Mount Rainier in all of its glory. You might even be present to photograph the distant dark specks of climbers on a snowfield. Use a wide-angle lens for your landscapes and a telephoto lens to capture those climbers.

Climbers on the mountain, Mount Rainier National Park / Rebecca Latson
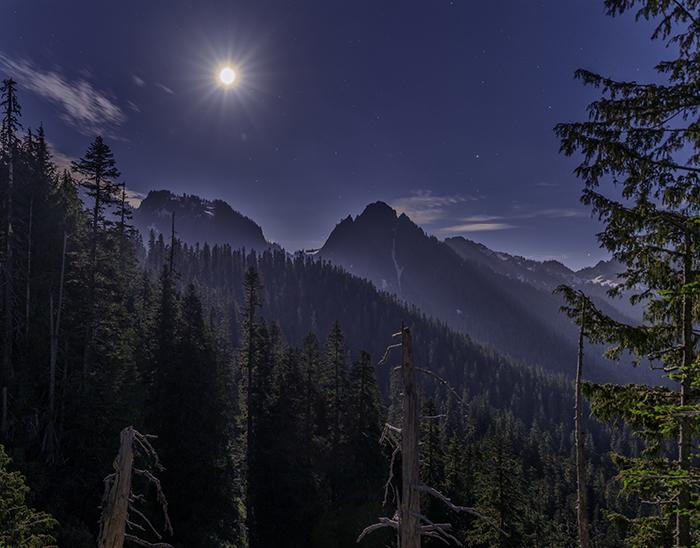
This view area is perfect for early morning sunrise images as well as middle-of-the-night star and moon shots. If you visit this area during the night for star or moon photography, affix your widest-angle lens to your camera. On a moonless night, you’ll need to turn off the auto focus (AF) and use manual focus (MF). Set your lens focus ring to infinity or just a tad before the infinity mark to get a clear view of the mountain (hint: it’s a good idea to practice this in the daylight to ensure the correct focus setting). Set your ISO anywhere from 800 to 6400, open your aperture wide (between f2.8 – f4), and use slow shutter speeds from 10 seconds to 30 seconds. You’ll find it necessary to switch on a flashlight or headlamp to see your camera’s settings. I prefer a headlamp because it leaves both hands free.
If you visit this view area during a moonlit night, then you might be able to squeak by using your camera’s auto focus, since the light of a full moon is bright enough for you to see your own shadow (truth). You’ll definitely be able to use lower ISOs, smaller apertures, and a faster shutter. For the photo of Mount Rainier below, my settings were ISO 1000, f5.0, shutter speed 10 seconds. That bright line you see in the middle of the composition, below the mountain, was the trail of a SUV as it made its way down the road toward Longmire.

Mount Rainier in the midnight moonlight, Mount Rainier National Park / Rebecca Latson
Don’t focus on just the mountain, though. Turn your camera around to photograph the moon and/or stars over the Tatoosh mountains. It’s not all about The Mountain, y’know.
The Tatoosh mountain range by the light of the full moon, Mount Rainier National Park / Rebecca Latson
If you choose to make an early-morning foray to this view area, perhaps you'll encounter mist clinging to the mountains' flanks. You’ll need to utilize your grad ND filter because a definite division exists between light and dark on the landscape.

Early morning over the Tatoosh mountain range, Mount Rainier National Park / Rebecca Latson
A View Of Nisqually Glacier
Just a little further up the road is the junction to either Longmire or Paradise. Turn right and start the final climb up to Paradise. You’ll pass another unnamed pullout to your left with a nice view of Mount Rainier and Nisqually Glacier. The trees make a wonderful natural frame for your wide-angle images. Pull out your telephoto lens, too, and get some close-ups of crevasses and blue-tinged ice chunks “flowing” down that “river of ice.” On a sunny day, try applying an f-stop of around f9-f11 or higher, keep your ISO around 160-200, and use a fast shutter speed of 1/500-1/640 or more; a telephoto of the glacier means you are focusing on light colors and bright snow. You don’t want to risk overexposing your image.

Nisqually Glacier: a "river" of ice, Mount Rainier National Park / Rebecca Latson

A close up of Nisqually Glacier, Mount Rainier National Park / Rebecca Latson
The Paradise Sign
You’re almost there when you see the large NPS Paradise sign to your right. Pull over and get a selfie with the sign to show that you have literally reached Paradise. If there are others present, offer to get a group photo using one of their cameras, so all of them can get in the shot. I had fun photographing a family in front of the sign, as well as a lone woman, like myself. All of us were there to marvel at the beauty of this national park in Washington state.

The photographer at Paradise, Mount Rainier National Park / Rebecca Latson
Next month, Part 3 of this Mount Rainier National Park Armchair Photography Guide will focus on photo ops within the Paradise area. Stay tuned!


Comments
Thanks again, Rebecca. Someday, someday . . . I'm gonna make it to Ranier.
But the caption in the next to last photo is simply wrong.
It should read: "The photographer IN Paradise."
;=}
Again - your work is so wow-worthy.
Thanks, everybody, for the kind words! They are always much appreciated.
Muchas gracias for your fine photo articles, Rebecca! My favorite this time is the moon over the Tatoosh Range. Another spot photographers should check out is Lake Louise. Park in the long turnout just below Sunbeam Ck. and find the Wonderland Trail across and right below the road. A sign marks a short steep side-trail that leads about a hundred yards to the lakeshore. The view of Mount Rainier is blocked by Faraway Rock (named before the Stevens Canyon Road was built), but the open slopes across the lake are one of the best places in the park to see bears, early mornings in berry season.
Excellent work! Perfect tips! Hope to visit again some day with family this time.