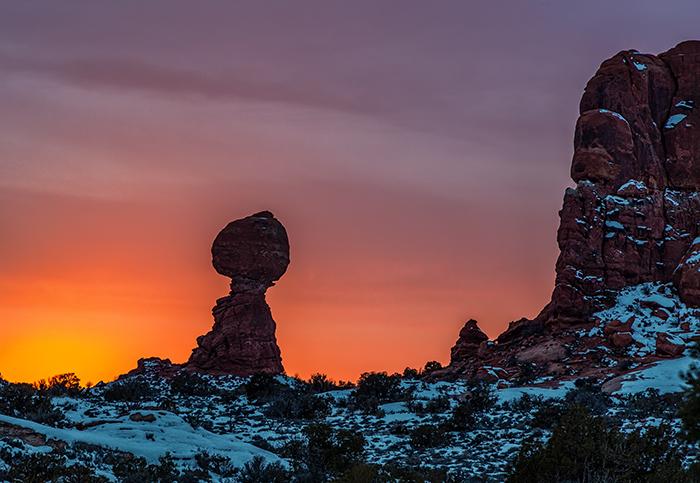
Sunset over Balanced Rock, Arches National Park / Rebecca Latson
Images tell stories. Images also teach and inspire us. Photography is a great educational tool, and I enjoy capturing subjects and scenes about which I have no clue because it encourages me to learn about what I’ve photographed.
I love geology. That’s my “thing.” To me, the terrain and wildlife are the skin, hair, and organs of a national park, and the geology is the skeleton, parts of which are exposed to reveal the landscape's interior anatomy. During my recent visits to Arches National Park, Canyonlands National Park, Zion National Park, and Bryce Canyon National Park, I came away with all sorts of shots emphasizing the geological forces at play in each location. I’m going to use the photos I’ve captured during those visits to teach you a little bit about their geology. Along with these tidbits of information, I'll provide suggestions that will help you frame a scene that stokes your own curiosity to make for more than simply a “grab and go” shot.
OK, class, here we go.
Arches National Park

Layers of red sandstone, Arches National Park / Rebecca Latson
At Arches National Park, you’ll see plenty of red sandstone, arches, and balanced rocks. What makes that sandstone so red? How did the arches and balanced rocks form?
Have you ever heard of “iron oxide”? It’s a chemical compound that gives rusting iron that red color. Hematite is an iron oxide mineral and it’s the primary mineral coloring the sandstones in this park. You may even own hematite in the form of shiny, silvery-black jewelry. A piece of hematite will look black or gray, but when you scratch it against something hard, it leaves a brick- or blood-red streak.
To make my red-rock shot interesting, I contrasted it with rocks of other colors. When you frame your own photo of a scene, think about the contrast your subject might make in relation to other things around it.

Red and yellow sandstone, Arches National Park / Rebecca Latson
In the image below, I filled the frame entirely with that red rock to emphasize its hue, as well as the textures and patterns exhibited by the different layers. Filling the frame of whatever it is that interests you can really pop out and grab your viewer's attention.

Filling the frame with red sandstone layers, Arches National Park / Rebecca Latson
The arches in Arches National Park are composed of sandstone, which is a sedimentary rock. Sedimentary rocks are created from bits and pieces of minerals and other rock particles, all glued together with some sort of cement, like calcium carbonate or gypsum or silica. Think about sand grains on a beach. Over millions of years, those sand grains will be cemented together to form the building blocks for Double Arch, Pine Tree Arch, and Tunnel Arch.
The process of arch formation starts when the sandstone is cracked or fractured. Those open spaces allow wind to scour the rock particles away and rain (acid rain) to eat away at the cement holding together all those red sand grains. Ice freezes and expands to break apart more rock. Sharp corners become rounded. What starts out as thick beds of sandstone erode into slabs of rock called “fins.” Further erosion creates windows or “inset arches." Gravity also plays its part in the breakdown process. Eventually, those inset arches erode from one side of the rock completely through to the other side, and that small arch enlarges into something similar to Delicate Arch, Landscape Arch, or Turret Arch.
Turret Arch stands out in the crowd because it’s isolated by open space. Emphasize your subject's solitary position with a wide-angle lens to capture that isolation, along with the surrounding landscape, weather, and lighting conditions.
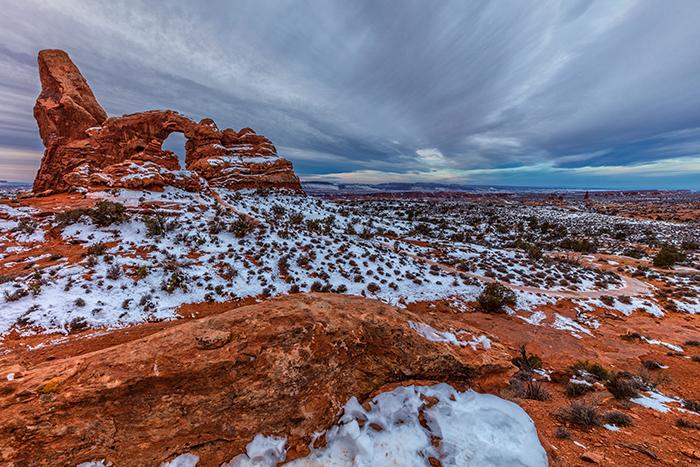
A moody morning over Turret Arch, Arches National Park / Rebecca Latson
Make note of light conditions around you as the day progresses. As the afternoon waned in the Windows section of the park, I made use of a closer view of Turret Arch to underscore the sunlight streaming through the arch opening and shining on the little tree and red rock..
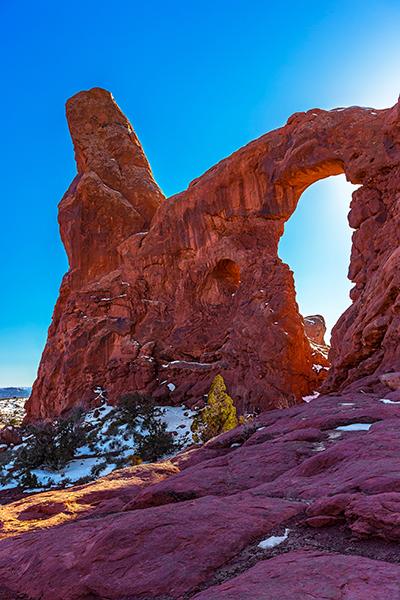
Afternoon sunlight through Turret Arch, Arches National Park / Rebecca Latson
If you are near or on a trail leading to your subject, create a "leading line" with that trail, and the viewer's eyes will follow the trail to its terminus, which, in the image below, was Turret Arch.
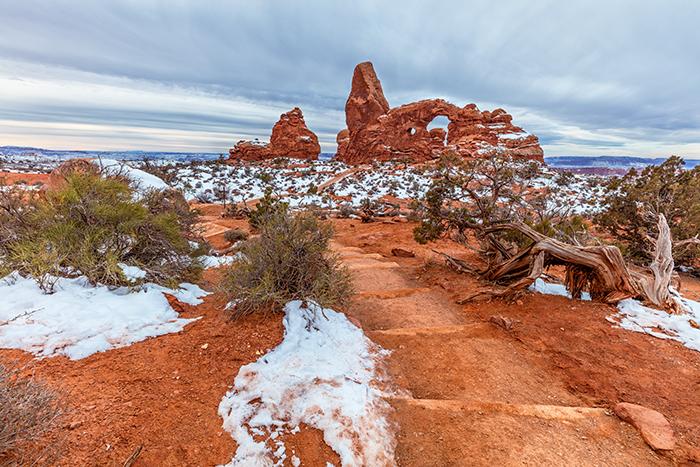
A trail leading to Turret Arch, Arches National Park / Rebecca Latson
Driving through Arches National Park, you can’t help but notice the massive layers of red rock, some layers eroding noticeably faster than others. This type of erosion, known as “differential erosion,” is what shaped Balanced Rock. The upper portion of this rock formation is more resistant to erosive forces than the rest of the formation. Eventually -- tomorrow or a hundred years from now -- the "neck" of Balanced Rock will no longer continue to support the "head," which will topple to the ground. So photograph this formation while it's still in one piece.
Sunrise makes just about any scene special, and sunrise images of Balanced Rock are quite dramatic. The brilliant sun creates a silhouette while brightening and saturating the colors in the background.

Sunrise over Balanced Rock, Arches National Park / Rebecca Latson
Capture different perspectives of your subject, if you are able to. Walking around Balanced Rock, I noticed changes in the shape of its "head." I also captured a telephoto image to allow a closer focus on my subject. I guess you could say I got a "head shot" portrait.

A different perspective of Balanced Rock, Arches National Park / Rebecca Latson
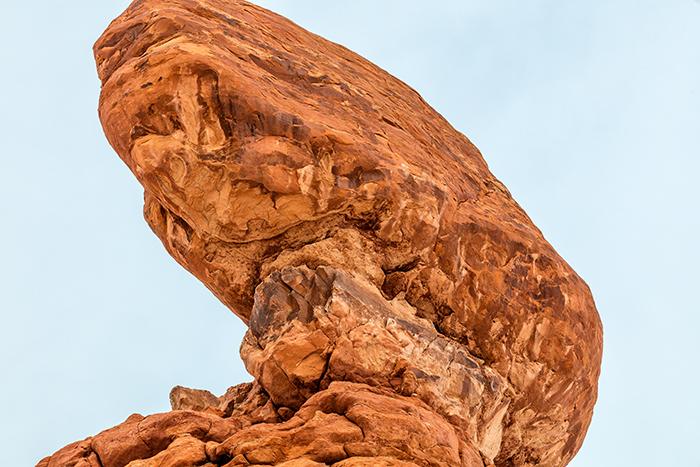
I'm ready for my close-up, Mr. DeMille, Arches National Park / Rebecca Latson
I'm a big believer in including people or man-made objects in some of my images to represent scale and provide a frame of reference. In turn, a frame of reference anchors the viewer's eye to the image and helps them understand what they are seeing in that image.

The size of a human versus the size of Balanced Rock, Arches National Park / Rebecca Latson
Canyonlands National Park
Canyonlands National Park scenery reminds me of a slice of cake made from chocolate, vanilla, and strawberry layers in between which are spread frostings of buttercream, pudding, and fruit (hungry yet?). These rock layers are primarily sandstone, in addition to shale and limestone, all sedimentary rocks. Hematite, limonite, pyrite (fool's gold), and chlorite minerals provide the red, pink, mauve, yellow, black, and green rock colors. Deposited atop one another at sea level, these layers upon layers of sediments were uplifted millions of years later by movement of the earth’s crust. The average elevation of this national park is around 5,000 feet above sea level. That’s quite a bit of uplift exposing all those rocks to the elements of erosion. An excellent place to photograph the different layers and colors of this rock “cake” is the Green River Overlook in the Island in the Sky District. Telephoto shots work best to zoom in and focus on these layers.

Colorful rock layers in a geological cake, Canyonlands National Park / Rebecca Latson
Because Canyonlands is more than just a canyon, I made sure to get plenty of telephotos of these rock structures to help define and flesh out the pieces and parts comprising the entirety of this national park.

A result of uplift and erosion, Canyonlands National Park / Rebecca Latson

Geology up close and personal, via a telephoto lens, Canyonlands National Park / Rebecca Latson
Differential erosion like that described in Arches National Park also occurs in Canyonlands. Results of this type of erosion can be seen in the crazy hoodoos located in the Needles District of Canyonlands.
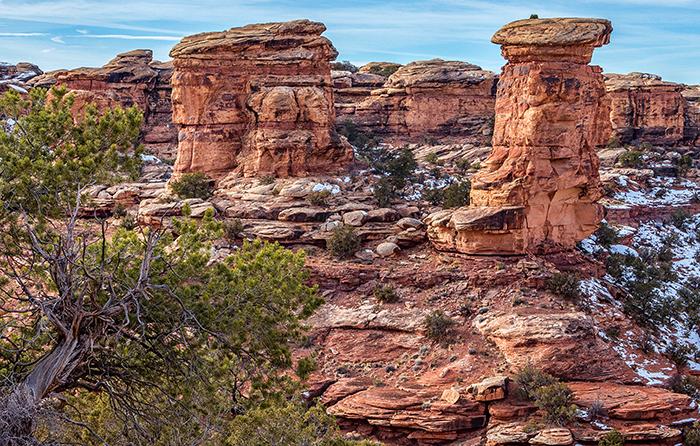
Needles District hoodoos, Canyonlands National Park / Rebecca Latson
Zion National Park

Layers of sandstone, Zion National Park / Rebecca Latson
Zion National Park is geologically varied, ranging from deep canyon downcutting by the Virgin River to inset arches to “petrified” sand dunes. For me, the main attention-grabbers are the views of cross-bedded sandstones comprising those great ancient, lithified dunes you see along the Zion-Mount Carmel Highway, formed in an environment similar to the Sahara Desert. Wind-blown sand grains piled up, then toppled over after reaching a certain height, tumbling to the bottom and starting the build-up process anew, creating the layers of cross-beds we see in the rock today. Cross-beds dip (slant) downward in the direction of the wind. In the photo below, the wind blew from right to left. Believe it or not, some of the sand in the sandstone at Zion may have originated as far away as the ancient Appalachian Mountains, transported west via rivers and streams.

An ancient, cross-bedded sand dune, Zion National Park / Rebecca Latson
As mentioned earlier, filling your frame is a great technique to call attention to a particular sight or subject. I wanted to call attention to these sandstone cross-beds, so I filled my frame and used a couple of other techniques, such as including a tree for reference and placing that tree to the side of the composition (Rule-of-Thirds technique).

Filling the frame with cross-bedded sandstone, Zion National Park / Rebecca Latson
The layers of sandstone fascinated me, so I moved close to photograph their different colors, shading, and graininess. You can capture close images like this in one of several ways: your point-and-shoot camera should have a macro mode (usually it's an icon with either a flower or a microscope on it), you can use a macro lens on your SLR, or, with a telephoto lens or the zoom function on your point-and-shoot camera, you can zoom in on your subject, and then crop it later if you want an even closer look.

A close-up look at colorful layers of sandstone cross-beds, Zion National Park / Rebecca Latson
The perspective you use when getting a shot makes quite a difference in grabbing your viewer's attention. For the image below, I knelt in a ditch between the road and the cross-bedded sandstone, tilting my camera lens slightly upward. I also used a wide-angle lens, which creates an interesting perspective. As a matter of fact, try this exercise the next time you affix a wide-angle lens of 14mm to 18mm on your camera: Look through the viewfinder as you move the lens up and down to see the change in your composition.
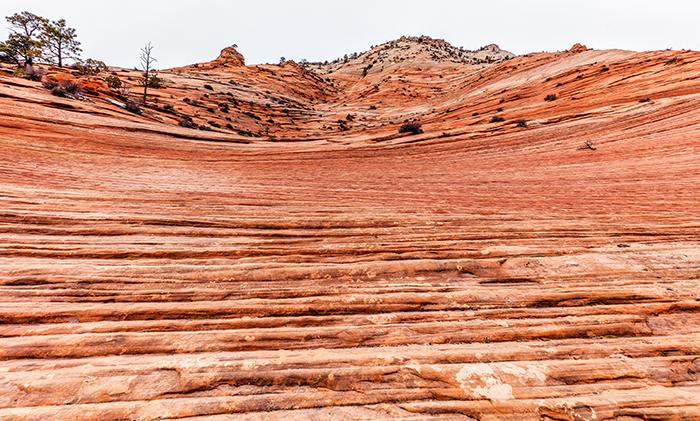
Looking up for a different perspective of sandstone cross-bedding, Zion National Park / Rebecca Latson
Naturally, I had to photograph the iconic Checkerboard Mesa. It's pretty much a requirement when you visit this national park, you know. Vertical joints on this cross-bedded lithified dune create a “checkerboard” or “graph paper” pattern in the rock. As erosion continues, those vertical joints will grow wider and deeper.
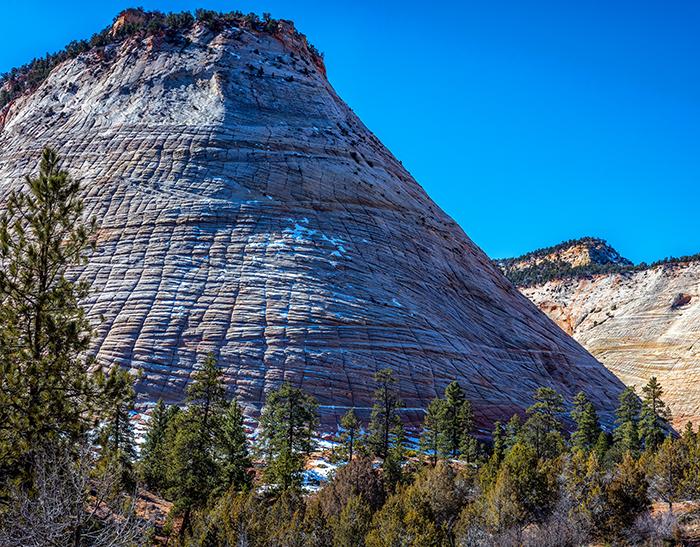
Checkerboard Mesa, Zion National Park / Rebecca Latson
Speaking of vertical joints, the next time you visit Zion and are driving along the Zion-Mount Carmel Highway, take a look at the rock walls on either side of the road. Notice the trees growing within the long joints? Those tree roots are part of the erosion process, prying apart the rock and widening the joint opening as their roots grow. Melted ice, wind, and the occasional rain storm scour away the rock fragments and dissolve the cement in sandstone.

Growing out of an ancient sandstone dune, Zion National Park / Rebecca Latson

Trees growing out of the sandstone joints, Zion National Park / Rebecca Latson
Bryce Canyon National Park
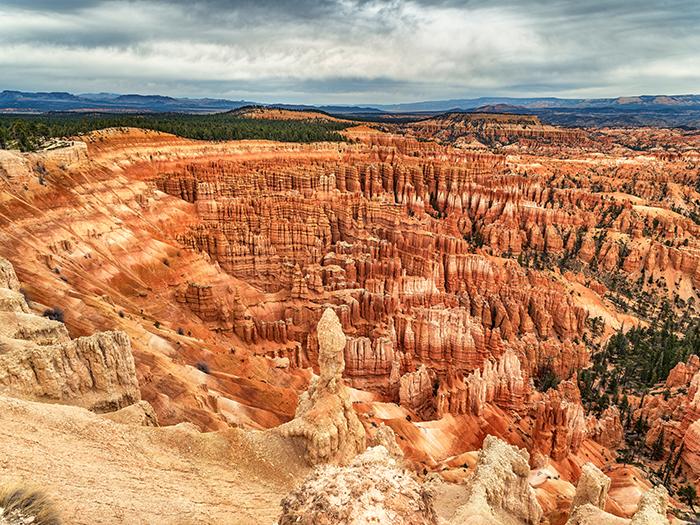
A wide-angle view of the amphitheater from Inspiration Point, Bryce Canyon National Park / Rebecca Latson
Bryce Canyon National Park is not so much a canyon like the Grand Canyon, but a series of deep, sloping, semi-circular depressions called "amphitheaters." As you hike along the trails within these amphitheaters, you'll notice the "crumbly" texture of the walls, fins, hoodoos and spires. These surreal formations consist mainly of easily-eroded limestone, with some sandstone, siltstone, and dolomite thrown in for good measure, all of which are sedimentary rocks. The main erosive force here is water, in the form of frost wedging. In addition to the ice, acid rain, flash flooding, wind, and gravity all play important parts for shaping this national park's scenery.

An early morning scene of crumbly-rock walls, fins and hoodoos along the Queens Garden Trail, Bryce Canyon National Park / Rebecca Latson
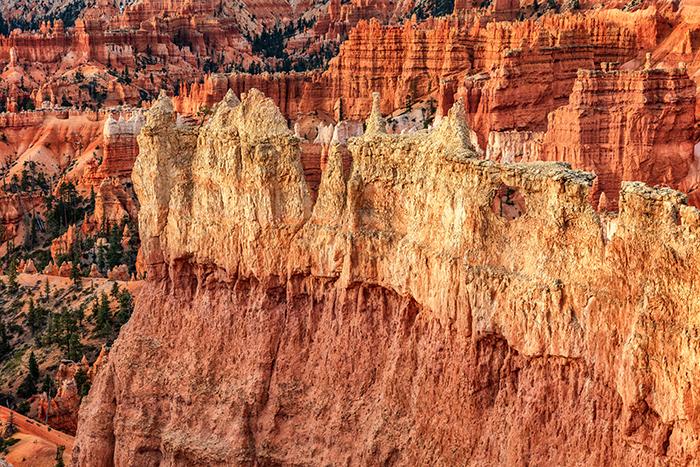
A wall of crumbly rock along the Queens Garden Trail, Bryce Canyon National Park / Rebecca Latson
According to the NPS website for Bryce Canyon, the temperature goes above and below freezing each day for 200 days a year. When water freezes, it expands (remember what happened the last time you put your can of cola or beer into the freezer and forgot about it?). This expanding ice pushes out/breaks up the rock. When water melts, it carries those rock particles downward via gravity. Acid rain dissolves the limestone. What starts out as a wall of rock becomes separate fins of rock, which, in turn, erode into windows, then spires and hoodoos. Eventually, those spires and hoodoos break down and the whole process begins again with further erosion of the amphitheater wall. Inspiration Point and Bryce Point are two great viewing areas where you can see the entire erosional diorama. FYI, hoodoos look more like totem poles, with their curvey shapes up and down the formation. Spires taper upward, wider at the bottom and narrower up top.
To demonstrate the effects of a process, find something to photograph that is the result of that process. To really demonstrate the effects of constant erosion in Bryce, I chose not a formation, but a tree with exposed roots to remind everybody that, at one point in time, those roots were once covered with dirt that is now washed further downslope.

Keeping a toe-hold at Sunrise Point, Bryce Canyon National Park / Rebecca Latson
Remember my earlier advice to find ways to highlight a subject's isolation? In this case, I thought it was pretty wild to see trees like the ones below growing on top of a hoodoo. Talk about isolated. Nowhere to grow but up.

A precarious perch for some Ponderosa pines, Bryce Canyon National Park / Rebecca Latson
Note the "totem pole" shape of the hoodoos in the image below.

Hoodoos: stone "totem poles," Bryce Canyon National Park / Rebecca Latson
For a closer inspection of the rock, I filled the frame with crumbly colors of orange, yellow, and mauve, using a lens cap for scale.

Crumbly rock, Bryce Canyon National Park / Rebecca Latson
This article is all about photography and geology, and what I have learned about geology from my photography. This article is also about how you can take the techniques I utilized for my geology shots and apply them to your own compositions, which may teach you about biology (the birds and wildlife), botany (flowers, plants, and trees), or entymology (insects).
The next time you visit a national park, be curious. Take a look at your photos. What would you like to learn from those photos? Indulge that curiosity. Ask a ranger or volunteer. Attend a park program. Peruse the visitor center’s bookstore. Learn something new from your photography and pass it on to your viewers. Not only will they be impressed with your subject knowledge, but learning an interesting fact about a scene might encourage your viewer to visit that national park for themselves. Your amazing photos are visual teachers for yourself and for others. Cool, yeah?

From rock wall to fin to hoodoo, Bryce Canyon National Park / Rebecca Latson



 Support Essential Coverage of Essential Places


Comments
Rebecca --
I always enjoy your photo "lessons", but this that includes geology, meteorology and the like is particularly impressive -- plus it includes some of my favorite places! Great thoughts.
-- Susan
I'll second Susan's comment
I'll third it!