You don't need high-end gear to go birding. Fairly inexpensive entry-level gear can get you going, and you can upgrade as your budget allows. Photo via
Bigstock Photo.
Every hobby has its collection of necessary equipment. You can’t golf without clubs, balls, and tees. You can’t knit without a collection of needles and a room full of yarn. You can’t (and definitely shouldn’t) skydive without a parachute.
Birding is no exception. The beauty of birding as a hobby, however, is that there are distinct stages of equipment necessity. The gear can be reduced to a minimum – picture golfing with only a putter and 5-iron in your bag. You’re not going to win the Masters that way, but as a beginner you could still enjoy a fun round of golf. With a Spartan cache of equipment, the new birder will still launch a life list like we all do with the common local birds and enjoy every minute of it.
Will better and more expensive equipment make you a better birder? Only if you learn the ropes by going out every day and birding. That $800 driver isn’t going to make you tear up the links like Tiger Woods the first day you go golfing either. You start with the basics, you acquire skills, and you buy the toys that make the hobby more rewarding as you go.
With that in mind, let’s look at the gear a new birder will want, and the gear a birder will eventually want as their hobby blossoms.
Pay Attention To Your Senses
The most basic equipment needed to watch birds is bequeathed to most of us at birth. Eyes and ears. If you can see a bird and hear its song, you are, by definition, a bird watcher. If you want to become a birder (loosely defined as a birdwatcher that keeps lists of birds seen to compete with others or against oneself), you’re going to need optics to aid in spotting the birds, guides to help identify them, and something to carry everything in.
Optics are to birding what golf clubs are to golf – the tools that make the whole endeavor easier and more rewarding. In my experience, some birders even like to talk about optics more than they like to talk about birds. The basic optics that will be the first investment a birder makes are binoculars. You can bird without them, but it sure is easier to identify a 5-inch long object from 100 feet away with the help of some magnification.
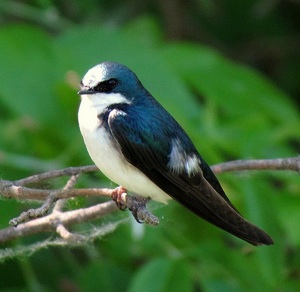
This tree swallow is about 6 inches long. A good pair of binoculars would help you count its feathers. Kirby Adams photo.
Every pair of binoculars will have a set of numbers associated with it that represent the magnification and the diameter of the objective lens. This will be expressed as “8x50” or “10x42.”
The first number is the magnification. An 8 means the object is magnified by eight times. The second number is the diameter, in millimeters, of the objective lens. That’s the wide end of the binoculars. So 10x42 indicates a magnification of 10 times with a 42mm objective.
The size of the objective is important because a larger lens allows more light to enter, making the image brighter. So you want the biggest objective possible, right? Not necessarily. As objectives become larger, the weight, and often the overall size of the binoculars increase. If your binoculars are hanging by a neck strap, extra weight can be a killer. I always wear a harness to take the weight off my neck, no matter what size of binoculars I use. Harnesses cost about $20 and are worth every penny. Neck pain makes birding (and driving and sleeping) miserable. I use Vortex brand harnesses and love them.
The size of the binoculars and how they’re worn is also something of special consideration for women, given their torso anatomy. Let’s just say it’s wise for anyone, women in particular, to try out how binoculars hang from a given neck-strap or how a chest harness sits before purchasing.
Bigger Is Better, Right? Not Always
Back to the numbers, can we also assume more magnification is always better? Again, not necessarily. For years, experienced birders have considered 8x magnification to be the way to go. With 8x the field of view is larger, the image brighter (vs. a higher magnification with the same objective diameter), and effects from hand shake or movement are lessened. With 10x or 12x, the field of view becomes increasingly more narrow, so a warbler flitting among branches may keep exiting the view making it difficult to follow.
On the other hand, with higher magnification more details are visible and that may be the difference between an unidentified bird and a Blue-headed Vireo. These days, 10x binoculars are becoming increasingly more accepted among the seasoned birders, but the debate rages on. It’s a running joke that a birder will say he really needs 9x, since we never seem to be satisfied with what we have or what’s available.

You can't identify birds on this rock at Glacier Bay National Park without a good spotting scope or binoculars. Kurt Repanshek photo.
Once you’ve figured out the numbers, you’ll notice that there are 8x42 binoculars that cost $50, some that cost $250, and some that cost $2700. The reason for the extreme range of price is the quality of the glass and coating. Many companies produce entry-level binoculars for under $100. I spent my first two birding years with inexpensive Bushnell H2O binoculars that gave me a lot of good bird sightings. I continue to recommend Bushnell’s entry level optics as some of best bang for your buck when on a tight budget.
Sooner or later, you’ll be birding enough that higher quality binoculars are called for. In the range of $250 to $400 there are a lot of great options. Bushnell and Nikon have models in this range that perform splendidly. Vanguard makes the excellent Endeavor series that I reviewed here last summer. I carry Nikon Monarch ATB 10x42’s as my everyday binoculars. These can generally be had for around $250 and offer crisp, bright viewing.
Spending Your Inheritance On Optics
Then the day will come when you can justify investing significantly more money into your optics. Looking through high-end binoculars can be an almost religious experience for a birder accustomed to lesser optics. The images are incredibly sharp and bright. The first time I looked through a pair of Swarovski’s EL-50 Swarovision 10x50’s I felt like I could reach my hand in front of the binoculars and touch a bird that was 50 yards away. I also handed them very gingerly back to the sales rep because I didn’t have $2,600 to buy them.
Are they worth the extra money? Yes, the image is actually that much better, but every birder has a budget and you need to make that call. When you can take a whole birding vacation to Everglades National Park for the cost of a binocular upgrade, the choice can be difficult.
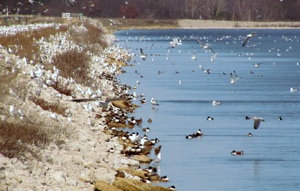
Telling these birds apart requires a decent spotting scope. Kirby Adams photo.
Now, we have a group of ducks floating on a lake about 200 yards from shore. Your binoculars may show you that the birds are indeed ducks, but possibly not much more than that. You need more magnification. You need a spotting scope.
A spotting scope is like half of a binocular. Technically, it’s a monocular. A scope is nothing more than a telescope that is modified for use on land-based objects rather than heavenly bodies. For example, a telescope’s image is upside-down, which would be quite disconcerting when identifying a bird. This is rectified in a spotting scope.
Luckily, we already know most of what we need to know about scopes because the numbers mean exactly what they do for binoculars. A 60x82 scope has a magnification of 60x and an objective lens diameter of 82mm. A 20-60x60 has a zoom magnification of 20x to 60x with an objective of 60mm.
I started out with a nifty entry-level scope from Bushnell called the Spacemaster. It’s a 20-60x zoom and only cost around $200 when I got it. A little further up the budget ladder are some scopes that retail around $500 to $800.
The Vanguard Endeavor scope is a great scope in this range and a good entry-level scope for digiscoping – attaching a camera to the scope to take photographs through it. In the $1200 - $1700 range are some even higher quality scopes. I personally don’t leave home without my Nikon ED-82 20-75x82 scope. At around $1,700, this scope gives you very close to the quality of some of the top-of-the-line models for about a thousand dollars less.
At the upper end are the premium scopes from companies like Leica and Swarovski that can cost from $2,500 to nearly double that. As with the binoculars, the quality is noticeable and real. The birder’s budget will have to determine if the investment is worth it.
You Might Need Support For Your Optics
It would be an exaggeration to say a spotting scope is only as good as the tripod it’s mounted to, but an inferior tripod can definitely make scoping distant birds a stressful undertaking. I don’t think enough birders pay enough attention to (or enough money for) their scope tripods. Tripods designed for cameras are fine for scopes. You do want to make sure the tripod can handle the weight of the scope. I find tripods designed for video camera-use are excellent for spotting scopes. They usually have controls that make panning and following birds easy. Another feature to look for is how the legs extend and lock. Quick release clips make life and tripod erection a lot less stressful than screw locks. By the time you unscrew all the legs, the birds have left the pond and migrated half way to their nesting grounds.
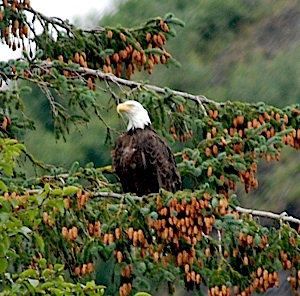
Imagine this bald eagle viewed through a high-end spotting scope. Kurt Repanshek photo.
Lastly, but perhaps as important as everything else, is weight. Here’s where you can end up spending a good bit of money for a tripod, but you can also save some muscle ache on a long haul. Carbon fiber tripods provide exceptional durability and light weight, but can be comparatively expensive versus aluminum alloy or fiberglass models. I use a Vanguard AltaPro 263AGH with a ball head for easy panning. For around $250 it’s a wise investment as a compliment for any scope.
There you have it – the very first things you need to know about binoculars and spotting scopes. In our next installment, we’ll figure out how to identify those darned birds once we have a good view of them in our optics. Birding field guides, software, apps, and more are making identification easier and more fun than ever.
Story Categories:
A copy of National Parks Traveler's financial statements may be obtained by sending a stamped, self-addressed envelope to: National Parks Traveler, P.O. Box 980452, Park City, Utah 84098. National Parks Traveler was formed in the state of Utah for the purpose of informing and educating about national parks and protected areas.
Residents of the following states may obtain a copy of our financial and additional information as stated below:
- Florida: A COPY OF THE OFFICIAL REGISTRATION AND FINANCIAL INFORMATION FOR NATIONAL PARKS TRAVELER, (REGISTRATION NO. CH 51659), MAY BE OBTAINED FROM THE DIVISION OF CONSUMER SERVICES BY CALLING 800-435-7352 OR VISITING THEIR WEBSITE. REGISTRATION DOES NOT IMPLY ENDORSEMENT, APPROVAL, OR RECOMMENDATION BY THE STATE.
- Georgia: A full and fair description of the programs and financial statement summary of National Parks Traveler is available upon request at the office and phone number indicated above.
- Maryland: Documents and information submitted under the Maryland Solicitations Act are also available, for the cost of postage and copies, from the Secretary of State, State House, Annapolis, MD 21401 (410-974-5534).
- North Carolina: Financial information about this organization and a copy of its license are available from the State Solicitation Licensing Branch at 888-830-4989 or 919-807-2214. The license is not an endorsement by the State.
- Pennsylvania: The official registration and financial information of National Parks Traveler may be obtained from the Pennsylvania Department of State by calling 800-732-0999. Registration does not imply endorsement.
- Virginia: Financial statements are available from the Virginia Department of Agriculture and Consumer Services, 102 Governor Street, Richmond, Virginia 23219.
- Washington: National Parks Traveler is registered with Washington State’s Charities Program as required by law and additional information is available by calling 800-332-4483 or visiting www.sos.wa.gov/charities, or on file at Charities Division, Office of the Secretary of State, State of Washington, Olympia, WA 98504.

National parks and their natural resources belong to you. The National Parks Traveler works to ensure you know how these essential places are being cared for.
Sign Up For Our Weekly Newsletter
Unsubscribe at any time.
INN Member

The easiest way to explore RV-friendly National Park campgrounds.

Here’s the definitive guide to National Park System campgrounds where RVers can park their rigs.
Our app is packed with RVing- specific details on more than 250 campgrounds in more than 70 national parks.
You’ll also find stories about RVing in the parks, tips helpful if you’ve just recently become an RVer, and useful planning suggestions.
