Your national park photographs need not suffer just because the sky overhead is cloudy or overcast. You simply work with what you have.
This is, more or less, a follow-up to the previous article I wrote about sunrises, sunsets, and silky waters. It all began with a remark made by the husband of a San Antonio couple with whom I’d struck up a conversation at Delicate Arch in Arches National Park.
“Gee, too bad it’s such a cloudy day up here for pictures. You can’t really see everything, can you?” If I had a quarter for every time I’d heard various iterations of that cloudy-day remark, I would be able to afford a Canon 800mm lens by now.
Digging into my photographer’s vest, I pulled out my Lee 4x6 .9 graduated neutral density filter and presented it to the San Antonio man while smiling broadly. “Clouds are awesome for photography!” I proceeded to explain the capabilities of a grad ND filter – especially when coupled with a circular polarizer filter (CPL).
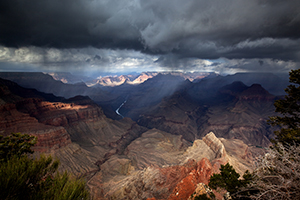
Incoming storm over Pima Point along the South Rim of Grand Canyon National Park. Rebecca Latson photo.
As I talked, I watched comprehension dawn in the man’s eyes; it was one of those Oh-I-get-it-now kind of moments.
Maybe I’d planted the seed of a new photographic idea in his head; I hoped so. Landscape photographers aim to create one or more of the following with their camera and the beautiful park scene before them: interest, emotions, drama.
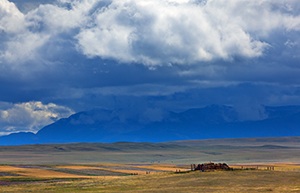
Looking towards the mountains of Glaicer National Park from Highway 89. Rebecca Latson photo.
Much like the capture of a sunrise or sunset, a cloudy day cuts to the heart of all of these, but you need the right tools to capture the results: a CPL and a grad ND filter. These filters may be used separately or together, and they are de rigueur gear for every camera bag.
What Does A CPL Do?
Working on the same principle as your sunglasses, a circular polarizing filter (CPL, or polarizer, for short) contains specially-treated glass that - when the sun hits the glass at a certain angle - acts to reduce glare and reflections on water, windows and vegetation, remove haze, enhance a scene’s color, create a darker sky, and delineate cloud texture. In some instances, a CPL can eliminate water glare to the point you can actually see beneath the water.
CPLs come in regular and slim profiles.
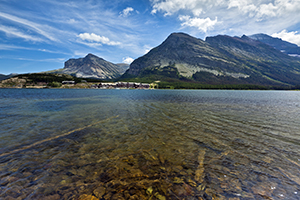
The view across Swiftcurrent Lake, toward the Many Glacier Hotel, Glacier National Park. Rebecca Latson photo.
If you look closely at a regular CPL, you will see threads on both sides of the filter. One side screws onto the end of the lens, and the other side has threads allowing other filters to screw on top of that filter (this is called “stacking”).
Slim CPLs don’t have that stacking capability and thus the profile looks – well – slimmer. Since I shoot landscapes with wide-angle lenses of 16- to 24mm, I prefer slim CPLs because a regular CPL on a wide-angle lens tends to create “vignetting.”
Vignetting is that old-timey look you see in photos where the top and edges are darkened to focus more on the subject. In the case of a regular CPL in use with a wide-angle lens, the top and edges are blackened in a very unattractive manner.
What Does A Grad ND Do?
If you read my previous column, then you already know, but if not, or if you need a refresher explanation, then please read on. A graduated neutral density filter (grad ND) is a piece of glass or resin that is half clear - half gray shade. The shading comes in different strengths and may have a “hard” edge or a “soft” edge. A hard edge grad ND means the gray shading is the same strength all the way to the halfway mark of the filter where it meets the clear edge. A soft edge grad ND means the shading lightens incrementally as it nears the clear part of the filter.
A grad ND filter is especially helpful in compositions that have some sort of a horizon line where the horizon bottom is darker, while the scene above the horizon is excessively bright, light and cloudy, or dull and cloudy.
You see, your camera is going to meter off of either the brighter sky (in which case, the ground/mountains/forest in your scene will be exceedingly dark) or meter off the darker part of the image (in which case your sky is going to be totally blown out and all details will be lost and possibly not retrievable even with photo editing). A grad ND filter evens this out, while darkening and delineating cloudy skies.
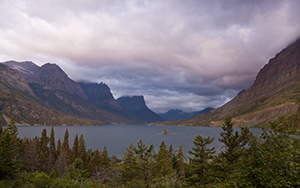
A cloudy late afternoon at the Wild Goose Island Viewpoint on St. Mary Lake, Glacier National Park, Montana, captured without the use of a grad ND filter. Rebecca Latson photo.
Grad ND filters come in round, square, and rectangular sizes. The round filters screw on the thread-end of the lens just like CPLs and have a rotating mount just like a CPL. Round grad NDs allow for stacking of a CPL as well. Square and rectangular sizes need a special holder, or can be hand-held.
I choose to hand-hold my grad ND flush against the lens because it’s easier and quicker for me to move the filter up and down as I choose in order to alter the shading gradation without losing precious moments when time is of the essence.
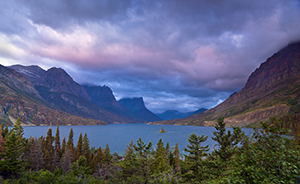
The same location as the previous image, shown with the use of a grad ND filter (and some post processing to bring out the colors of the day as my eye saw the scene. Rebecca Latson photo.
Of course, the caveat is that the camera must be on a tripod for me to do this. If you shoot without using a tripod, then you need to purchase a filter holder for those square/rectangular filter shapes or else use a round screw-on grad ND.
A number of photographers out there (including me) may sometimes decide they need the effects of a grad ND filter after the fact, during image editing. Photo editing applications like Aperture, Adobe Lightroom, Adobe Photoshop and Photoshop Elements have “virtual” graduated filter tools for such occasions.
So, don’t let a cloudy, inclement day in the park keep you from photographing the view around you. Just make sure you’ve got the right filters and you can proceed to capture some stunning images.



Comments
Rebecca--- What a great article-- very helpful-- thanks!!
Thank you, Ms. Latson. Even an old dog like me can learn new tricks from young puppies like you.
Another great collection of tips, Rebecca. I already have the CPL and the graduated ND filter, but I haven't tried using them in unison, so it's worth some experimenting. Here in Oregon, cloudy days aren't that unusual!
Thanks, everybody, for the nice comments! I'm always gratified to know that people are reading what I write (grin).
Thanks ! Good stuff