
Hiking the Cinder Cone Trail, Lassen Volcanic National Park / Rebecca Latson
If you read my Part 1 smartphone photography article, you’ll have learned about smartphone (well, iPhone) camera basics, along with a few photo techniques. In this Part 2, you’ll learn a few more techniques, what kind of in-app editing you can do, and ways to get those great images from smartphone to your desktop or laptop computer. The previous article utilized images captured during a hike at Mount Rainier National Park in Washington state. This article uses images shot from a recent four-day stay at Lassen Volcanic National Park in California.
Look For Texture, Pattern, And Color
Yes, your national park experience is all about the big vistas and the wildlife, but it’s also about the little things contributing to that experience, such as texture, pattern, and color. So, photograph whatever catches your eye, be it the odd texture of an egg-shaped boulder at Bumpass Hell, the puzzle-like wood bark of a Jeffrey pine along the Cinder Cone Trail, the brilliant neon-green wolf lichen framed against the dark gray background of an asphalt turnout, or the parallel lines of a charred swath of trees.

Petrified dragon egg, or volcanic boulder at Bumpass Hell? Lassen Volcanic National Park / Rebecca Latson

The jigsaw puzzle tree bark texture of a Jeffrey pine along the Cinder Cone Trail, Lassen Volcanic National Park / Rebecca Latson

Wolf lichen, Lassen Volcanic National Park / Rebecca Latson
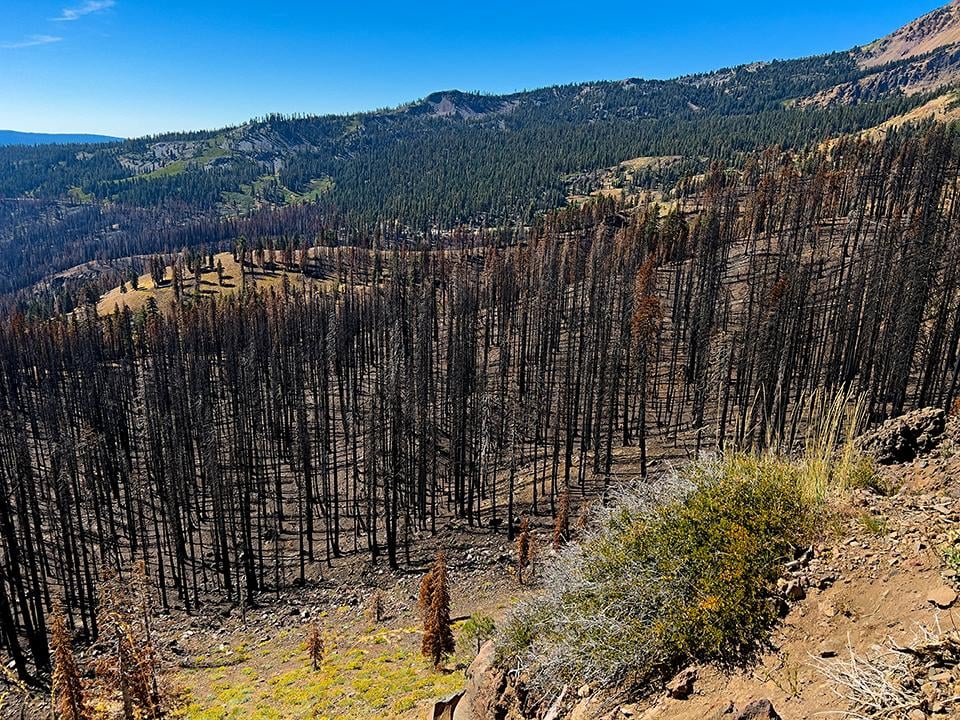
The parallel pattern of charred trees, Lassen Volcanic National Park / Rebecca Latson
Photograph Those Quiet Moments
Stand still, look around you, and capture those quiet moments during the early morning or later in the evening. The crowds are fewest at these times and wildlife and birdlife take advantage of this. A visit to Manzanita Lake in the early morning might find you keeping company with a blue heron searching the shallows for breakfast.

Blue heron searching the shallows in Manzanita Lake, Lassen Volcanic National Park / Rebecca Latson
Negative Space
Use negative space (aka white or empty space) to emphasize your subject’s vastness or size. Alternatively, remove that negative space for a closer view of your subject. In the image below, I photographed the vista beyond the Cinder Cone summit in the northeastern part of Lassen. I left quite a bit of sky (negative space) to emphasize the landscape’s broad coverage. I then copied that same image and cropped out most of the sky for a closer look at the scenery.
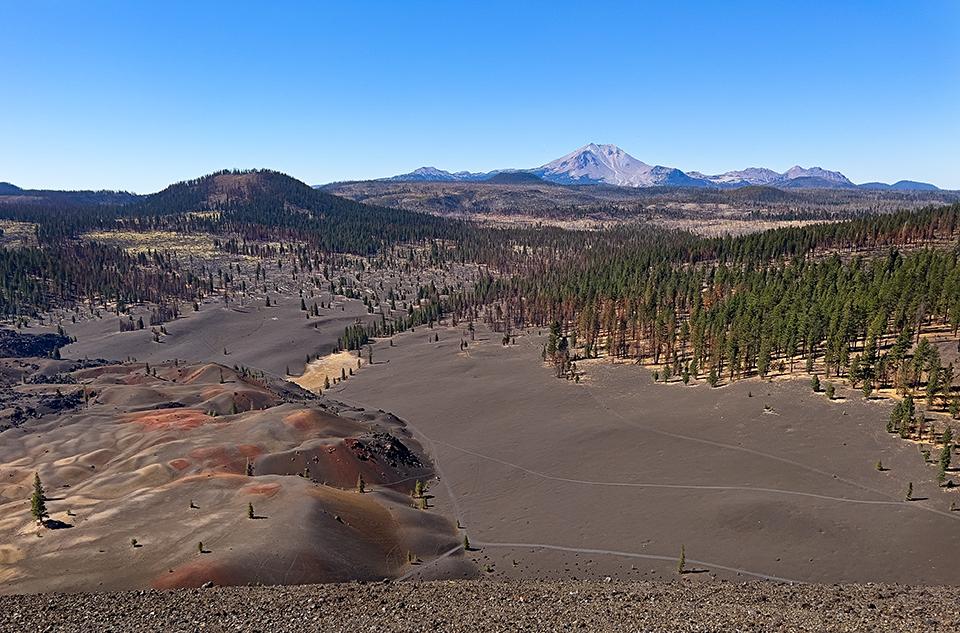
The view from the top of Cinder Cone - original, Lassen Volcanic National Park / Rebecca Latson
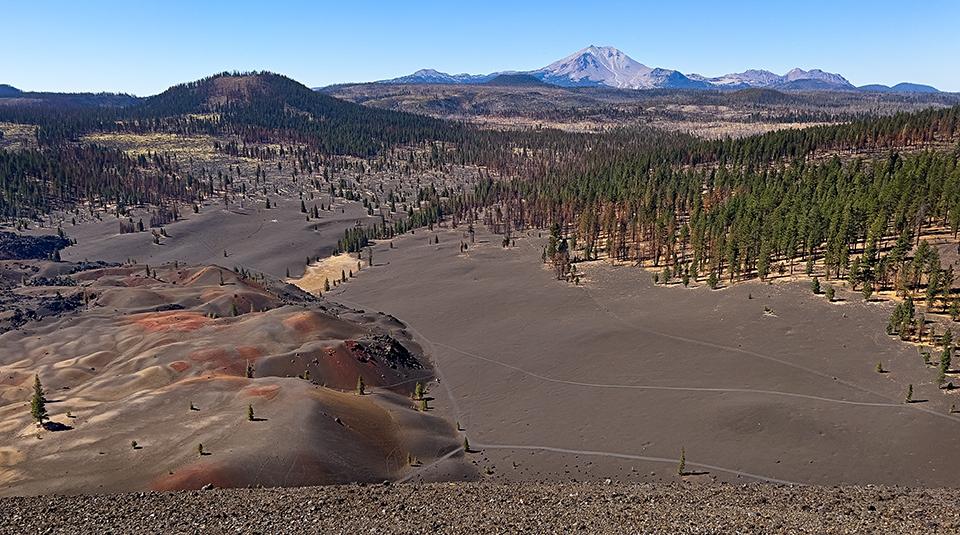
The view from the top of Cinder Cone - negative space cropped, Lassen Volcanic National Park / Rebecca Latson
Which scene do you like best? No wrong answer here, since photography is a subjective art. It’s up to you to choose how you wish to convey the scene you saw to your viewing audience.
Apply Your iPhone’s Ultra-Wide-Angle Lens

An ultra-wide-angle view of Cinder Cone crater, Lassen Volcanic National Park / Rebecca Latson
The 24mm focal length on my 24-105mm lens couldn’t quite incorporate the entire crater opening at the top of Cinder Cone, but my iPhone’s ultra-wide-angle lens did. This same smartphone lens was also helpful in photographing all of Emerald Lake, not too far from the Bumpass Hell parking area.

The entirety of Emerald Lake, Lassen Volcanic National Park / Rebecca Latson
Apply Your iPhone’s Telephoto Lens
Don’t forget to use your smartphone camera’s telephoto lens, too. A closer view of the hikers on the sinuous trails within Cinder Cone’s crater really gives your viewer a sense of scale and reference in addition to conveying a certain starkness to this composition.
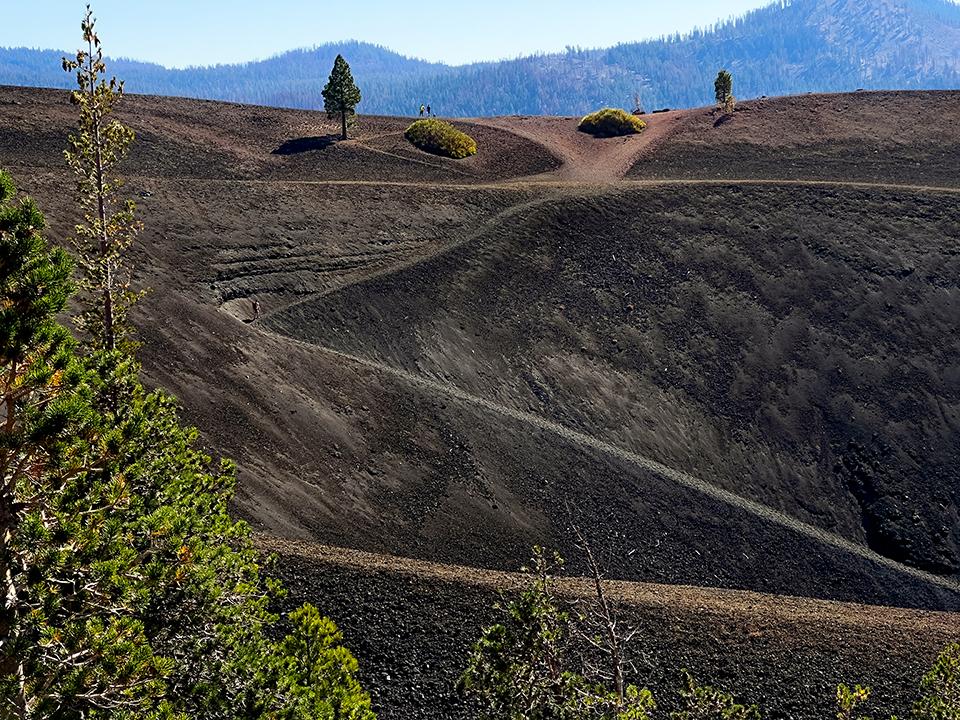
Hiking up from the Cinder Cone crater, Lassen Volcanic National Park / Rebecca Latson
Try That Long Exposure Setting For Silky Water
I wrote about this in the previous smartphone photography article, but it doesn’t hurt to mention it again, since it’s such a cool feature. If you are using an SLR camera, then a tripod is mandatory to get a sharp shot using a slow shutter speed. But with this Long Exposure setting on the iPhone, you can get a silky water shot in a matter of a couple of seconds … while handholding your phone. You can’t be shooting in Raw for that, though. You’ll need to turn on the Live Photo feature when using your camera (it’s the concentric circles icon). Once you capture your flowing water image, go into your photo album and select the photo you just captured, tap that “Live Photo” in the upper left of the screen, and you’ll see a series of choices. Tap “Long Exposure” and voila! With older model iPhones, you’ll need to hold down on the photo and swipe up to choose the Long Exposure feature.
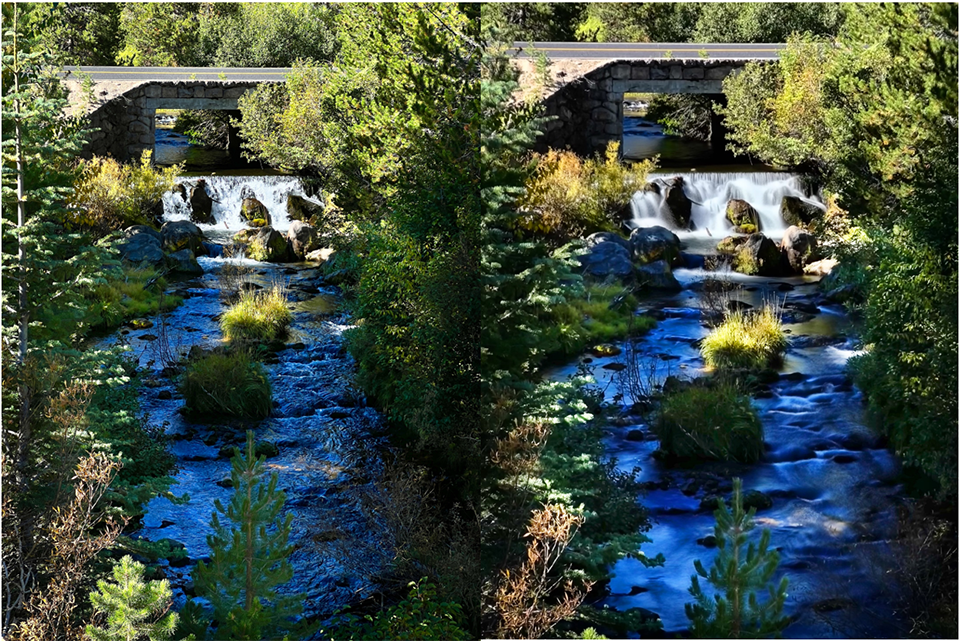
Hat Creek, before and after the Long Exposure setting is applied, Lassen Volcanic National Park / Rebecca Latson
Exposure Compensation
Did you know you can (sort of) change the exposure on your iPhone (well, the newer models, anyway)? Prior to snapping that photo, tap the up-arrow at the top of your screen (if holding the phone vertically) or to the left of your screen (if holding the phone horizontally) to open the editing options. See the circle with the +? That’s your exposure compensation option. Tap on it then slide your finger either way to lighten or darken your composition before tapping the shutter button.

iPhone exposure compensation / Rebecca Latson
FYI, you can also tap on the brighter part(s) of your photo to darken that brightness a bit, although that places your yellow focus square on the bright part and your smartphone might have issues with achieving a sharp scene. If you tap the dark parts of your image, that lightens up the shadows a bit, but you also stand the chance of blowing out (overexposing) the brighter portions of your shot.
In-App Editing
I totally believe every photo needs a little editing. Your smartphone, like any camera, captures all the data, but sometimes, you need to help it along. Smartphones have a plethora of apps for this task.
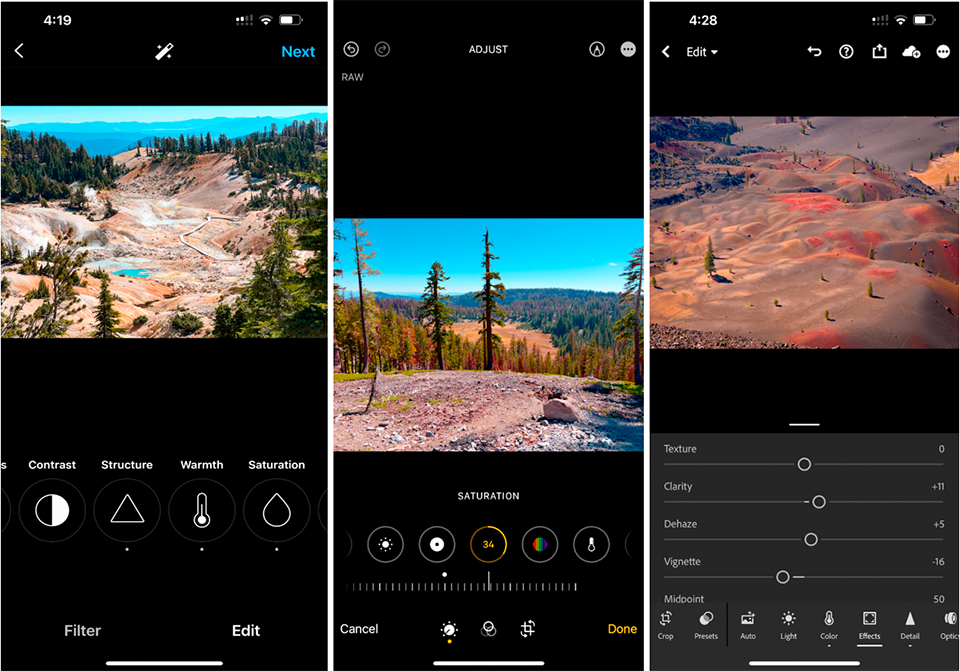
Smartphone editing apps: Instagram, iPhone's own, downloaded app from the App Store / Rebecca Latson
- Instagram presents some nifty editing choices. The problem is, what if you just want to edit the image and not post it to Instagram? According to www.howtogeek.com, all you need to do is turn on your smartphone’s airplane mode. Then, go to edit and post your photo onto Instagram. You’ll get a failed upload, but the edited image is now in your phone’s photo album.
- Your own smartphone probably possesses some nice editing options. With the iPhone, after snapping the photo, go into your photo album, tap on the image, and you’ll notice the Edit choice in the top corner of the screen.
- Of course, you can download all sorts of cool editing apps from the App Store. I have Adobe Lightroom and PS Express on my phone.
From Smartphone To Computer
Granted, your smartphone is a hand-held computer, but in this instance, I’m writing about how you can transfer those smartphone images to your desktop or laptop.

Methods of sending iPhone images to your computer / Rebecca Latson
- Go into your photo album and tap on an image. At the bottom of the screen, tap on the upload icon (the square with the arrow pointing upward). You’ll see several choices for the upload process, one of which is email. Tap on that and whatever email app you have installed will open, all ready for you to type in the address and send the image. Tap the send icon and you’ll get a choice of what size email (including attached photo) you wish to send. Even the largest size is a small, compressed jpg size compared to your original phone photo. In the case of the 39.5 mb Cinder Cone photo, the largest email size I could use was 4.9 mb.
- If you shoot Raw with your newer-model iPhone, you’ll probably want to send the full-sized Raw file to your computer. Go into your phone’s photo album, tap and hold on the photo you wish to email. One of the choices you see will be “Copy”. Tap on that, close out of your photo album and open your email app. Type in the email address and subject line, then tap and hold on the body of the email message area. You’ll see a bubble with a series of selections. Tap “Paste”. You’ll see the file number and file size.
Note: I tried this procedure using my sister’s iPhone 7 and I saw the image rather than the file number and size. Anything older than an iPhone 12 Pro won’t shoot Raw and thus the photo file will be smaller.
Flash Drive For iPhone
These little flash drives are the best, IMO. One end is a Lightning Connector for your iPhone, and the other end may either be a standard USB-type A (which worked with the older laptop I took with me to Lassen), or USB-type C for newer computer models. You can purchase several brands from Amazon, including SanDisk. I prefer a name brand like SanDisk. With this flash drive, all I needed to do was download the SanDisk iXpand app onto my phone, attach the flash drive, and I was ready to copy from my photo album - full resolution - to the flash drive, then from flash drive to computer..
Your smartphone will capture some great memories of your national park visit. Sure, you can grabshot-and-go, but why not make a nice smartphone photo into an amazing smartphone photo. Take a little more time with your composition, then go the extra mile with these techniques and editing apps to see the difference.


 Support Essential Coverage of Essential Places


Comments
Great article with lots of good techniques to try.
Your shots of wide vistas are wonderful.
As usual, I would like to invite the author to Eastern National Parks where we have so many trees on the trail.
When you get to the top of a hill or mountain, we have the views.
But until then, we need to concentrate on the smaller flowers, ferns and if you're lucky, a snake.
Of course, we have many more accessible artifacts such as cabins, chimneys, churches, and other sign of human habitations.
And that's what I photograph.
Thanks
Danny Bernstein
I have a moto Z force droid with interchangable, modular backs. One is a battery booster, another is a polaroid 2"x3" color printer (great for sticking on the back of business cards), but the best is a hasselblad spec 10X optical zoom glass lens by carlZeiss which overrides the internal camera. It will shoot 16Mpix in 16x9 format, or a 21Mpix square format. A 10x digital (cropping) widget is programmed in. A primo wildlife tool.