
The golden light of sunrise at Sunrise Point, Bryce Canyon National Park / Rebecca Latson
A No. 1 rule of mine regarding photography is: always keep learning. This applies not only to photo editing and writing skills, but also to thinking outside of my usual photography box when it comes to camera, lens, and photo app uses. For instance, I’ve learned that my telephoto lenses are great for landscapes in addition to wildlife, portrait, and sports shots. Zooming for a closer focus of a craggy canyon wall or hoodoo captures details otherwise difficult to make out in a wide-angle shot.
I now also regularly use Instagram and its editing functions when I do recall once pooh-poohing the notion of seriously using this app. As a matter of fact, I’m now a regular guest-poster on the Traveler’s Instagram account (@national_parks_traveler).
And, speaking of thinking outside of the usual photography box, I decided to try my hand at creating a few time-lapse videos during a visit to Bryce Canyon National Park this past April. I’ve made sporadic attempts here and there, but nothing during any national park travel.
I really didn’t even think much about this technique until one day, while looking through Instagram, I noticed an ad for a little gadget that fits onto the camera’s hot shoe, where a flash would go. This gadget and others like it (Pulse, Miops, Pluto) use bluetooth to allow your smartphone to communicate with your SLR. Utilizing your smartphone, you can then program your camera to do such things as create basic as well as HDR time-lapses, act as a remote shutter release and self-timer, and even trigger the shutter release to capture lightning strikes.
While handy and fun, these little devices aren’t that cheap. So, I began scrutinizing my cameras’ menu settings a little more closely (SLR, point-and-shoot, and smartphone) to see what could be accomplished without the use of a pricey little bluetooth remote.
The What
The idea of capturing time really means capturing movement: clouds sailing through the sky, people hiking along trails, the passage of sunlight and shadows, etc. Time-lapses are great for compressing long periods of time into the space of 10-30 seconds or more.
By “long periods of time,” I really mean compressing anywhere from 25 minutes to an hour, for the purpose of this article. You may already be creating your own time-lapses within a national park. For those of you who are not, but who might be interested in trying something new, let’s take a short walk through the process.
Depending upon your camera of choice, a time-lapse video may either be filmed using your camera's "video mode," or shot as a series of still photos of the same scene taken at timed intervals, to be later combined into a video using a program like Adobe Photoshop. This still-shot process is called “timed interval.” OK, actually, it’s a little confusing, because capturing a time-lapse in video mode involves timed intervals as well. For the sake of this article, let’s differentiate between "video mode" and "still-shot mode."
A wealth of information and tutorials exist on the web. As a matter of fact, there’s a nice little blog post by Rusty Parkhurst with step-by-step instructions on turning your timed-interval still shots into a time-lapse video in Adobe Photoshop.
Some cameras (like my point-and-shoot and iPhone 8) allow you to create a time-lapse via video mode only. Other cameras (like my SLRs and medium format) allow you to create a time-lapse using either video mode or timed-interval stills.
The How And Its Results
For a basic time-lapse, all you need to figure out is how many photos you want to take over a certain interval of time (for example, a photo taken every 5 or 10 seconds for a total of 200 photos). You can specify how many images you want to take, all the way up to an infinite number of shots. Most cameras will even tell you how many minutes/hours it will take to capture all of those shots. Maneuvering to your time-lapse menu on your camera is not exactly intuitive, so I do advise that you read your camera’s instruction manual in addition to whatever online tutorial you view.
I’m going to keep this simple and tell you that while it’s easier to capture a time-lapse using the video mode, you’ll get better resolution and more dynamic range (light, tone, color, depth) to your time-lapse if you use the still-shot mode. Of course, the file size will be considerably larger using still shots, and that’s something to think about, depending upon how you wish to use your time-lapse video and how large of a file upload can be handled.
Let’s take a look at the time-lapse results from my SLR, point-and-shoot, and smartphone (iPhone 8). Note: all the cameras used were affixed to my tripod. I’d never be able to keep a steady hold on my cameras for the period of time spent getting the shots for a time-lapse.
The first clip below was taken with my point-and-shoot, which only allowed me to take a time-lapse in the video mode. Yes, it’s only 5 seconds long. The brevity was due to the fact I was standing on the rim trail, overlooking the Bryce Amphitheater midway between Sunrise and Sunset points, with a constant, very cold wind gusting strongly enough to push on my sturdy tripod (hence the sporadic jolt of the scene) while blowing stinging clouds of dust into the canyon and at me. I didn’t much like the thought of getting dust scratches on the camera’s little lens.
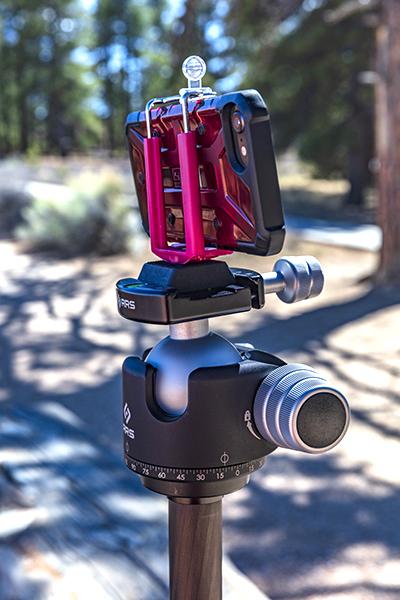
This next time-lapse was captured with my iPhone 8. Wait – how do you put an iPhone (or any smartphone) on a tripod? I’m glad you asked. I went online to Amazon and discovered a range of smartphone tripod mounts from $4-$7. The one you see in the images below even comes in several different colors. Be aware, though, of your tripod and tripod head. You may either need to unscrew your tripod head in order to affix the smartphone mount directly onto the tripod, or screw a quick-release plate to your smartphone mount and *then* attach it to your tripod head, which is the route I took.

A smartphone tripod mount on a tripod ball head, Bryce Canyon National Park / Rebecca Latson
A rear view of the smartphone tripod mount, Bryce Canyon National Park / Rebecca Latson

A front view of the smartphone tripod mount, Bryce Canyon National Park / Rebecca Latson
The time-lapse function on my iPhone is easy peasy. In the Camera mode, I selected "time-lapse," then tapped the red circle. The camera began capturing images every 5 seconds for as long as I wanted to stand there. In this case, I think I stayed put for about 45 minutes; the wind wasn’t as bad, hence it was a little “warmer” that afternoon. You can see the passage of clouds and the movements of the tiny hikers along the trail.
Using my SLR, I stood near the Sunset Point view area to get a view of the Navajo Loop Trail and acquired a time-lapse clip using the video mode. I captured 200 images at 5 seconds per image over a period of 25 minutes. If you compare this time-lapse captured in the video mode to the following time-lapse using the still shot mode, you'll note a difference in resolution and detail, as I mentioned earlier.
I also used my SLR with the still-shot mode, the resulting images of which were captured at the Bryce Point view area and later combined into a time-lapse video using Photoshop. For the still shots, I captured images every 10 seconds, for a total of 372 over a period of an hour or maybe a little longer. I admit to losing track of time, but I know I was in that spot for at least an hour, visiting with a nice couple vacationing from Hong Kong.
While it’s water under the bridge, I occasionally think about all the times I might have been able to capture a sunrise, from dark to dawn and beyond, at Arches National Park. I thought about those times when I might have been able to trace the passage of an amazing lenticular cloud floating over “The Mountain” at Mount Rainier National Park.
I thought about those times when I could have tracked the movement of a thunderstorm over the deep, vast expanse at the Grand Canyon National Park, had I but only given serious consideration to this photographic technique. Better late than never, I guess, and maybe my simple, short examples here will spur you to try seizing and compressing your own passage of time. It’s fun and adds yet another dimension to your photographic story of a national park visit.


Comments
Another well done, informative article, Becky. I am looking forward to trying time lapse even more now.