
I placed a mix of boneless breast meat, boneless thighs, and bone-in thighs into the bottom of the Dutch oven, and the meat began to sizzle in the hot olive oil. Diced onions, potatoes, sliced celery, and dried morels from the nearby mountains soon followed. Before long it was all simmering in a quart of vegetable broth, along with plenty of a hearty red wine. And then, we pretty much forgot about it for a couple hours, giving us time to nibble a few tasty lobster tails, and down a few beers. By then, the Coq au Vin was perfect, the meat moist and succulent and swimming in a tasty broth.
Dutch oven cooking can be just that easy; a bit of preparation time, then a bit of a wait. I can see how cooking with Dutch ovens could take some practice and repetition, though.
I first encountered Dutch oven cooking after a short day on a long river. We got into camp at midday. That turned out to be a blessing, as we were able to set up our tents and kitchen just before the skies opened up and released a drenching rain.
Soon our group of 15 was relaxing in chairs rimming a campfire; an overhead tarp kept the downpour off our backs. Off to a side a few of the women were busy combining a variety of ingredients—flour, sugar, milk, butter and more—which they poured into a Dutch oven whose bottom had been lined with succulent slices of pineapple.

They brought this cast iron pot over to the fire, which had burned down to hot coals, and planted it square in the middle. A handful of the glowing embers went onto the pot’s lid, and that was that. After the ladies decided enough time had elapsed, they served up some fresh and golden Pineapple-Upside-Down Cake for dessert. Fantastic!
Mealtime on your trips into the national parks, whether you pull into a site in the front country campground, head down a river, or paddle across a lake and end the day on a shore, is a high point. Dutch oven cooking gives you time to sit around with friends and family laugh, talk, and nibble the hours away.
With today’s technology, you can be as elaborate as you want with your meals, or as quick and simple as you need to be of, course. Freeze-dried and dehydrated meals have improved immensely over the decades. You can go with the tasty, gluten-free entries such as the Thai Curry and Smoked Three Bean Chili from Good To-Go, which are rehydrated with a cup or so of boiling water, and soon ready to eat, or similar products.

One company, GSI Outdoors, can help you outfit a backcountry kitchen that would please Gordon Ramsay. This small, privately held U.S. company has pots and pans, cooking systems, chef’s tools, and much, much more for both front country and backcountry use.
Their pressure cookers are particularly interesting if you frequently travel above 4,000-5,000 feet in elevation, as they greatly reduce cooking time. And their Halulite 5.7 Liter pressure cooker (MSRP $75) can even travel into the backcountry if your mode of travel is raft, kayak, or canoe. Weighing less than 5 pounds, this unit is easily stashed in your gearbox or kayak hatch.
We tested the pressure cooker with some lobster tails. In a cup of water, in less than 10 minutes, we were dipping steaming chunks of sweet lobster into melted garlic butter. It was divine.
And that’s just one example. The cooker can quickly cook a wide range of foods, from beef chuck roast (35 minutes, 1.5 cups of water) and leg of lamb (35-40 minutes, 1.5 cups of water), salmon fillets (2 minutes, 1 cup of water), and black beans (1 cup of dry beans, 35 minutes, 3 cups of water and a tablespoon of vegetable oil).
The non-reactive, hard anodized aluminum construction makes it easy to clean the pressure cooker, but food smells can be harder to remove. The silicon sealing ring around the lid absorbed the smell of lobster, and held onto it through several washings, leading us to seek a second seal that we could use. (Traveler footnote: For replacement parts or answers to questions, contact GSI Outdoors at: [email protected] or 1-800-704-4474)
For those new to pressure cookers, the instruction booklet provided by GSI Outdoors covers everything you need to know, from defining just what a pressure cooker is, how it works, and providing safety tips. It also has great cooking ideas, such as braising meat or poultry in the pot before adding the water and putting the lid on.
Since the temperature of boiling water decreases with altitude, the included chart is invaluable. It spells out how much extra time you should allow for cooking at altitudes ranging from 2,950 feet above sea level (5 percent more time) all the way to 7,874 feet (30 percent more). And then, of course, the booklet includes cooking times and the amount of water to be added for meats and poultry, seafood, vegetables, dried beans, and rice.
Meanwhile, back at the campfire, while the Coq au Vin simmered in the Dutch oven, we cooked and ate our lobster. Every so often, we’d check on the main dish, and drop another few coals on the lid.
What’s the appeal of a Dutch oven? They and their sibling skillets are made of heavy-duty cast iron that can stand up to years of use, get incredibly hot when necessary, and are great for searing meats.
There are some good cookbooks on the market for Dutch oven cooks. We like Dutch Oven: Cast-Iron Cooking Over an Open Fire by Carsten Bothe, as he goes over both seasoning your oven before use, cleaning it, a short history of this unique cookware, and more than 100 recipes. Our Dutch oven, a 12-incher (they come in 10-inch, 12-inch, 14-inch, and 16-inch sizes) came from Camp Chef, a Utah company that offers a “National Parks Cast Iron Set” to help celebrate this year’s centennial of the National Park Service. Included in that set are a 12-inch Dutch oven, a 12-inch cast iron skillet, and a lid that fits both. The oven and skillet are cast with national park images, such as a bison in front of Old Faithful in Yellowstone National Park or Delicate Arch at Arches National Park.
Camp Chef’s recommended “starter kit” for cooks new to Dutch ovens includes a 12-inch Dutch oven, and a Charcoal Lighter basket. We used this, and it quickly lit our briquettes. You can even use the included aluminum liner pans in the Dutch oven, to keep it clean, and so you can lift out the meal to the table. The sturdy lid lifter is an ingenious, yet simple, tool that lets you pull up the lid of the Dutch oven, without dropping any ashes into the pot. The lid lifter also has a hook for lifting the entire Dutch oven out of the fire by its wire handle. A padded carrying case for storage would probably be a good idea for traveling.
As a bonus, Camp Chef applies a “True-Seasoned” finish to its ovens and skillets so you don’t have to season the cookware before using it; it provides a nonstick surface. Seasoning with oil does help prevent rust on the cast-iron ovens and skillets, and also helps create a nonstick surface.

Camp Chef’s cooking guide includes a small number of recipes, as well as a temperature guide for how many briquettes to use to achieve a desired temperature inside the oven. For instance, if you’re using a 12-inch Dutch oven and need a temperature of 375 degrees Fahrenheit, you need 23 briquettes, with 16 placed on the lid and seven beneath the oven. It’s all very scientific.
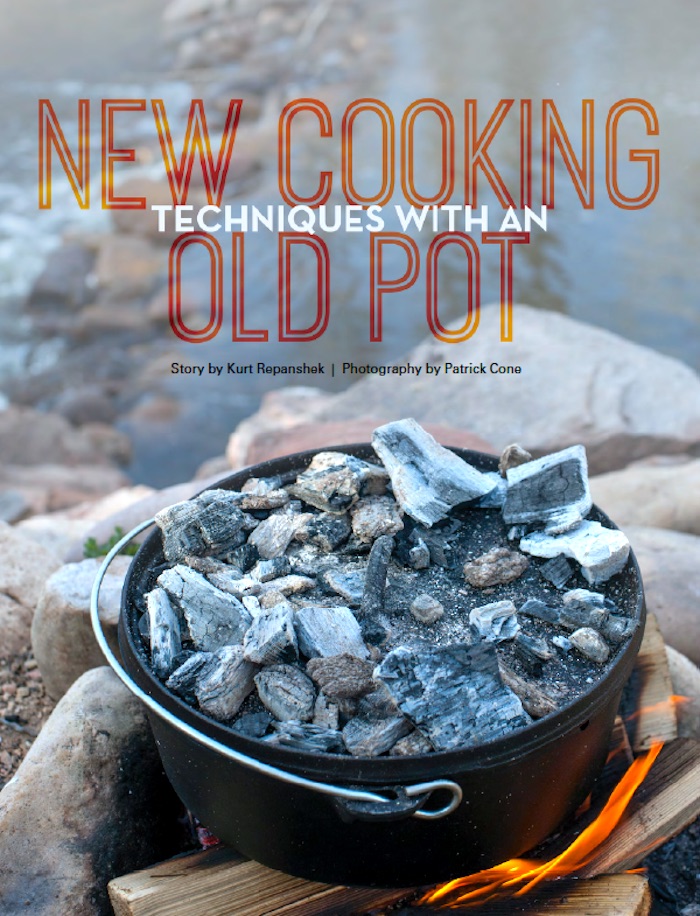
While many recipes call for the use of charcoal briquettes for the heat source, you can also use a wood fire, as we did. Perhaps the greatest difference is that briquettes are easy to count and, if you have a temperature chart, easier to distribute around the oven for a set temperature. That said, if you’re not cooking a batch of Cowboy Sourdough Rolls (page 143 in Dutch Oven: Cast-Iron Cooking Over an Open Fire) where you want a nice golden crust, you don’t always need to place coals on the lid. We used a wood fire to create a bed of hot embers for our oven. A few tablespoons of oil on the bottom kept the chicken from burning, and then we added the other ingredients. The lid was put in place, and we topped it with a small, but reasonable, number of embers from the fire.
An occasional check on the progress ensured that our oven stayed level while the coals below it burned down. You might need to add more coals, or firewood, to keep the temperature up.
As I mentioned, these cast iron kitchen tools can absorb the odors and tastes of the foods you cook in them. While some say this simply adds to the rich flavor of each subsequent meal, you wouldn’t be wrong to have two or three Dutch ovens and assign one to sweets, such as Pineapple-Upside- Down cakes and such, and the others to hearty and savory dishes.
Finally, these cast iron ovens and skillets shouldn’t be cleaned with steel wool products, like S.O.S., as they can scrape off your layer of nonstick seasoning. Instead, use plastic Scrubbies, or a similar product. The folks at Bon Appétit recommend, “rubbing your cast iron cookware down with kosher salt and a kitchen towel while it’s still warm, then wiping it down with fat (flaxseed oil or lard do the trick nicely).” The salt acts as an abrasive without scraping off the seasoning coating. Or you can use the Cast Iron Cleaner and a Cast Iron Conditioner from Camp Chef, which make this chore even easier.
While these pressure cookers and cast iron ovens are not items you’d want to put into a backpack, they’re great for the back of the truck, in a canoe, or on a horse packing trip. They’re durable, and pretty much foolproof.
Bon Appétit!
Story Categories:
A copy of National Parks Traveler's financial statements may be obtained by sending a stamped, self-addressed envelope to: National Parks Traveler, P.O. Box 980452, Park City, Utah 84098. National Parks Traveler was formed in the state of Utah for the purpose of informing and educating about national parks and protected areas.
Residents of the following states may obtain a copy of our financial and additional information as stated below:
- Florida: A COPY OF THE OFFICIAL REGISTRATION AND FINANCIAL INFORMATION FOR NATIONAL PARKS TRAVELER, (REGISTRATION NO. CH 51659), MAY BE OBTAINED FROM THE DIVISION OF CONSUMER SERVICES BY CALLING 800-435-7352 OR VISITING THEIR WEBSITE. REGISTRATION DOES NOT IMPLY ENDORSEMENT, APPROVAL, OR RECOMMENDATION BY THE STATE.
- Georgia: A full and fair description of the programs and financial statement summary of National Parks Traveler is available upon request at the office and phone number indicated above.
- Maryland: Documents and information submitted under the Maryland Solicitations Act are also available, for the cost of postage and copies, from the Secretary of State, State House, Annapolis, MD 21401 (410-974-5534).
- North Carolina: Financial information about this organization and a copy of its license are available from the State Solicitation Licensing Branch at 888-830-4989 or 919-807-2214. The license is not an endorsement by the State.
- Pennsylvania: The official registration and financial information of National Parks Traveler may be obtained from the Pennsylvania Department of State by calling 800-732-0999. Registration does not imply endorsement.
- Virginia: Financial statements are available from the Virginia Department of Agriculture and Consumer Services, 102 Governor Street, Richmond, Virginia 23219.
- Washington: National Parks Traveler is registered with Washington State’s Charities Program as required by law and additional information is available by calling 800-332-4483 or visiting www.sos.wa.gov/charities, or on file at Charities Division, Office of the Secretary of State, State of Washington, Olympia, WA 98504.
Comments
Well, reading this first thing in the morning sure gave me an appetite for breakfast today!
I am an avid Dutch Oven cook, and although the weight of these pots are considerable, they are TOPS in flavor and ease of use. I recommend real lard for seasoning, and cooking with as well, your pies will never taste better! I travel the American west and Mexico with my pots and use a claw hammer to lift my pot lids. You can use charcoal briquettes in most cases even if campfires are restricted, I like the instant lighting ones since the food is not in direct contact with the flames. The cookbooks mentioned are great, check out Sourdough rye starter....made my first starter in 2015 in southern NM....and am still using it. I make all my bread with this recipe!