
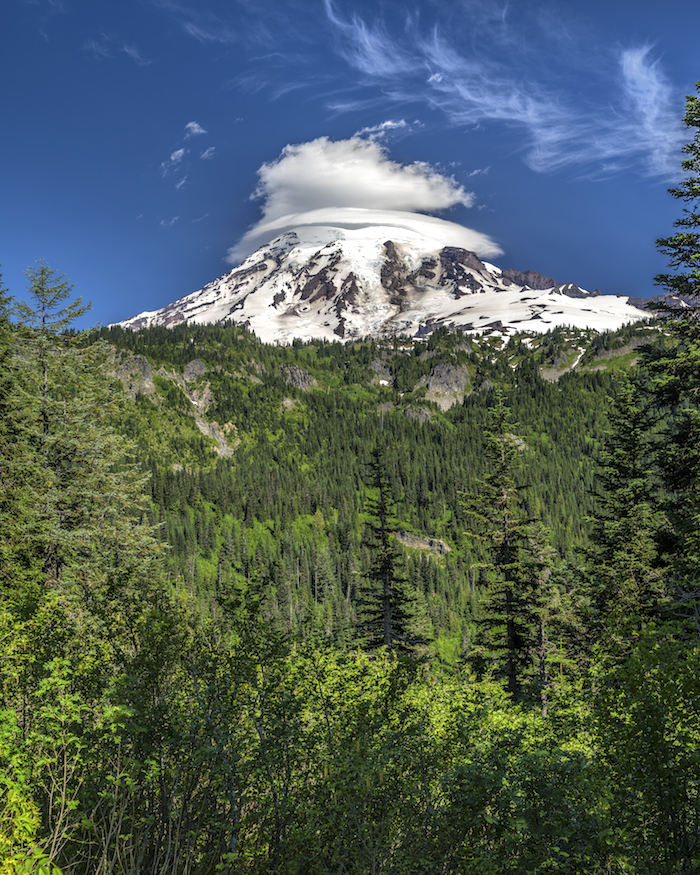
It was, John Muir recounted during the summer of 1888, “awful in bulk and majesty, filling all the view like a separate, newborn world, yet withal so fine and so beautiful it might well fire the dullest observer to desperate enthusiasm.”
“It” was Mount Rainier, and it astounded Muir when he saw it for the first time, and his words remain true today. This mountain never fails to amaze visitors, whether it’s their first glimpse or just their latest.
If you’re like most park travelers you’ll want to memorialize your visit to Mount Rainier National Park with more than a few photos. Pictures of the trails, the wildflowers, your family and friends hiking, and the mountain.
To help you negotiate Rainier and return with some pleasing photos, here is a photo and travel guide to help you explore the park.

Covering a little more than 369 square miles, Mount Rainier National Park might not seem terribly large when compared to a Yosemite or Yellowstone. But it feels large, with four entrances surrounding this 14,410-feet-tall, “episodically active,” stratovolcano shrouded with the most glaciers (25) on a single peak anywhere in the contiguous United States.
Whichever entrance you choose (White River, Stevens Canyon/Ohanapecosh, Nisqually or Carbon River), you’ll want to have a full gas tank, because once you enter the park there are no gas stations.
Different Seasons in the Park
I can tell you, unequivocally, that the seasons will dictate what you’ll see of Mount Rainier. The only road access to vehicles during winter is via the Nisqually Entrance. Bring chains for your tires (they’re typically required in winter) and snowshoes or skis for yourself.
In spring the road from Longmire to Paradise is usually rimmed by snow banks. The snowpack often is so high that only the upper floors and roof of the Paradise Inn peek out from beneath a deep, white blanket.
Summer weather is fickle. There are clear days when you can see the mountain 99.9 percent of the time, and there are soggy days with leaden clouds that obscure Rainier. Early in the summer you’ll likely encounter snowpack in the higher elevations, blocking access to all or parts of the trails.
Mid-to-late August is really the perfect time. But good weather draws crowds, so arrive at your chosen trailhead before 9 a.m. or after 5 p.m. to grab a good spot for a popular hike or a nice shot of a popular scene.
Low clouds and rainy weather can completely obscure the view of Mount Rainier for many consecutive days during the fall. There are rewards though, for weathering through an inclement autumn period. At times, morning dawns with clear blue sky, the huckleberry bushes are saturated shades of bright orange and red, and the sun is bathing “The Mountain’s” face.
Staying In The Park
Two historic brick-and-mortar lodges within the park can shelter you. Longmire’s National Park Inn has just 25 guest rooms, while the Paradise Inn, which celebrated its centennial anniversary in 2017, has 121 rooms. There is no elevator in either lodge, although both have ADA-accessible rooms located on their ground floors. Pets are not allowed, except for service animals. Note: Paradise Inn room availability will be reduced due to reconstructive maintenance on the Annex portion of the Inn through May 2019. Make your reservation far ahead of your intended visit (months to even a year ahead) if you wish to stay at either of these lodges.

Of the park’s four campgrounds, White River, Ohanapecosh, and Cougar Rock allow vehicle camping. Mowich Lake Campground is tent-only. Visit the park’s website for more camping information. You can also download and print maps from the website or get a commercial map app for your smartphone to help you navigate your journey. While you won’t see the entire national park in three days, you can cover plenty of ground. Let’s take a look at a potential three-day visit:
Day 1
Sunrise
Start your drive to Sunrise early in the morning, and access the White River/Sunrise entrance via State Route 410 north or south. If you travel north along this route from Yakima and over Chinook Pass, take time at the long pullout overlooking Tipsoo Lake. Weather permitting, this will be your first official view of Mount Rainier as it looms over this serene little alpine water body.
If you are traveling south along SR 410 toward the park entrance, you’ll miss Tipsoo Lake, but still have an opportunity to stop at a pullout granting you a close view of this immense mountain.
Drive the winding 12 miles from the park entrance to Sunrise Point for panoramas of Mount Rainier, other mountain ranges, and even Mount Adams to the south on a clear day. From Sunrise Point, drive the last two miles to the Sunrise Visitor Center and Day Lodge for some hiking and photography.
For frame-filling photos of Mount Rainier, follow one of the trails joining up to the Sourdough Ridge Trail. Once you reach Sourdough Ridge, take the other connecting trail back down to the visitor center for a loop, or continue along Sourdough Ridge west to Frozen Lake or east to Dege Peak. After your higher-elevation hike, ramble along the 0.1-mile trail from the parking lot down to Emmons Vista for some scenes of Emmons Glacier and Mount Rainier framed by tall trees that provide great natural picture frames.
Day 2
Paradise via the Stevens Canyon Entrance
There are two ways to enter Paradise. The Nisqually Entrance is the more direct route, but it’s my opinion that the Stevens Canyon Entrance offers more opportunities for photos. Beyond the Stevens Canyon entry booth stretch your legs, if you wish, on the 1.25-mile round-trip Grove of the Patriarchs Trail before driving the short distance to the Falls Creek Bridge. There on sunny days you can photograph the shaded little waterfall surrounded by sunlight-speckled rocks, foliage, and trees.
Approximately 10 miles up the road the Box Canyon/Cowlitz River view area offers a restroom, a view of the Muddy Fork of the Cowlitz River, and a short walk along a paved trail paralleling glacially-smoothed and striated rock outcrops with views of Mount Rainier framed by tall trees. Further along the trail is the bridge overlooking Box Canyon.

Continuing your drive, there are more scenic pullouts, the Snow Lake Trailhead, a waterfall at Sunbeam Creek, and views of Mount Rainier from Reflection Lake. Prior to the Longmire-Paradise junction is a large parking lot and view area providing panoramic vistas of Mount Rainier, the Tatoosh mountain range, and the valley beyond. Depending upon the season and time of day, you might even be treated to the distant sight of climbers on a snowfield.
Drive to the Longmire-Paradise junction and turn right, stopping up the road at the National Park Service “Paradise” sign for a selfie before heading to the Paradise parking lots. Long-term parking will be to your left, prior to reaching the Henry M. Jackson Visitor Center. The large parking lot in front of the visitor center is for handicap- accessible and two-hour parking, only. If you have a reservation with the Paradise Inn, get a parking pass for your car from the front desk, as there are parking spots reserved specifically for the inn’s guests.
Take some time to wander around and admire this historic inn’s rustic architecture. Climb the stairs across from the front desk up to the second level and ramble around the mezzanine, photographing the rustic wood beams, hand-painted hanging lamps, and the lobby below.

For more of a leg stretcher, head across the parking lot to the visitor center, where you’ll find the network of Paradise trails heading out from the top of the stone steps across from the visitor center. Be sure to read the inscription of an 1889 quote by John Muir carved into the steps: “… the most luxuriant and the most extravagantly beautiful of all the alpine gardens I have ever beheld in all my mountain-top wanderings.”
There’s a good choice of trail lengths. Avalanche Lily Trail, Waterfall Trail, Nisqually Vista Trail, and the portion of the Skyline Trail leading to Myrtle Falls are all less than a mile. In the early summer, Avalanche Lily Trail is indeed carpeted on either side with the cheerful, delicate white blooms. Tall trees frame Myrtle Falls with Mount Rainier in the background, making it one of the most popular (and crowded) view areas within Paradise.
Without a doubt, the most popular trail in Paradise is Skyline Trail. Start a clockwise circuit of this 5.5-mile loop that will lead you to side trails (Alta Vista and Glacier Vista) with imposing views of Nisqually Glacier, Mount Rainier, and mountain valleys with silver waterfalls. Continue up to the all-encompassing view of Panorama Point. On a clear day, you’ll see the tiny speck of Paradise Inn below, the Tatoosh Mountains in the background, and Mount Adams, Mount Saint Helens, and possibly Mount Hood far beyond. Resume your hike back down to Paradise Inn with the option of taking the Golden Gate or Paradise Glacier side trails.
Day 3
Longmire
After your overnight stay at Paradise, get an early morning start down to Longmire so you can have a relaxing stop at both Narada Falls and Christine Falls. The parking lots to these two popular sights usually fill by 9 a.m. or 10 a.m. Between Narada Falls and Christine Falls is Ricksecker Point. This one-way road, which was the original route to Paradise, runs about six miles and offers some nice views of the mountain. Drive slowly before heading further down the road.

You’ll know you are nearing the historic Longmire District when you pass Cougar Rock Campground on your right. Park near the National Park Inn for a break, and take time to tour the Longmire museum, before crossing the road to walk the 0.75-mile Trail of the Shadows loop. Along the trail, you will wander through a cool, shaded forest with miniature waterfalls, bubbling mineral springs, and tangible signs of James Longmire’s homesteading days. This trail encircles Longmire Meadow, with a view of Rampart Ridge to one side and Mount Rainier at the meadow’s northern end.
From Longmire, head southwest and park at the pullout beside the Twin Firs Trailhead. Enjoy trailside tableaus of shade- and-sunlight-dappled forest, moss draped over the branches of tall trees, and seedling- and fungi-encrusted nurse logs along the 0.4-mile loop. The lowland forest evokes a quiet, meditative feeling. The depths of the forest interior mute the noise of passing cars and enhance the music of trickling water and echoing birdsong.
Drive a few more miles to Kautz Creek to cross the road and walk the few hundred feet for a photo op of Mount Rainier as seen from the creek. Along the way to the Nisqually Entrance, stop at one of several pullouts along the left side of the road. These stops offer photo ops of the Nisqually River landscape, where the silver-gray fingers of the river complement the gray rocks and provide an interesting contrast to the greens of the forest bordering the river banks.
Wildlife
During your time at Mount Rainier there will be prospects for wildlife sightings, both feathered and furred. In the Sunrise area, look for Clark’s Nutcrackers. These brazen (and aggressive) gray and black birds have a raspy, almost nagging, caw. Deer, hoary marmots and blue grouse roam the Paradise area, and you might have the opportunity to see deer, marmots, Steller’s jays, and perhaps even a pretty little fox trotting up the road at Longmire. Keep your camera’s focus mode set to track movement and do your best to focus on your wildlife subject’s eyes. For critters too far away to capture a close-up, make them a part of your landscape composition, instead.

Wildflowers
Summer brings blooms like the glacier lily, avalanche lily, tiger lily, Jeffrey’s shooting star, mountain heather, spreading phlox, crimson columbine, lupine, beargrass, foamflower, spirea, thistle, penstemon, monkeyflower, and pasqueflower. Many varieties of paintbrush range from bright orange-red to deep magenta. Utilize either your macro or telephoto lens for flower shots, again making certain to have your focus mode set to track the movement of flowers swaying in the breeze.
Point-and-shoot cameras will have both telephoto and macro settings, and even smartphones should achieve nice shots, although a breeze might make it a little more difficult for your phone’s camera to focus on the flowers. Try a technique called the Rule of Thirds wherein you mentally divide your viewfinder into three segments, then place your subject to either side of your frame, rather than smack-dab in the middle.
Another eye-catching method for wildflower shots is to simply fill the frame entirely with your flower find.
During your stay, be sure to pack out what you pack in, don’t feed the wildlife, stay on the trails and off the meadows, and take lots of photos. You’ll have plenty to do and see during a three-day visit to Mount Rainier National Park, with plenty more to do and see (or re-see) on your next visit.

Stories about:
Story Categories:
A copy of National Parks Traveler's financial statements may be obtained by sending a stamped, self-addressed envelope to: National Parks Traveler, P.O. Box 980452, Park City, Utah 84098. National Parks Traveler was formed in the state of Utah for the purpose of informing and educating about national parks and protected areas.
Residents of the following states may obtain a copy of our financial and additional information as stated below:
- Florida: A COPY OF THE OFFICIAL REGISTRATION AND FINANCIAL INFORMATION FOR NATIONAL PARKS TRAVELER, (REGISTRATION NO. CH 51659), MAY BE OBTAINED FROM THE DIVISION OF CONSUMER SERVICES BY CALLING 800-435-7352 OR VISITING THEIR WEBSITE. REGISTRATION DOES NOT IMPLY ENDORSEMENT, APPROVAL, OR RECOMMENDATION BY THE STATE.
- Georgia: A full and fair description of the programs and financial statement summary of National Parks Traveler is available upon request at the office and phone number indicated above.
- Maryland: Documents and information submitted under the Maryland Solicitations Act are also available, for the cost of postage and copies, from the Secretary of State, State House, Annapolis, MD 21401 (410-974-5534).
- North Carolina: Financial information about this organization and a copy of its license are available from the State Solicitation Licensing Branch at 888-830-4989 or 919-807-2214. The license is not an endorsement by the State.
- Pennsylvania: The official registration and financial information of National Parks Traveler may be obtained from the Pennsylvania Department of State by calling 800-732-0999. Registration does not imply endorsement.
- Virginia: Financial statements are available from the Virginia Department of Agriculture and Consumer Services, 102 Governor Street, Richmond, Virginia 23219.
- Washington: National Parks Traveler is registered with Washington State’s Charities Program as required by law and additional information is available by calling 800-332-4483 or visiting www.sos.wa.gov/charities, or on file at Charities Division, Office of the Secretary of State, State of Washington, Olympia, WA 98504.
